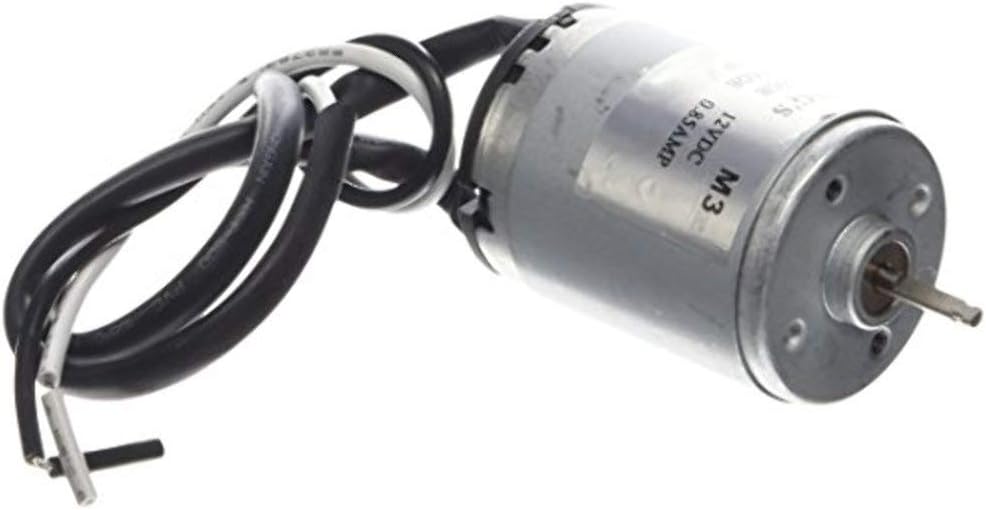
Heng's (90037-C1) 12V Vent Motor
Product ID: 10052443
Details
- BrandHENG’S
- Model Name90037-C1
- Voltage12 Volts
- MaterialMetal
- Item Weight0.25 Pounds
⚡12V power for reliable performance
🔄1500 RPM high-speed vent motor
🛠️Quick & easy installation
Desertcart purchases this item on your behalf and handles shipping, customs, and support to Seychelles.
⚡ Upgrade your airflow game with Heng's 12V Vent Motor — power meets precision!
Heng's (90037-C1) 12V Vent Motor is a high-speed, durable replacement motor designed for 12-volt power vents including Elixir, Heng's, Jensen, and Ventline models. Featuring a robust metal build and a compact design, it delivers 1500 RPM for efficient ventilation. Easy to install and cost-effective, this motor is a trusted choice with over 850 positive reviews and a 4.4-star rating.


| ASIN | B007KSY5W4 |
| Best Sellers Rank | #572,559 in Automotive ( See Top 100 in Automotive ) #60 in RV Heaters & Furnaces |
| Brand | HENG’S INDUSTRIES |
| Brand Name | HENG’S INDUSTRIES |
| Customer Reviews | 4.4 out of 5 stars 854 Reviews |
| Global Trade Identification Number | 00811878010806 |
| Included Components | Heng's 90037-C1 12-Volt Power Vent Motor - Retail Package |
| Item Dimensions W x H | 6.5"W x 1.5"H |
| Item Type Name | Heng's 90037-C1 12-Volt Power Vent Motor - Retail Package |
| Item Weight | 0.25 Pounds |
| Manufacturer | Heng's |
| Material | Metal |
| Material Type | Metal |
| Model | 90037-C1 |
| Model Name | 90037-C1 |
| Part Number | 90037-C1 |
| Product Dimensions | 6.5"W x 1.5"H |
| Speed | 1500 RPM |
| UPC | 811878010806 |
| Unit Count | 1.0 Count |
| Voltage | 12 Volts |
| Warranty Description | Please contact us if you experience any issues within 30 days of receipt. |
B**O
Worked great
Easy to install and a much cheaper solution than an entirely new fan. Last one lasted 8 years, here’s hoping this one does also.
G**Y
Exact fit and replacement. Quick delivery.
May be a little early to tell, but item is working as expected. RPM is at least as good as the one replaced. Delivery was very quick. Was an exact replacement for the M3 Hengs in our vent a hood. Did not have to make any modifications. Only drawback of any kind was that it did not have a quick clip on the wire, so had to cut the old one off the old motor and splice it in.
M**E
Works!
Finally installed this motor a Year after purchasing. The old one suddenly started working again right after I got the new one. So I left it until it finally died this year. Installation was fairly easy and it works just fine so far. Just as quiet as the old one. Would be helpful if they included mounting screws with it also as I nearly destroyed the head of one trying to get it loose. Gave it 4 stars for that reason and since it came with a different name on the package instead of Hengs as advertised. Will wait to see how long it lasts.
C**5
Easy to install
Strong little motor
N**S
DYI "How to" inside! Was $47 at RV Place! You can do it! For $8 I'm more than satisfied!!!
Step 0: Ensure you have power going to fan motor to ensure motor is bad. Then add this to cart and click BUY. Step 1: Phillips #2 screwdriver- Remove vent trim carefully Step 2: Phillips #2 - remove screen. Unscrew crank and remove crank. Unscrew plastic round nut that holds push switch to screen. Remove screen carefully and see how the wires were tucked away for when you install. Step 3: Phillips #1 - remove fan blades carefully by pulling down on the fan using the thick part closest to the center of the blades. It pulls off. Some have clips, but my 2000 RV PaceArrow didn't. Then remove the 2 small screws that hold motor on. Step 4: I touched wires to new motor to ensure it worked. It did so I put it in place with the 2 tiny screws. Step 5: cut existing wires to proper length. The old motor is hanging, remove old wires from bracket hole and feed new wires through. Remove wire insulation for the white wires and use butt connector and crimp them down. I used wire nuts, but crimping is better. Then do the same with the black wires. Basically if your confused just do one wire at a time. Step 6: Move wires to the side and zip tie if needed. Push fan blade back on. If not enough confident friction to keep blade on, put a piece of potato chip bag over the hole to take up some room and push it on. Step 7: Push wires aside, push button and test. Now you're happy! Hide the wires and put it back together. NOTE: Do not overtighten trim screws or you'll break the plastic.
P**L
Cheap motor, does what it needs to.
Seems to be a direct fit for the Hengs range hood in our Open Range camper. Curiously it runs at twice the amperage of the old motor (possibly runs at twice the speed) and did not come with a female spade connector for the fan switch. Works ok, but since it's essentially a brushed hobby motor I don't expect it to last much longer than a few seasons like the motor before it.
T**M
The description says it's compatible with Ventline... ...
The description says it's compatible with Ventline...well, maybe some Ventline products, but not the roof vent in my RV. It almost fits but the collar on the shaft was slightly bigger than on the old motor and the holes for the little bolts that hold it to the bracket were spaced farther apart and were for a slightly larger diameter bolt -- no bolts were included with the fan. I drilled a bigger hole for the collar to fit into on the bracket, new holes, and got some tiny bolts from a hobby shop. The shaft is slightly longer than the old one, too, but it didn't cause a problem in my particular installation. That said, it's more powerful than the motor it replaced and pulls a bit more air. Even knowing about the incompatibilities, I'd probably buy it again -- the OEM imotor is three times as expensive -- but anyone purchasing it to replace a Ventline roof vent should be prepared to do a little modification.
K**B
ALL GOOD
Hi all For me and my old 1977 mini Winnie it was a direct replacement for the vent fan in the crank open vent. Took 10 minutes to replace, no more rattly old fan. I also bought a new fan blade, but i did not need to the old one was the same as the new. I used the old screws to mount the new motor, everything seemed to be a direct replacement for the old motor. I ordered a second one to replace the fan motor in the vent hood over the cook stove, this time I did not order a new fan blade because the old one will work just fine. By the way it arrived much quicker than amazons estimate.
P**T
Would recommend
Great replacement motor no issues at all
R**.
Fit very good easy to install
Use on my camper
S**E
Great replacement.
This was almost a perfect replacement for the model I had previous. Only difference is the amperage it draws. Original was .85 amps. Actually blew the fuse for that circuit in my trailer. Couple of bucks for a larger fuse and we are in business.
P**N
N'accepte pas les retours
Pour une raison que je ne m'explique pas, il est impossible de retourner cet article, pratique extrêmement malhonnête, j'exige un remboursement pour ce produit de piètre qualité, moteur trop bruyant
P**C
Perfect fit
Product was exact match for RV kitchen fan , easily installed
Trustpilot
3 days ago
1 week ago