Desertcart purchases this item on your behalf and handles shipping, customs, and support to Seychelles.
✨ Elevate your ceiling game—style meets simplicity! 🏡
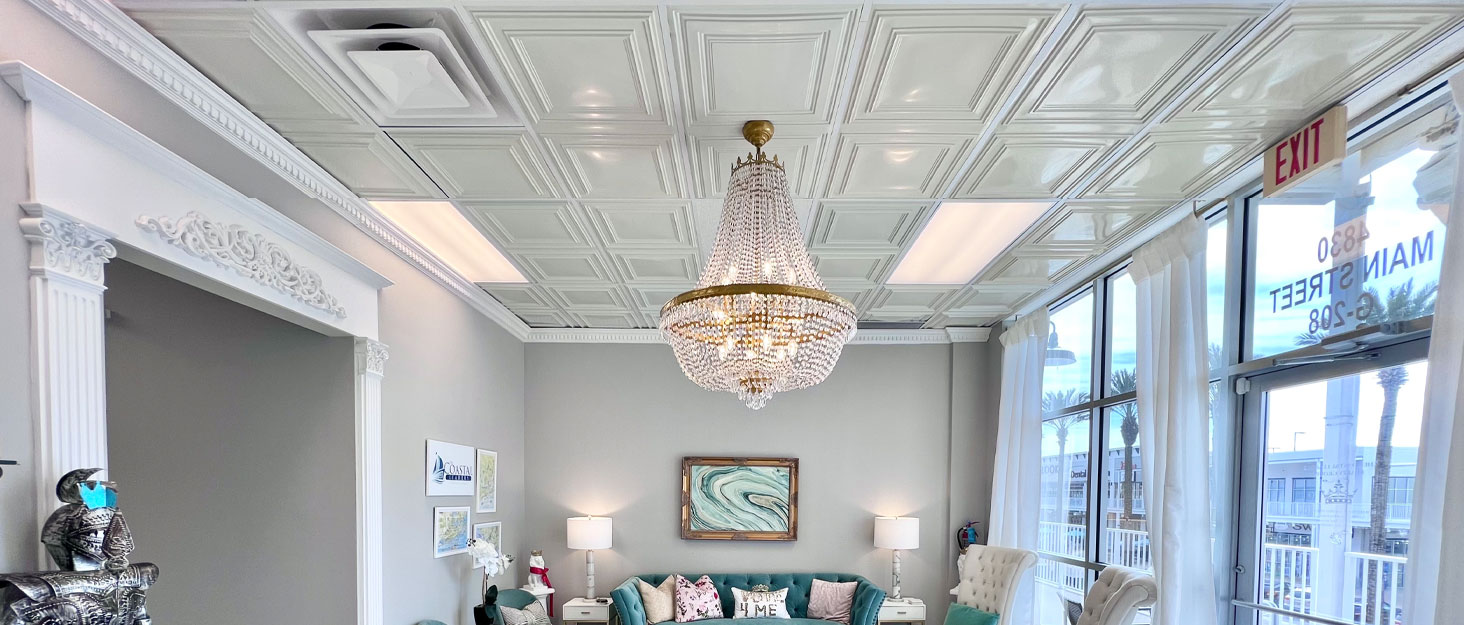
À LA MAISON CEILINGS R24 Line Art Foam Glue-up Ceiling Tiles offer 256 sq.ft. of lightweight, paintable polystyrene tiles designed for easy installation over popcorn and other ceilings. Each 19.63" square tile weighs just 4.8 ounces, enabling quick DIY upgrades without specialized tools. Water-resistant and low maintenance, these modern-style tiles provide a seamless, customizable finish ideal for residential spaces.


| ASIN | B08DMY7YXW |
| Additional Features | Lightweight, Easy Glue Up Application |
| Best Sellers Rank | #755,912 in Home & Kitchen ( See Top 100 in Home & Kitchen ) #147 in Hanging Decorative Tiles |
| Brand | À LA MAISON CEILINGS |
| Brand Name | À LA MAISON CEILINGS |
| Color | Plain White |
| Coverage | 256.00 Square Feet |
| Customer Reviews | 3.9 out of 5 stars 1,361 Reviews |
| Edge Type | Square |
| Finish Type | Unpainted |
| Finish Types | Unpainted |
| Form Factor | Square Tile |
| Included Components | Ceiling Tile |
| Installation Method | Glue-Up |
| Item Dimensions L x W | 19.63"L x 19.63"W |
| Item Display Dimensions | 19.63 x 0.38 x 19.63 inches |
| Item Thickness | 0.38 inches |
| Item Type Name | Foam Glue-up Ceiling Tile |
| Item Weight | 4.8 ounces |
| Manufacturer | Decorative Ceiling Tiles Inc. |
| Manufacturer Part Number | R24-96pw |
| Manufacturer Warranty Description | 2 year manufacturer |
| Material | Polystyrene (PS) |
| Material Type | Polystyrene (PS) |
| Model Number | R24 |
| Pattern | Solid |
| Recommended Uses For Product | Residential rooms |
| Shape | Square |
| Size | Pack of 96 |
| Style | Modern |
| Style Name | Modern |
| UPC | 810010250827 |
| Unit Count | 256 Square Feet |
| Water Resistance Level | Water Resistant |
J**U
You would never know it’s Styrofoam
This ceiling tiles are the coolest thing ever, super lightweight made from basically Styrofoam. Beautiful designs, they are easily damaged though, so you do have to be gentle when installing, not pushing very hard, or you will end up with finger indentations. We went to install and thought we bought glue, but we did not, we bought caulking, but surprisingly that worked excellent! They are super easy to use, we installed this on top of a popcorn ceiling, and it hides it 100%. You can decide to paint over these if you want, I chose to just put them up and let them up without painting because I like the little glisten. they worked excellent! They are super easy to use, we installed this on top of a popcorn ceiling, and it hides it 100%. You can decide to paint over these if you want, I chose to just put them up and let them up without painting, because I like the little glisten to them, so far I’ve done two bedrooms and thought enough to do another hallway. There’s also multiple colors and designs to choose from, I chose just a basic plain tile. Overall great purchase and I would definitely recommend!
K**.
Fantastic and easy to work with
Great product! I was finishing a partially finished half bathroom in the basement (just toilet and sink). Floor was installed, walls and doors up, fixtures in place, just needed a ceiling. So my initial attempt was with beadboard. That did NOT go well. So I began searching. I did NOT want to mess with Sheetrock again. If I never touch another piece of Sheetrock again in my life it will be too soon. Anyway, I ordered two boxes of these to allow for mess-ups (a necessary thing I have found as a diy-er). These things are super easy to install/cut. Don’t be taken aback when you open the package. They are super super light and you are thinking “really, styrofoam?!” But trust me it works. I used loctite white adhesive. These tiles are forgiving if a screw head is slightly popped out too which helps a bunch! I used a base of plywood and just glued them up. Even without paint they look great but they DO need paint. They mar very very easily! Be careful with rings, fingernails, etc. I indented one putting the light fixture back up but I’m hoping paint will help that. Overall it was a fantastic experience. I can imaging how easy it would be working with an existing ceiling (covering popcorn ceiling, etc).
A**R
pretty BUT...
So disappointed. I installed over old popcorn ceiling. Looked beautiful as is. Next day I was dealing with sickness that lasted 3 days. During that time, some tiles fell and many others were starting to drop. I thought maybe not enough adhesive was used so to tiles that weren't all the way down yet, I squirted extra glue in. Didn't hold. So gently pulled all tiles down and started over by scraping all the popcorn off. I was able to peel dry adhesive off the tile and re-applied glue, this time more of it. Some tiles stuck, others did not. I don't have the time and energy to fight this so going to paint textured ceiling again. What a waste, what a disappointment. Only good thing out of this was that sickness kept me from finishing installing trim as I would have had to bring that down as well.
B**.
Broken tiles
Received with several tiles broken. They come 8 to a package. The top three in the top package have pieces broken off. Update: we have Dustin install the tiles today. We were able to use the broken ones for corner or end pieces. We applied them to my 20 x 12‘ cathedral vaulted ceiling in my living room and they look gorgeous. My handyman said “whoever invented these is a genius!“ they are very lightweight Styrofoam that you can see-through when you hold them up to the light however, once they are glued to the ceiling, you can’t see through them at all. We used a la Maison brand glue. For those who said that you could see the glue through the tiles, we have a white primed ceiling and white glue so you see nothing. The sheen is semi gloss and reflects a lot of light back in the room. We are do not plan to paint them the Project was very easy and it took approximately four hours. We finished off the edges with caulk and it looks very nice. Still deducting one star for the damage tiles. We like the ceiling so much that we were planning to do it again in our master bedroom.
B**Y
Recycled Styrofoam Beer Cooler Ceiling Tile :-)
Generally, I have to give the A La Maison Ceiling Tiles at least a B+ and I would use them again. Overall, I am very pleased with my ceiling rebuild project (I had to replace 3 sheets of gypsum board before applying the tiles). The total tiles required for my project were two cases of 48 each, 96 total and when completed I had just 2 tiles remaining. I saw so many others using calling guns with Power Lock adhesive so I went out and bought a battery-operated (Ryobi) caulking gun and started with 6 PL cartridges, don't waste your money, it was overkill and actually didn't do that good of a job, not to mention the PL yield was a paltry 6/7 tiles per cartridge so I opted for a gallon of Acryylpro tile adhesive and a putty knife, perfect! As you can see by the video, I am no spring chicken, a retired Local 4 Jersey Bricklayer 20 years or more ago, so in all fairness, to DIY'ers I have been around the trades for more than 60 years and found this a slam dunk if you want to cover a bad ceiling. Some of the video producers on YouTube are full of shirt, 2 hours to complete a room (maybe a closet) But when you are working alone like I was, you can spend the best part of an hour just laying out the ceiling, my tile's cut dimensions from front to back and left to right are within a half inch of each other, that takes a bit of planning and there is also relocation of lighting/fan fixture so it lies in the center of a tile. I found after you place a tile and position it using a slightly dampened washcloth does a great job pressing the tile glue in place. I did notice that because these tiles are very thin styrofoam you can compress it horizontally, maybe more than you would want to and actually make it shorter than the 19 5/8 inch design. I wore 8 mil nytril raised diamond latex-free gloves which don't slide but they do a great job moving the tile after it is in place, and sometimes just a little too much. All in all, I am very happy with the outcome though I think the prices for this type of styrofoam tile are all over the place and maybe a little overpriced for the raw materials used.
A**S
Super easy to install and good results.
My house is built on clay, so it moves like it has a life of it's own. It's cost prohibitive to stabilize it so I have been making it more movement friendly. I installed Armstrong Woodhaven shiplap panels in one bedroom. It was a horrible pain in the...well, you catch my drift. I installed these panels in my living room. I purchased the pre-painted ultra pure white. Totally worth the extra expense. I used Loctite Powergrab Heavy Duty to adhere them to the ceiling. It took 8 tubes. My room is 13 X 18 and I used every single one of the pack of 96. There were 16 trimmed panels left over. I think it looks great. I'm on the fence about caulking all of it but may touch it up in a couple places. I will be adding crown molding just to finish it off. It was super easy to install. It took me almost a day and a half, compared to the week or so for the Woodhaven. I was considering Woodhaven for my kitchen but I'm going to use these.
P**A
OK ceiling Panels ...
If these installed evenly I would like them. I'm half and half with liking them and then not so much. What I didn't like: First, after a few are up, the corners stopped lining up evenly. In hindsight, rather than continue, I'd slightly cut off some edges to make sure they line up because it's noticeable. 2nd: I used Henry's acoustic tile glue and you can see the glue through the tiles. Lesson here is to place the glue where it won't be so noticeable. Also use a lot of it as the panels are starting to fall. (See pic) so I have to reglue. If installation goes well, these panels are nice. They covered the popcorn ceiling.
M**Y
Looks great !
I do like these tiles. And I like the pattern. I tried to choose one of the least expensive tiles because I have a lot of area to cover. I will say that I have used regular inexpensive caulk to put these up on the ceiling. Couple of suggestions : these dent very easily so when putting it up be very careful not to press too hard into the tile or you will create a dent trust me I’ve done this many times. Also make sure that the very tips of the corners of the tile have adhesive on them because they could start coming down on the corners. I had a professional do my living room which I showed the video of and there are three different sections where the corners of the tiles are coming down. I won’t bother to call the person back because I can certainly put a little bit of caulk in each one of those sections and it’ll be fine. The other thing is a bead of caulk needs to be put in every seam where two tiles but up against each other. And you will also be able to see little dark spots which happened to be the adhesive on the other side of the tile that’s adhered to your ceiling. These tiles are really not meant to just stay the way they are they are meant to be painted. I made the mistake of painting my bathroom ceiling tiles with two coats of ceiling white paint from Behr and still I could see some spots. A man at Home Depot paint department said I really need to put something like Kilz or a primer on these tiles first and then paint them and then I did that and it worked.
V**A
High-end look without the “high-end” price tag
First off, let me start by saying yes this material is basically the same thickness and feeling as a styrofoam takeout container. However, you don’t want a heavy material hanging from your ceiling. You want something that is lightweight to prevent it from falling down. With that being said, I love how it’s thin, about 1/8”, and very easy to make cuts so it can fit in tighter places. I would recommend this product 110%! Some pieces did come damaged, but I took that into account when ordering (as you should with everything) and I have no regrets. We used LePage 300 for the adhesive and a DAP Flex Plus paintable caulking to clean up the seams between each sheet.
T**L
Incomplete
Missing 138 pieces!!!
S**5
Great product, lightweight and easy to install.
Product was used to improve ceilings in our cottage. Used in two bedrooms. Looks really good and updates the rooms significantly. Installed with caulking. Good value for money. Similar products at big box stores would have cost us $1000.
A**R
Make sure you buy clear silicone sealer as the glue
For our purpose it worked great. Light weight and covered the chip painted ceiling.
T**A
Damaged product
4 out of the 8 tiles were damaged , was able to cut sone in half and use part them. Not a satisfied customer at all .
Trustpilot
2 months ago
5 days ago