Desertcart purchases this item on your behalf and handles shipping, customs, and support to Seychelles.
๐ ๏ธ Seal smart, live safe โ the ultimate DIY foundation fix!
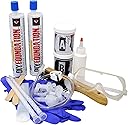
RadonSeal Complete DIY Foundation Crack Repair Kit offers a 10 ft supply of 2-part expanding urethane foam that permanently seals hairline cracks in poured concrete basement walls. Its drill-free injection system allows easy application with a standard caulking gun, curing fully in 24 hours to create a waterproof, radon-resistant barrier. Ideal for interior repairs, it prevents water leaks and soil gas infiltration without costly exterior excavation.


| ASIN | B006OP30L6 |
| Best Sellers Rank | #28,981 in Tools & Home Improvement ( See Top 100 in Tools & Home Improvement ) #129 in Wall Surface Repair Products |
| Brand | RadonSeal |
| Brand Name | RadonSeal |
| Color | Grey |
| Customer Reviews | 4.6 out of 5 stars 1,175 Reviews |
| Full Cure Time | 24 hours |
| Included Components | repair kit |
| Item Form | Foam |
| Liquid Volume | 22 fluid ounces |
| Manufacturer | Novion |
| Material Type | 2-Part Expanding Urethane Foam |
| Maximum Gap Fill | 0.5 inches |
| Model | 301 |
| Number of Items | 1 |
| Number of Packs | 1 |
| Part Number | 301 |
| Surface Recommendation | Poured Concrete Walls |
| Tensile Strength | 180 psi |
| UPC | 856255006058 |
| Unit Count | 1 Count |
| Water Resistance Level | Waterproof |
M**A
Excellent repair kit, no way to improve on it
This kit is well-thought out, including from the crucial standpoint of safety (I write safety articles for trade magazines, and, yes, I wear both eye protection and hearing protection when operating a lawn mower). It comes with splash goggles and two pairs of protective gloves. They even tell you about the "trick" of putting on both pairs at the start of the job (something every person who works with paints and epoxies knows to do). The instructions are quite clear and easy to follow. I must admit I didn't quite follow, having gotten a little impatient with the first fill nozzle; instead of using low pressure and waiting as the video and the written instructions said to, I kept pumping. Oops, the stuff cam out that next hole a little too fast! Lesson learned, and easy enough to recover from. My big fear was I'd run out of the resin, but that didn't happen. This kit had exactly enough for the job. This did fix the leak. I waited until after several gully washers, including the worst mother of all rainstorms I have ever seen since living here, to write this review. The patch held up and no water came in. While this kit is pricey, it is worth its price. The savings over hiring a "professional firm" who likely will send a barely trained person to your home to do the job is huge. If you are careful about how you do your work, you will ensure the job is perfect and the leak will be permanently fixed; that's an advantage of this kit. However, I will state that if you're not the kind of person who has some craft capability (works with tools in any way), you probably should not tackle this job (or any other home repair job). The biggest part of any craft job is the preparation. That takes patience, methodology, and attention to detail; things you either learned from personal instruction or just don't get. If you don't have experience doing home repairs, car repairs, computer repairs or other sorts of "pay attention to what you're doing and take the time to do it right" hands-on work then don't attempt this job either. Hire a carpenter or your buddy who likes doing these sorts of things. The kit contains everything you need, except ventilation fans and a grease gun. If you're qualified to do this job, then you already have those things. These folks put a great deal of thought into this product, and that shows in many, many aspects. I can't think of any way to improve on this product. This job went so smoothly for me, I've let the neighbors know I'll be happy to fix their foundations if they need an assist. And, of course, I will insist that this kit be used.
M**C
Good stuff.... worked very well
UPDATE... I fixed the cracks a few months ago and we have had some heavy soaking rains. Not one drop of water has leaked from the cracks I repaired. The cracks have been leaking for 25 years and a little river would form in the basement from the leakage..... The basement is officially dry after 25 years.... I bought 2 of these kits to repair to basement wall cracks that have been leaking for over 25 years. The first crack was a major leaker and this kit completely stopped the water problem. On the first crack I had spaced the ports about 8 inches apart and I had somewhat of a harder time to get the material to flow out of the upper port. On the second crack I fixed, I placed the ports 6 inches apart and it was much easier to get the material to flow out of the upper port. Items that need change.. - The epoxy sticks in the second kit were thinner than the first kit, and they broke almost immediately when I tried to remove the epoxy out of the container. - The second container came with a wide spatula and the first kit came with a narrow spatula. The narrow spatula was easier to work with at getting the epoxy around the ports. - I didn't wear the rubber gloves on the first kit I used. I got the material on my hands and it took two weeks for the crack material to wear off my hands. Wear the gloves because this material sticks to your hands like concrete. It will not wash off, it needs to wear off. - I has gotten concerned when the tube only compressed half its length in the caulk gun.... I thought something was wrong. It turns out that the caulk tube has two chambers and it will only compress half its length in the caulk gun... This needs to be mentioned... -I had a 20+ year old caulk gun.... I opened the tube before I placed it in the caulk gun. When I tried to insert the crack repair tube in the caulk gun, the nozzle did not fit. I needed to pry open the end of the caulk gun before the tube nozzle would fit in the gun. Make sure that the cracker sealer tube fits in your caulk gun before you open it... The epoxy sticks very well to the basement wall.. I did chisel it off the wall but it does take some time.... I had several different with chisels and the narrow chisel worked better. Also if you hit the epoxy with a hammer.... the blow from the hammer will crack and loosen the epoxy and it will be a little easier to remove the epoxy from the wall. Just want to let you know that the concrete wall will be a little rough when you chisel away the epoxy. REMEMBER TO WEAR THE SAFETY GLASSES... PIECES OF CONCRETE AND EPOXY WILL FLY... I places some newspapers under the plastic bag to catch the excess material that fell on the floor... This made for a much cleaner job... The material does expand quite a bit and it completely filled the wall crack to the outside of the basement. With the way the material expands, I doubt if these cracks will ever leak again. I did flush the top crack with a spray bottle as they instructed... but I also flushed all the ports with plenty of water to remove any debris in the crack... Bottom line I was very impressed... If you hire someone to fix your cracks in the basement, expect to pay at least $350 bucks per crack... This kit does the same job for a lot less... MAKE SURE YOU TAKE YOUR TIME AND PREP THE WALL CORRECTLY AND FOLLOW THE INSTRUCTIONS AND WEAR THE GLOVES..
C**H
Easy to use, and saves from costly foundation repair.
I had two cracks in my foundation, both approximately 6' in length, both leaked bad enough to leave a large spreading pool of water after moderate-to-heavy rains. At first glance, the price of this kit seemed a little steep, but when compared to what it would cost to have a contractor come in, it was a no brainer. I purchased two kits, and had plenty of left over material. I do believe this will sufficiently fill a 10' linear crack as advertised. The kit is all-inclusive, even includes eye protection and a wire brush! This was designed for the DIY'er who may not have their own tools. Directions are clearly written, with corresponding pictures. The two-part adhesive used to attach the ports and seal the crack is messy to deal with. Use the gloves, and ensure you have a few extra stir sticks available - whether the thick tongue suppressors, or paint stir sticks. Anything smaller would likely break while trying to mix the two parts. **IMPORTANT** The two part adhesive hardens quickly. Do not mix too much at once. Start with a dollop of each Part A and Part B, mix, and see how far that gets you. Adjust accordingly and continue to attach each port and seal the crack. **Recommendation** Follow the recommendation in the directions and heat the two part expanding foam canisters in hot water for 20 minutes before applying. This thins the liquid out and not only makes it easier to pump, but also allows it to flow more easily into the depths of the cracks. Wear gloves, use a drop cloth, and take your time. The kit works as advertised, the foam expands quickly and does a fantastic job stopping the leaks.
D**J
Includes everything you need, not difficult, but potentially really messy
Our home had an addition put on by the prior owners. There is a section where the 2 foundations meet at a corner and when it rains heavily, if the gutters outside aren't directed properly and dump water right at the foundation, water will come through the seam like a river. I've been wanting to seal it up and decided to use this product based on reviews. Essentially what you are doing here is sealing up the seam by creating a dam with a 2 part epoxy (very similar to JB Weld) then injecting a very low viscosity urethane foam which should flow into the small gaps, expand then cure. The foam is very similar to Great Stuff when expanded, but has a very low viscosity on injection. First, EVERYTHING is included in the kit. When it says to mix the epoxy, it includes stir sticks. It includes gloves and even trash bags. My application was a corner seam, and in checking the reviews many people said the injector nozzles had bendable tabs on the sides for this application. I called RadonSeal directly and was told that they can't provide "true" corner injectors (right angled) as the design is patented, so they get around it by making the sides bendy. The issue with this is that it was rather difficult to get the injectors to stick, especially since the seam I was working with wasn't perfect on both sides. Instead I kind of had to find places where I could jam the injector in between the concrete. Also, in my application I wound up only being able to do about 5 feet of an 8 foot seam before running out of the epoxy. The instructions say to not press the epoxy into the seam but basically gloss over it - and that might work for really thin, even cracks or seams, but not in my application. Even though there is an included plastic putty knife, the epoxy is difficult to work with and smooth out (it's a lot like working with marshmallow Fluff), so you wind up using more in spots. That said, the foam injection portion went OK - realize that when using a caulking gun for this, the piston will only go about halfway down the tube not the entire way. I thought that the issues I had with ensuring good coverage would mean the seam would leak out all the foam but the bottom 2-3 injectors worked exactly as described - injected slow until the liquid started coming out the next injector up, then capped that injector and moved to the next one. It was only further up the seam that I started getting small holes in the epoxy which led to leaks, but as my application wasn't that sensitive to appearance, I didn't really care. I've worked with Great Stuff a lot and it's easy to trim after it cures, and this foam is no exception. As I mentioned, in my application I can actually prevent water from coming through the seam by appropriately directing it using gutter downspouts, so we'll see if the seam is actually waterproof but I can't see this product making it worse. Lastly, it's kind of pricey, but as I said the kit includes everything you need. Also, epoxy is expensive. I had thought of getting a couple tubes of JB Weld to shore up areas where I had run out of the included resin but 10 oz of JB Weld is $20 - it seems this kit includes roughly 1.5-2 times that, so $30-40 in epoxy alone not considering all the other pieces/parts.
F**4
Take the time to get it right. This stuff works! No more leaking basement.
Had a hairline crack in basement wall that seeped every time it rained--and it rains a lot in our PA location. Selected Radonseal polyurethane based on a lot of research and the recommendation of a friend who is in heavy construction (highway overpasses, bridges, etc.) He knew exactly what I told him about (Oh yea. We use that @#$% all the time!") A couple of key things I focused on prior to using the product was prepping the wall. I removed all of the material applied by the previous owner (without success), including epoxy paint, hydraulic cement, roofing tar, caulking, and whatever else--about 15 pounds of material from a bulge of repeated attempts. It looked so bad I originally thought the form blew out, only to find he just put more material on top of the old. Took it all the way down to the original poured wall which was flat, including grinding (a mess) to make sure I removed everything that was stuck on from before. I washed the,are with Dawn (a miracle product) dish soap and water, and when that dried, I washed it down with a sponge and rubbing alcohol to get it as clean as possible. In the area where it leaked the most, I took a small concrete drill bit, set the bit two inches from the crack and drilled 45 degrees every eight inches to intersect the crack (I know you don't have to do this, but I thought I could get more of the polyurethane back into the crack. Since the crack was not the entire height of the wall, I figured I would take advantage of the extra nozzles available. Before I started, I made ten 8" X8" mixing boards for the epoxy. You can only use about a 1/2 teaspoon each of the black/white epoxy before it hardens, so better to use less and mix more often. As mentioned by others, the wooden spreaders that come with the kit are too flimsy, so I used plastic knives (picnic utensils) that worked much better. Mixed it up, set the nozzles, then pasted the crack as directed. Waited a full two hours for the epoxy to set. I glued the nozzle to those ports that I had drilled over 2-1/2 feet of the crack, and placed nozzles over the crack as directed. Prior to gluing the nozzles to the wall, I washed it down again with rubbing alcohol, and used a heat gun to get it dry as possible. Used the water bottle provided, and flushed each nozzle and crack from top-to-bottom until clear water flowed. (Note, not all nozzles would communicate to the nozzle below it, but made sure every nozzle took a lot of water (the water is what causes the polyurethane to expand--so don't skimp on the water flushing). I must have used six bottles of water to get al 15 nozzles flushed. I know some people mentioned they had problems with the injection tube leaking. My set up worked flawlessly following the directions provided. Started at the bottom nozzle as directed--figuring a minimum of four (4) minutes at each nozzle. The flex tube attaches very tightly to the nozzle--so that all worked well. At each nozzle I would pump first for 30 seconds, then wait 30 seconds, then pumped again for ~15 seconds until I could no longer pump into the crack. I held constant pressure on the gun the entire time. I figured this would allow the polyurethane to penetrate and begin to set before I pumped again. In some cases I could pump after the second time. In the part of the crack that seeped the most, it took a lot of poly during the first 30 second pump. After the first 30 seconds of pumping and ten waiting 30 seconds, it surprised me at how much more material it would take (I wonder how much poly set up on the outside of the wall?). After the second 30 second pumping it began to be more difficult to pump. Pump 30-Wait 30-Pump 30....and then it tightened-up significantly. I barely got a third pump into the nozzle, and then held pressure on it for about another 2 minutes. Tried to pump again but could not do it. Moved up to the next nozzle. Same process for the next nozzle in the high seep area, but couldn't pump into it for as long as the first, and the poly fluid started to seep from the nozzle above (I considered this good). Finished up the balance of the nozzles, drained all of he hoses, cleaned-up and called it good. I had about 3/4 of a tube remaining that I decided to save in the event I need to repeat the process. Note: I had a couple of nozzles "blow out" at the edge where the nozzle is attached to the wall. Looks as if I did not get the epoxy spread thick enough. Then again, when the poly begins to expand, it's extremely dense and it has to go some where. I also had poly push out the nozzle cap on two nozzles. I thought this was a positive, in that I had enough poly in the crack that it had no where to go but out towards the nozzle (the weakest point). Next day I removed the nozzles and started to remove the epoxy from the crack as shown in the video CD. After about 15 minutes, and a lot of hammering and chiseling, I called it for the day (or life?) Stuff is damn tough to remove, a lot of work, and a huge mess. Cancelled! Done! I thought about grinding it off (for about 10 seconds) but the epoxy dust is not something I want in my home, so that won't happen either. Per the recommendations of other users on here, use the gloves and lay down a large sheet of plastic. As for the gloves. I would put two pairs on at one time, that way when the outside pair gets nasty you just peel them off and the new pair is there. I used a couple of extra sets of gloves (two pairs to apply the epoxy, another two pairs to apply the polyurethane (as you get the polyurethane on your hands when inserting the plug into the nozzle as they drip when you remove the injection tube.) Give yourself plenty of room to work, and take your time. BTW, the epoxy and hardener when mixing is extremely foul-smelling. Make sure you are in an area that is ventilated as it is pretty nauseous. Report after three weeks. We have had three major storms of 3", 2.5" and 2 inches and some minor rains of 1/2" or more. Previously, the wall would have seeped with each and every rain. Since I used the Radonseal product--nothing. No seeping, not even a sweating where the crack is. I can tell you from past experience I would have had some water puddle on the floor, or in the lighter rains some sweating on the crack --but after the treatment, nothing. The wall is completely dry from top to bottom.
K**1
Works 100%
Great product, easy to use and works 100%.
D**R
Easy to use and Works!
Noticed wet carpet in our finished basement one night. Started doing some exploratory investigating and found a crack that ran the entire length of the 9' tall basement concrete wall (see picture of water coming from crack). We were able to purchase this repair kit for around $150, and figured it was worth an attempt to hopefully save $$. It worked very well! We have had a lot of rain the last week and not a drop of water coming in. Overall, the application process was very easy. Mix small amounts of the product at a time to ensure it doesn't harden on you while working with it. Injecting the foam was straight forward as well. Overall, I would definitely recommend and would use again if another crack formed in my basement.
A**3
Expired batch? - Plus, see update
Didn't work as advertised. I did follow directions. I wonder whether the kit I received may have been an old batch. The first mix of the port adhesive dried unexpectedly quickly, in about 5 minutes, maybe less, and I had to throw most of it away. After that I mixed small amounts. I had a clock near me so I'd be sure to spend at least 3 minutes injecting resin in each port. After 8 minutes at the bottom port (#1) the first cartridge was empty. As I was getting the second cartridge ready, foam started to appear at port #2. I bypassed port 2, and started injecting into port 3 - very slowly. After 9 minutes there was no foam in port 4. I sealed port 3, and started injecting into port 4. I used the remainder of the second cartridge on port 4. There hasn't been any sign of foam on port 5, nor on any of the other ports above. The process may have lessened the chance of the leak reoccurring, but I doubt it has fixed the problem. I'll know more the next time it rains hard. Even if the leak is cured, I won't change my rating. I am disappointed. I don't believe the product worked as advertised. 10-27-21 UPDATE The top part is from a few years ago, for which I gave 1 star. I continued to have an occasional water seepage at one point in the basement. After some success with waterproof paint, that eventually failed, last month I decided to try the polyurethane again, and I found not better than this company's. This time the poly was frothy. The batch was good. It went well. The product was put together logically, except for the very cheap and useless goggles, and the unnecessary wire brush, as anyone audacious enough to do the job is an experienced DIYer with (better) basic tools. In fact, the product was put together with too much thought, because the cartridges were only half full. This was my second try at the same seepage point, and I had hardly any poly left when done. Anyway, after the job, I waited for some heavy rain. We didn't get the torrential rains of this past July and August that would have been the real test, but we just got persistent rain that lasted more than a day and caused some flash flooding - AND NOT A DROP OF WATER IN THE BASEMENT. It can't be victory until the heavier rains, but the poly is definitely helping. Without it I would have had some water in the basement. For the current try, I'd give it 4 stars, detracting one star mostly because of the cartridges being half full. Because of the miserable first try, the overall rating is 3 stars.
B**E
Easy to work with when following instructions
Overall it was great to use. When it comes to the mix that is used to attach the ports and cover the crack I think if you were going to get 10 feet out of it you would have to really use it sparingly. One tip I found that worked really well was to soak the injection tubes in warm/hot water before using. It made it flow really easy into the ports and then into the crack. I would definitely use this again especially where it has everything you need.
A**R
Surprisingly Easy. Worked Perfectly!
Was quoted 2K for two foundation cracks.. After speaking with a friend, he sent a youtube video showing how to do it... It looked relatively easy (I am not a handyman type, more of a computer geek) but I figured I would try... Needless to say, it was easier than I thought and the results were amazing. A few days after completing the repair we had some crazy rain, and all was dry as a bone... VERY HAPPY.
J**T
Good product
Will be hard to use for cracks in hard to reach spaces due to thickness of epoxy. Kit should also come with more spudgers, gloves etc. Be sure to refer to instructions and not video here since it skips some important info. Knowing this, I would still buy the kit. Seems to be a good product nonetheless.
R**.
Very useful and works as advertised
Perfect kit to seal cracks! Follow the instructions and you'll be good!
A**R
Kit has worked so far
I purchased this set because of the epoxy crack filler used instead of the quickcrete type fast setting cement that came with some other similar kits. Overall the kit was easy to use and I was able to fill a 1/8โ crack that ran from floor to a basement window about 7โ up. I used most of the two tubes of filler with a little left over. So far no more water leaking since filling the crack.
Trustpilot
3 weeks ago
2 weeks ago