🌟 Elevate Your Comfort Game!
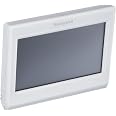
The Honeywell TH9320WF5003 WiFi 9000 Color Touchscreen Thermostat is a state-of-the-art HVAC control device that combines modern technology with user-friendly features. With dimensions of 11.43 x 8.89 x 2.24 cm and a weight of just 0.65 pounds, this thermostat is designed for easy installation and operation. It requires a 'C' wire for optimal performance and is compatible with Alexa, allowing for voice control. Enjoy a sleek design that not only enhances your home’s aesthetic but also helps you manage your air conditioning efficiently.
| Product Dimensions | 11.43 x 8.89 x 2.24 cm; 294.84 g |
| Item Weight | 0.65 Pounds |
| Specific uses | Air Conditioner |
| Batteries required | No |
| Included components | thermostat |
B**D
HONEYWELL Wifi 9000 thermostat works with Alexa.
Wifi 9000 by Honeywell works great. I needed a professional to install because my old thermostat only used 4 wires. The heating professional was able to install the new Wifi 9000 without any problems using my existing wiring.New thermostat is very easy to use. The Total Comfort Control app allows me to make most changes directly from my phone.Also it works nicely with Alexa.I am very satisfied
B**L
Works GREAT
I have 3 of these installed in my house. I installed 2 for the main and upstairs unit and my wife complained that she had to walk to the basement to adjust that thermostat. Now, I adjust all three from my smart phone, at home over wifi, or anywhere else over cellular.Installing the thermostat was not extremely difficult. You do need a 5 wire thermostat wire. They make work arounds and kits to make a 4 wire work, but I wasn't happy with the loss of control of some of the functions. I lucked out and my thermostats were located very close to directly below or above my unit. I had an HVAC company price installing these, and mind you, I BOUGHT THE THERMOSTATS, and they wanted $150 per unit to run the wire and install. PER UNIT! I'm usually pretty handy so I did it myself.This next piece of information is priceless, so do this if you have to run another wire. If your wire is close to your unit, above or below and you have a pretty straight shot at pulling up or down with the wire, take the original thermostat wire and strip the casing back to expose as much wire as you can, about 6 inches if you can. Now take the new wire and do the same. Now take the 2 wires (you now have 4 small wires exposed on one thermostat wire and 5 exposed on the other if that is how your system is set up) and make a hook using the exposed wires on each thermostat wire. Hook the 2 thermostat wires together and use electrical tape to connect them together so it looks like you have one long wire with tape in the middle. Don't use too much tape or the wire my be too big to fit through the holes drilled in the wall. Tape as far back on one wire as you can, around and around, to pretty far on the other wire overlapping slightly as you wrap the tape. Now when you pull the other end of the wire you want to replace, you are pulling the new wire with it. An electrician taught me that. GENIOUS!Now, back to the thermostat. Wiring into the HVAC unit can be tricky. Watch the videos online and read the reviews by others. Most units have a wiring panel that you just attach the wires to. It's important to see which color wire was attached to which letter in the thermostat AND MATCH IT EXACTLY IN THE NEW THERMOSTAT! Can't stress this enough. This must match or your system WILL NOT WORK. the RED wire does not always attach to the R in the thermostat. Diagram it before you remove the old one, and attach the new one the same way. That will leave you with one extra wire, the common wire. Attach it to the C terminal. This provides power to the thermostat for the screen and the wifi. Do the same with the wires in the HVAC unit. Diagram it first before removing the old and put the new wires back the same way. That will leave the extra common wire to attach to the C on the wiring terminal. If there is no wiring block on your system, this will still work, but you have to do more research on where to attach the wires. I almost decided to call someone for the last one I installed with no wiring block. It took about a week of web research, videos, chat rooms, diagrams, and an OHM meter to feel comfortable enough to disconnect the existing wires and attach new wires and find where to attach the 5th, common wire. I'm pretty handy and mine worked out fine. If you have a wiring block on your HVAC labeled with all the wires, it's MUCH easier.I now have 3 thermostats that I control through the Honeywell app on my smart phone. I wish they would integrate this with IFTT or the Amazon Echo so I could control it that way, but I don't know if that is ever planned. I originally wanted to install NEST units, but after doing the research, I didn't need the learning function of the NEST because there is someone in my house 24/7 and we ALWAYS need the units to be on in some fashion. The brilliance of the NEST is that it learns when you're away and adjusts your thermostat accordingly. The NEST has some functions that I wish the Honeywell had, like being able to see when and for how long your unit has been active. I achieved this by installing a TED Pro Home system in my breaker panel, but that's another review. I needed the ability to program and alter the temperature using a smart phone and an app. This unit does that perfectly. VERY happy with my Honeywell's.
M**E
perfect
work great!
K**A
Can be tough to setup, but they're great once working.
Getting the c-wire hooked up correctly on eight of these thermostats was a test of raw endurance, determination, and ingenuity. From crawling under the house to working with multimeters, splicing wires, and cutting holes in walls, it took me 35 hours over the course of seven days to figure out how to get each of the eight units we needed powered up and working. Every electrician and heating tech in the area was booked out 4+ weeks, and so I talked myself into giving it a go, not expecting my simple plan to spring into a Homeric odyssey with as many twists.But now that everything is working, these units are wonderful. We find the programming of these units to be very easy and intuitive. They allow you two or four stage programming (wake/sleep or wake/leave/return/sleep) that's a breeze on your phone, tablet, or PC, a multitude of color combinations to play with, humidity display, indoor/outdoor stats, compatibility with radiant heating systems, weather forecasts, free software updates, and full remote access/control. It doesn't have a feature I don't need or missing anything I'd like to have. It's a well designed unit by a company that's been doing thermostats for longer than anyone else.For those of you considering Nests, I'll admit at the low point of my c-wire journey that I did consider packing everything up and ordering 8 Nests, but I'm glad I didn't. (a) I don't like the learning aspect of a Nest - 4-stage programming is straightforward and predictable; I don't want to be getting a glass of water in the kitchen at 3 in the morning and be worried the Nest will try and heat the room. (b) Nests have batteries, and anything with a battery will have a limited life, and I'm not interested in changing my thermostats as often as I change my cell phones and laptops. (c) Nests are round - I get it.. 1950's kitsch. But it doesn't make for an ideal shape to display different types of data and the round dial look may be refreshed in the near future - again, I'm not interested in updating thermostats more often than once or twice in my lifetime.It's been a few days since I've finished this project, but I still find myself stopping when I pass a thermostat to admire the fruit of my efforts. They look beautiful, work well, and will pay for themselves in just a few months. Nice work, Honeywell!
J**O
East to install
Works great
Trustpilot
3 weeks ago
3 weeks ago