


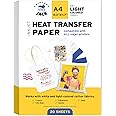
Printers Jack Iron-On Heat Transfer Paper for White and Light Fabric, 20 Pack 8.3x11.7 inch T-Shirt Transfer Paper for Any Inkjet Printer, Long Lasting Printing Transfer Paper for Heat Press
Description
🎉 Create, Customize, Celebrate!
- DURABLE STRETCHABLE - Crafted for longevity, ensuring your designs last.
- VERSATILE APPLICATIONS - Perfect for T-shirts, bags, and more—your imagination is the limit!
- SATISFACTION GUARANTEED - We stand by our product—your happiness is our priority!
- UNLEASH YOUR CREATIVITY - Transform ordinary fabrics into extraordinary designs!
- USER FRIENDLY INSTRUCTIONS - Step-by-step guide included for hassle-free transfers.
Printers Jack Iron-On Heat Transfer Paper is a premium quality product designed for white and light fabrics. Each pack contains 20 sheets measuring 8.3x11.7 inches, perfect for use with any inkjet printer. The durable and stretchable material ensures vibrant, long-lasting prints on various fabric types, making it ideal for personal projects or unique gift creations.


Specifications
| Manufacturer | Printers Jack |
| Brand | Printers Jack |
| Item Weight | 11.7 ounces |
| Package Dimensions | 12.44 x 9.37 x 0.55 inches |
| Item model number | B08N6CBWM6 |
| Color | For Light Fabric |
| Material Type | Paper |
| Size | 20 Sheets |
| Paper Finish | Smooth |
| Manufacturer Part Number | Heat Transfer Paper for Light Fabric |
Reviews
N**S
An great product
It's an excellent choice
E**V
Good quality
Easy to work with ink printer
P**A
Easy to use!
Good paper
D**N
Horrible instructions. HORRIBLE. Here’s how you do it…
Ok the instruction were absolutely terrible. Zero support on the website contrary to what the instruction sheets say. So it mentions what side to print on in different ways depending on what production lot the paper was from. There are no marking on the back side on most of the newer lots. You print on the glossy side. Set your printer to a gloss paper and on normal or better quality. Draft is a no-no and best is a waste of ink. It’s difficult to adjust some printers to the actual paper size. It’s not really letter size it’s a little longer and more narrow. It will print on letter but will likely be offset. If you want to save yourself a headache put your design on a Word document and fiddle with it there. As long as you leave about an inch on each side minimum you’ll be fine but you may have to do some cutting. The paper sometimes separates too easy depending on your printer and the paper settings. Sometimes the paper you get may have a manufacturing issue prone to separate easier. It’s usually where the paper enters the printer and it’s most of the times it’s minimal. If you leave at least 2 inches between the end of the sheet and your design you can trim off the area that began to separate. When cutting, rounded edges work better than straight ones. They seem to peel easier and appear to be more durable. Watch for jagged edges when you’re cutting and ALWAYS leave at least a half inch or better around your final product. It mentions it in the instructions but in a not understandable way. Some folks peel the backing off and then iron but the transfer paper is fragile and more prone to getting hung up on the material when ironing. I always keep the backing on and use oversized parchment paper so that it hangs an inch or 2 over the sides of the design. The paper parchment paper it comes with the kit is like toilet paper use your own parchment paper if you have any. Use slow motions light pressure at first and start putting some good weight behind your iron. Don’t forget to concentrate a pass or 2 on the outline of your transfer and watch that the tip of your iron doesn’t get hung up on the fabric. A little over 2 minutes on high usually does the trick. Do not use an ironing board work it on a smooth wood floor or wood table. Do not iron on glass, ceramic, or anything that may conduct heat away from your material. Finally let the shirt or whatever cool somewhat before peeling. Not piping hot and not too cold. Cool. Peel slow and methodically. If you peel too fast you’ll see the end transfer to the backing and you may get uneven color transfer on your material. End product will probably survive between 1 and 4 washes. Wash gentle inside out and NO dryer. Don’t wash for at least 24 hours I’d say 48 hours. Oh yeah the white transfer requires you to create a mirror image of the photo and text. Some transfers do not. Most do however. Make sure to read the instructions. When you place the transfer on your material printed size down the final product should be oriented correctly. If it’s not you either placed it on the shirt the wrong way or you didn’t mirror the image. If your printer doesn’t have a “mirror” setting you have to do it manually on your photo software or on Word.Final product is decent. Looks way better than Avery at a fraction of the price. The Avery lasts a little longer I think however. This would be 5 stars if they had better instructions or support on their website. They only seem to have support for their dye sublimation transfers not for inkjet.
T**N
Heat transfer paper
Great quality
J**
The instructions were worthless, product quality was not great
I used this product on a new pink t-shirt.The instructions on the Amazon description are completely different than the instructions on the actual package. I followed the instructions on the package very carefully, and the transfer quality was terrible. About 30% of the image wouldn't transfer at all, and the rest of it was spotty and unusable. I ruined a t-shirt and two pieces of the paper trying to make it work. Also, there are no markings at all on either side of the paper, so there is no way to identify which side is the correct one to print on. I made a lucky guess.I tried it again using the instructions on the website rather than the package, but that turned out even worse, with only bits of the image transferring.I tried it a third time using a combination of both sets of instructions, along with tips from another reviewer (thank you, Dr. Manhattan!), and that was somewhat successful, but still tricky, and the image feels a little rough. (Definitely let it cool before peeling the parchment off!) I will use this because I am in a time crunch and don't have time to experiment with anything different, so hopefully the eight shirts I have to make will be passable. But I don't expect them to last through a washing because they just don't seem to be stuck on that well, and I don't know how to fix that using this product. I would never buy this product again nor recommend it.
M**S
Recommend
Recommend
M**E
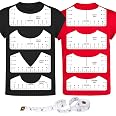
Here’s how to tell the light & dark pages apart!
As others have said- the instructions that come with this product are minimal. I purchased the pack that comes with 20 pages (10 for light fabrics & 10 for dark fabrics. One thing I could not find anywhere online was how to know which packet of 10 was for dark fabric & which was for light fabric. Because of this, I had to waste a few sheets of paper before I came to a conclusion. The packet of 10 that has PRINTERS JACK stamped on the backing is for DARK fabric. The other packet of 10 has no marking on the backing. That is for LIGHT fabric. Just an added note: for the light fabric paper- make sure you print on the slick side.I’ve included pictures to help show the difference between the two as well. The dark red showed through the white on the paper that was meant for dark fabric. That was disappointing.Also, when I used the heat press on the paper for light fabric, it somehow melted the design to the parchment paper (that came with the package of paper). I didn’t want it to melt on to anything else, so I’m now using parchment paper from my kitchen roll.After all of this trial and error, I used the paper for dark fabric to create a shirt and it came out fine. Not perfect, but fine. The dark fabric still seems to show through. If there’s a better version of this product out there, I’d love to know what it is.
Common Questions
Trustpilot
5 days ago
1 week ago
