Desertcart purchases this item on your behalf and handles shipping, customs, and support to Seychelles.
โจ Upgrade your kitchen game with granite glamโwithout the granite price! ๐ก
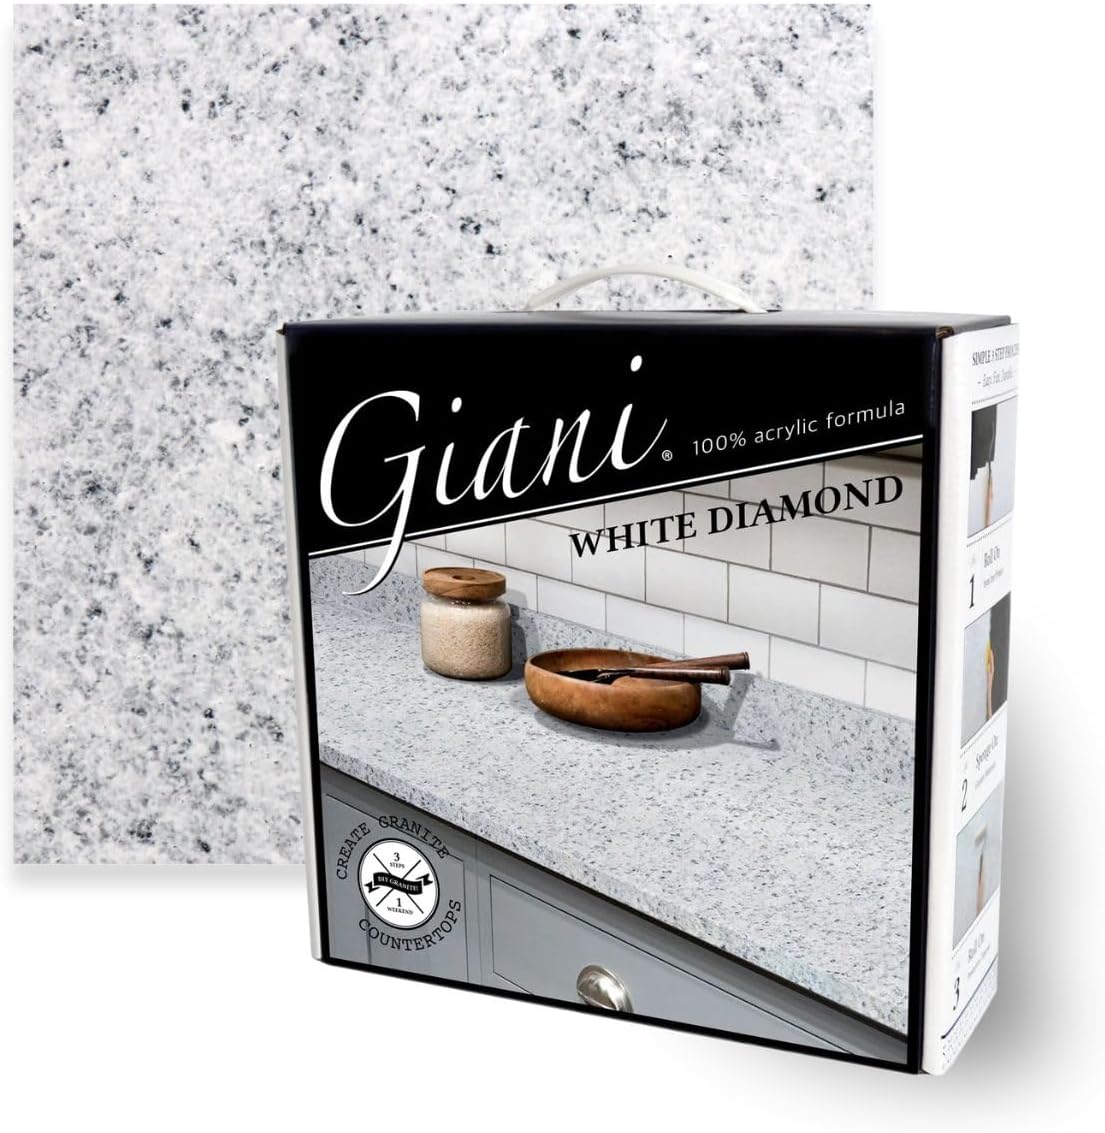
The Giani Granite Countertop Paint Kit 2.0 in White Diamond offers a professional-grade, 100% acrylic, low-odor formula that transforms laminate and other surfaces into a stunning granite finish covering up to 35 sq. ft. Its easy 3-step application and durable, food-safe topcoat deliver a high-gloss, authentic stone look perfect for modern kitchensโall proudly made in the USA.


| ASIN | B092DR12R7 |
| Age Range Description | Adult |
| Best Sellers Rank | #17,140 in Tools & Home Improvement ( See Top 100 in Tools & Home Improvement ) #10 in Household Countertop & Tile Paint |
| Brand | Giani |
| Brand Name | Giani |
| Color | White Diamond |
| Color Code | White Diamond |
| Container Type | Can |
| Coverage | 35 square feet |
| Customer Reviews | 4.4 out of 5 stars 3,872 Reviews |
| Finish Type | Gloss |
| Global Trade Identification Number | 00850015970092 |
| Included Components | Applicators, Paint, Sponges |
| Indoor Outdoor Usage | Indoor |
| Is Waterproof | True |
| Item Form | Liquid |
| Item Volume | 500 ml |
| Item Weight | 6 pounds |
| Manufacturer | Giani, Inc. |
| Model Number | FG-G2 WHT DI |
| Paint Type | Acrylic |
| Part Number | FG-G2 WHT DI |
| Size | 56 Fl Oz (Pack of 1) |
| Special Feature | Low Odor |
| Special Features | Low Odor |
| Specific Uses For Product | Interior |
| Surface Recommendation | Indoor |
| UPC | 850015970092 |
| Unit Count | 56 Fluid Ounces |
T**Y
Worth every penny!
I was honestly nervous about painting my countertops, but this kit completely exceeded my expectations. I used the Bombay Black color, and the finished result looks like a high-end granite countertop for a fraction of the cost. The instructions were easy to follow, and the process was very beginner-friendly as long as you take your time with prep work. I paired it with a white subway tile backsplash and light-colored cabinets, and the contrast is absolutely beautiful. Friends and family can't believe these are painted countertops. The finish has a realistic stone look with subtle sparkle that catches the light without looking overdone. If you're willing to be patient and let each coat cure properly, you'll be rewarded with amazing results. This kit completely transformed my kitchen and saved me thousands of dollars compared to replacing the countertops. I would definitely recommend it and would use it again without hesitation! See before and after.
S**R
Easy and makes a huge difference
Directions were clear, easy application. The worst part is waiting for it to dry. Before our counters were cream, and looked awful against the white painted cabinets. Now the slate looks great!
M**S
Let the before and after be my witness
Value and quality. Easy to use. Dyes quickly, durable and beautiful
T**A
Definitely an inexpensive improvement!
Just finished applying the 3rd, final step. Looks so much better! Hopefully it lasts long enough until we can remodel this outdated, hardly functional kitchen. At least now, itโs not embarrassing! Gave it 4 stars because I just finished it and not sure on how durable itโll be.
A**T
PHENOMENAL Customer Service!!
This is my third time using this product over the past four years. I had dingy laminate countertops that were not in great shape. Was looking for an economical refresh and this has been it! In the past I didn't have the best looking end result using the sponge on technique, (I was happier with some areas over others) so this time I tossed the sponge and decided to forgo the sponge on technique entirely. I simply primed, and mixed a bit of the White Limestone into the Inca Gold until I achieved the tan shade I was looking for. From there I rolled it on with a foam roller, and used a quality 2" angled sash paintbrush for the back splash. I have about 18 square feet of counterspace and squeaked by/pulled it off using one kit. Because I'd prefer thicker coverage, I ordered an additional can of Inca Gold and White Limestone for that reason. But that's just me. I have found that the areas along the edge of the countertops that get leaned against the most, while reaching into the upper cabinets get the most wear. Also, even after applying the top coat, when wet items are placed on the countertops, it leaves water marks. Until fully dry. Then they disappear completely. For the price, ease of use and OUTSTANDING customer service I would highly recommend this product. It will buy me time, until I can finally decide if I want butcher block or quartz kitchen countertops. Until then, this is a decent refresh. They DO sell an epoxy that would be more durable than the top coat that is included in this kit, but having no experience using an epoxy I will be staying within my comfort zone and using the top coat thatโs included. Place painters tape around your sink and stove, keep damp paper towels or baby wipes at the ready, and I suggest wearing disposable gloves. A good product. 11/21/25 UPDATE: I stand by what I said in my initial review. In a nutshell, the customer service is great, and this product is easy to use. That being said, if youโre of average height like I am, and wear a belt with your jeans, leaning over the kitchen sink has put a considerable amount of friction against the countertop in that area. You can see the wear and tear, with the black primer underneath in the attached photo. Any area that gets leaned against the most will show wear and tear. While this is a good product, donโt expect it to last indefinitely. Also, it stains. I used the topcoat that it came with, and in addition, purchased an additional 16 ounces to protect it as much as possible. But at the end of the day, I hold onto my reasonable expectations, as this is still paint.
M**R
Transformed my 50 year old countertop!
Was looking for an easy, inexpensive way to fix my 1970's formica countertops. These were originally installed in 1979 and had some sort of textured paint stuff put on about 15 years ago. The paint was peeling off in some places and stuck like crazy in others. I started by trying to scrape off the old textured paint with a razor blade, which worked in some spots and not in others. Finally gave up and just used a sander with 80 grit to remove, knock down edges and smooth out as much as possible. This kit was super easy to use! After the sanding prep and cleaning well, I went in with the primer, right over top of the stubborn painted parts that wouldn't budge. The primer went on easily. Waited the instructed amount of time for drying then did the sponge painting part. I was a little nervous that I would mess it up, but quickly realized that even if I did end up with a big blob of the mica paint, it was easy to go back and fix it by adding more layers where needed. The only thing I found a bit tricky was that towards the end, the Sponges were so loaded with paint that it was almost impossible to get the nice "speckled" looked. I would definitely recommend getting an extra sponge to use when the first one gets too loaded with paint. Even with the sponge challenge, I was able to make it look pretty good. Used glitter topcoat twice. Again, super easy to use. I am so impressed with the way it turned out! I wasn't expecting perfection, just trying to make it look half way decent. I would say mission accomplished! Completely tansformed my almost 50 year old eyesore of a countertop! I can't speak to the durability yet, but for the price and ease of the project, I am very happy!
T**8
Definitely NOT For Porous Laminate
I could just cry! It is NOT a product for porous countertops. No where do they state that. Looking back now, I can see they do show only smooth surfaces being painted in ALL product videos. I bought 2 kits to use, one on kitchen and hutch in dining room across from the kitchen and the other on built in desktop & window bench in the hallway. I ended up having to use both kits for my kitchen & hutch because the circa 08 faux granite laminate soaked up so much that I was out of the 3rd paint (2c) from the 1st kit after just 1 section of counter top since the conflicting instructions re application dry vs immediately are not clear. You've got more instructions telling people to apply immediately than the lone 1 * added re the white diamond and one other kit in the written instructions. READ THOSE because there is info re 2 different kits that require allowing drying time between coats that is not mentioned in any videos. Also, the backsplash & counter crevas area. More on that paint sucking issue later. When you do it immediately, it is indeed a muddy mess and the black primer (which obviously does not seal a thing) is a total joke due to the porous material slurping it in like a Lot Lizard ๐ฆ๐ on a busy night! It takes a good concept and turns it into a gray (paint 2a) mess. Then you're stuck with the washed out gray, bad 90's sponged wall effect and its too late to get the black back. According to the instructions, you'd have to wait a full 14 days for paints to cure before covering over any previously Giani painted surface. At this stage, your house is torn apart, all countertops are primed black and unusable. Who has over 30 days (14 for the 1st paints to cure before you can reapply & another 14 to wait for 2nd application to cure to "possibly" fix the mess. Plus days spent doing it.) to order takeout, not use your sink, dishwasher (3 days) and stove top which will create humidity. Nope, not me! I had read the (contradicting to all videos) instructions and knew that's what would happen if I proceeded with the rest of it. I had to take a chance of tolerating that crappy final look enough to not wait over 30 days. Especially since in my case, the primer didn't seal the porous surfaces. It would be just more of the same gray blah. You should really clarify instructions re drying between layers in ALL of your videos. Not just in the written that no one knows about until after purchased?? Perhaps also address that your primer does NOT seal porous surfaces. Therefore, the look you obtain on the practice sheet of primed paper is nowhere near what you end up with. The sponges wear out and leave pieces of themselves behind in the paint. Some are visible to the naked eye while looking down and others are not visible until dried into the paint and you look at counters from a lower, angled perspective. You can feel all of them dried into your poly topcoat. Some advice to peeps... 1. Wear a hair net or shower cap while applying. I learned that one. By my sink I had 2 hairs fall out of ponytail & into the glitter poly coat. I'll be doing that when I redo them with the other much thicker All-In-One Soapstone kit I've bought to redo this mess. I've got a plethora of extremely rare life threatening illnesses. One of which is an MS mimicker and as of last year, lesions hit my spine. My back is so messed up from all the bending doing 4" backsplash. This soapstone will be so much easier since it's a brush & rub on and off with only 1 lg stencil "paw" to create the veining. There won't be sponges on pencils which by the way... 2. Sponges on sticks, if not meticulously and painstakingly applied to the bottom of the 4" backsplash or counter under crevas, it will rub up against the other surface and smudge them up with straight streaks. This creates a need to apply more and more of the 3 paints and makes the 2 areas above and below the crevas whiter and grayer than the rest of your project. I've got a wonky eye with no depth perception so this area and around the sink where you also have to use the sponge on a stick does the same thing. I'd practice on something with that crease setup so you get a feel for the depth & angle which to hold the sponge. Also modify your sponge size ahead of time so it doesn't smear the upper or lower areas you've just completed. 3. Buy more sponges & change them often or you'll have bits of sponge residue dried in your final product. I had 2 and used them both yet still had them fall off into wet paint & poly. 4. Use a dry sponge to stipple/dab the excess paint so you don't get a build up & texture of 3 paints. Even if you're not pressing hard. It blends it in. 5. Do NOT use a nap roller for the topcoat. That doesn't dry evenly. Use a foam roller or you'll be redoing the entire thing. It looks great in the videos on a smooth surface but no way for porous. I don't know if I've mentioned that yet! I'm so bummed. The grayish white it creates is no where near my white cabinet paint so that throws me off. I'll never use this product again. Especially after researching and finding the All-In-One paints. I'll definitely be using those after the 14 day cure time.
-**-
Perfect for countertop upgrade.
Iโve used this two different times and got a beautiful outcome both times; I get many compliments on the countertops. The application isnโt hard at all, it just takes some patience to wait for it to dry in between coats. You can adjust the colors to give it your preferred scheme, and adjust the size of the sponge to achieve the look you want. The top coat gives the finish an amazing shine. I had an appraiser think they were actually granite. I would buy again. And again.
M**I
New worktops look
Amazing experience, good quality. It gives my kitchen a beautiful fresh and modern look.
H**B
Transformational
Expensive for paint but cheaper than having what was a tired looking kitchen torn apart. Completely transformed the look of the kitchen. Very clear instructions provided as well as the tools needed to apply the paint and acrylic.
Trustpilot
1 week ago
2 months ago