💧 Keep your washer draining like new — don’t let laundry day slow you down!
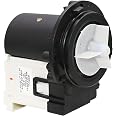
The Puxyblue 4681EA2001T ASKOLL OEM washer drain pump motor delivers reliable 85W power at 3600 RPM, efficiently removing up to 4.5 liters of water per minute. Designed as a direct replacement for LG and KenMore front-load washers, it features a detachable filter housing for easy maintenance and a sealing ring for quieter, smoother operation. This durable, easy-to-install pump helps avoid costly repairs and downtime, supported by a 365-day after-sales service guarantee.


| Brand | puxyblue |
| Color | Black |
| Material | ABS Plastic, Metal, Rubber |
| Style | Drain Pump |
| Power Source | Corded Electric |
| Item Weight | 1.3 Pounds |
| Maximum Flow Rate | 4.5 Liters Per Minute |
| Voltage | 120 Volts |
| Manufacturer | puxyblue |
| Brand Name | puxyblue |
| Model Info | 4681EA2001T-ASKOLL |
| Item Weight | 1.3 pounds |
| Product Dimensions | 3.9 x 3 x 2 inches |
| Item model number | 4681EA2001T-ASKOLL |
| Part Number | B-4681EA2001T |
| Wattage | 85 watts |
| Material Type | ABS Plastic, Metal, Rubber |
| Included Components | Package Includes 1 x 4681EA2001T 0EM drain pump |
| Batteries Required? | No |
K**D
Followed another review. So far so good. Askoll OEM Brand!
Copied this from another review. The guy is right. You don’t have to take the entire washer apart. Which I have done before. This is the second time replacing our pump. I bought a cheap one the first time. Lasted 3 yrs and was loud! Hope this one last longer.Here we go…I made changes from his review and just had my husband hood the washer tilted so I could replace the part.DIYers listen up! Do NOT take the top and front off your washer, including the dreaded boot clamp, to install this drain pump! I know, I know, the videos all show it, and it certainly can be done that way, by professionals, who have a boot clamp tool and who also WANT TO UP THEIR BILLABLE HOURS FOR THIS REPAIR. You will save yourself at least an hour by NOT taking the top and front off the machine, and quite possibly damaging your door boot and losing a finger or two. Here's what you do:1) Unplug machine2) Drain the tub of any water using the drain hose (located behind the small plastic panel at the bottom front of the machine) and a low-slung, fairly high capacity pan/Tupperware. If you don't do this first, leaking water (potentially a large amount too) will be an issue as you proceed with the pump swap.3) Move the machine out from the wall enough to tilt it to access the drain pump. We used a small step stool as a scotch but my husband also held it to keep it from falling on me.4) You can now access the old drain pump (and the recirc pump, three hoses and their clamps and the two wiring harnesses) from the bottom of the washer, which has a HUGE access hole. THIS IS SOOO MUCH EASIER THAN DISASSEMBLING (AND THEN REASSEMBLING) THE WASHER TOP, CONTROL PANEL, DOOR LATCH, BOOT AND BOOT CLAMP that it's ridiculous!5) Have a towel handy just in case some water is still there. Disconnect the three hoses via their clamps using a set of Channel-lock or slip-joint pliers.6) Take phone pics of the wiring to the old pump (and recirc pump) for reference during reassembly and then disconnect these wires. Only 4 wires. Two on left and two on right.7) Remove the assembly holding the old pump. Note you need to open the drain tube compartment on the front and take those screws out. Then there is a small plastic tab that must be depressed when removing the assembly from its mounting on the bottom of the washer. It should pop right out.8) The new pump, once swapped into the assembly via its three screws and wired back up per your photos (or any number of internet videos), must then be placed back into the mounting as the plastic tab is once again depressed. It will release spontaneously to lock the assembly to the bottom panel of the unit as the assembly slides back into place.9) Reattach the three hoses and their clamps10) Plug the machine in and push back into position.11) Say a quick prayer! Turn the machine on and do a rinse and spin cycle to test the new drain pump. It should run quietly, no error codes should be thrown (esp. the "OE" code) and you should hear the water evacuating the machine via the drain hose at the proper time in the R&S cycle.That's it. You're done. Congrats! BTW, this drain pump is the "Achilles heel" of the LG washer line and has been for years. Make sure you get the "Askoll" brand pump, which is the OEM. It's a sketchy part, even OEM, so keep your fingers crossed. Save these instructions as you'll likely be using them again during the life of your machine! I'm not kidding. Good luck. You got this!
R**R
Works great for LG WM4370HKA!!!
Pump was easy to replace by following YouTube videos. Worked perfectly for my WM4370HKA!!!!
J**U
Fit my LG Steamwasher with no issues
This fit my LG SteamWasher (WM2688HWMA) perfectly. (I put a picture of the washer model above.)Before I replaced this part, I had no draining of the washer and an odd vibrating noise. There are 2 pumps in this washer - the drain pump and the recycle pump. If the washer won't drain then this is the likely culprit.Installation was pretty straightforward.1) Take off the supply lines and unplug the washer. DRAIN it.2) Tilt back the washer enough to get your head and an arm under it and brace it so you can work under it.3) Remove the 2 screws on the plastic frame behind the small door in the lower left of the front of the washer. Remove the plastic frame holding in the supplementary drain line and the sediment trap/filter. Remove the remaining 2 screws that hold the pump assembly to the front of the washer.4) Remove the three hoses on the pumps and pump assembly (The 2 pumps and the part they hook to.)5) pull out the assembly gently. (Use a Sharpie to mark what color wire goes where - 4 wires - and remove the wires.(some people said there were screws holding their assemblies in - mine had a cheap plastic notch... I just pulled it out.)Note the orientation of the pumps and remove the one on the Left (My Left as I face the front of the machine.)6) Remove the screws holding in the old pump and then replace the old pump with the new one and put it all back together.It was really quite easy. It was just awkward. By doing it this way there is no need to remove the front of the washer nor the rubber ring.When I finished, I put the lines back on and plugged it in and it worked perfectly again.
K**Y
Fix it yourself
Great boy and my husband fixed our washer after watching a youtube video.
H**E
Solved OE error code on LG washer
repaired front load washer. multiple videos available to help with the repair. check model # to confirm correct part. this pump works well but is loud during operation.curious if that is an indication of quality.
J**T
PLEASE try replacing the pump from the bottom of an LG machine!!!
This part appears to be a genuine LG OEM part from Askoll, which is a wonderful thing at a great price with great delivery! Amazon rocks!!!Please try replacing the pump from the bottom of a front-loading LG washer, as it is SO MUCH EASIER AND QUICKER. If it doesn’t work, you can always do the “official” method of taking off the entire front of the machine, but doing it from underneath avoids the huge headache of reinstalling the rubber gasket and spring clamp.This is what it took for my 10-year-old LG washer. Unplug the power to the washer and slide away from the wall. Tip the machine at about 45 degrees and lean it against the wall. (The washer hoses can remain connected.) Remove the two screws holding the beauty cover from the front of the machine. The bottom of these screws, the long one, is also one of the three screws that hold the pump to the face of the washer. Then remove the other two pump-retaining screws under the beauty cover holding the pump to the machine. From underneath, notice the orientation of the pump motor to the pump housing and the pump to the machine. No need to even remove the hoses from the pump. Pull the pump loose and pull the drain tube out from the front of the machine. Next remove the three screws holding the pump motor to the pump housing. Remove the slide-on plastic cover over the old motor and transfer it to the new motor. Reinstall the three screws attaching the new motor to the pump housing. Pass the drain hose back through the washer housing. Reinstall the top two screw that attach the pump to the front of the washer. (It is nice if you have someone on the outside of the washer screwing while the person underneath rotates the pump to align the screw holes. Reattach the beauty cover and two screws. Lean the machine back to the floor, push it back into place, and plug back in the machine. Now you are finished in 30 minutes or less and all it took was a #2 (standard) Phillips screwdriver!!!
Trustpilot
3 weeks ago
5 days ago