🌀 Spin into Action with Confidence!
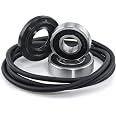
The 4434ER0002D Washer Spinner Support by Beaquicy is a high-quality replacement part designed for LG and Kenmore washing machines. This package includes essential components like a clutch band, three shoes, lining, and springs, ensuring a complete and reliable installation. With dimensions of 50.29 x 43.43 x 17.78 cm and a weight of 2.74 kg, this durable support spider is engineered for longevity and backed by a 30-day return policy, making it a smart choice for any homeowner.


| Manufacturer | beaquique |
| Item model number | 4434ER0002D |
| Product Dimensions | 50.29 x 43.43 x 17.78 cm; 2.74 kg |
| ASIN | B0838W1PPW |
J**I
works great
fit perfect and now my washer doesnt make noises
B**A
Calidad buena
Muy buena pieza la compraría de nuevo
M**O
Absolutely perfect fit lg washer
Super nice product, made for a wonderful rebuild..
G**8
Bien producto
Idéntica ala qué necesite trabajo muy bien gracias
E**N
Take it slowly, and it will go on easy.
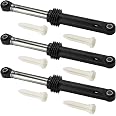
I originally thought that our 15-year-old LG washer needed new bearings because it was making a lot of noise and clunking. But after taking apart the tub, it was clear not only were the bearings worn out but the spider arm was fractured, severely pitted, and brittle. As seen in the pic, the old spider arm, which broke into pieces once removed, was identical to the new. This fit perfectly and our washer, equipped with this new arm and a new set of bearings, now sounds and performs like new again.HELPFUL HINT: The factory-installed bolts have a threadlocking compound that must be broken free before you can remove the spider arm from the stainless steel tub. To remove the bolts, gently but firmly TIGHTEN the bolts just a tad to get them moving. Then gently loosen the bolts just a bit, then tighten a bit again, then loosen a bit more, then tighten, then loosen a bit more again, etc. By doing it this way, you will avoid destroying the plastic pieces that hold the nuts in place. For me, all six bolts came out using this method with no issues at all. To reassemble, I first cleaned up the holes by threading in each bolt loosely and then removing again to get rid of some of the old gunk that stuck to the bolt threads. Then, after cleaning the bolt threads thoroughly with a small wire brush, I applied blue threadlocker and snugged them down.
Trustpilot
3 days ago
2 months ago