✨ Scratch-Free Glass Awaits! ✨
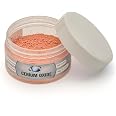
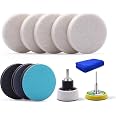
The Glass Polish Scratch Removal Kit (GP28003) is a comprehensive solution for restoring scratched glass surfaces. Designed for DIY enthusiasts, this kit includes a 75mm backing pad, polishing pads, abrasives, and a glass polishing compound, all compatible with electric drills. Suitable for various glass types, it comes with easy-to-follow instructions and expert support, making it ideal for home, office, or automotive use.


| Manufacturer | Glass Polish |
| Part Number | 28003 |
| Product Dimensions | 16.51 x 5.08 x 18.8 cm; 300 g |
| Item model number | 28003 |
| Colour | Multi-color |
| Material | Polishing kit |
| Item Package Quantity | 1 |
| Grit Number | 180 |
| Grit Description | Mixed |
| Batteries included? | No |
| Batteries Required? | No |
| Item Weight | 300 g |
J**M
Brilliant Kit – Saved Me Time and Money!
I had a pretty deep scratch on my glass sink as you can see in the photo, this kit did an amazing job restoring it. I didn't believe this could be done but the scratch is completely gone, and the sink looks as good as new again.The kit comes with very detailed instructions, but just to be sure I scanned the QR code and watched a couple of videos, I also reached out to the company before starting the project. They replied within 24 hours and were incredibly helpful.I used a standard power drill and spent about 2 hours on the job. The results speak for themselves — I genuinely saved money and hassle by not having to replace the sink.A bit of advice: follow the instructions carefully, take your time, and you’ll be amazed by the outcome. Highly recommend!
P**
Did the job, bit stingy on the pads.
I had this on my car windscreen from a brick falling off the back of a flat bed van on the motorway. It wasn't in my line of sight or cracked so I left it. It needs to go in for it's first MOT so needed it sorting. Went to 3 different auto glass repair places, all looked at me like I was an alien when I said it could be buffed out! All wanted to fit a new windscreen at £800! Spent 45 minutes with this kit and now it's not visible unless scrutinised. Looking out from the inside there's a patch that looks blurred but not hazy. If there were more pads in the kit I'd have carried on, but this will be fine for it's mot.
D**C
Shame the rationing of pads.
The amount of abrasive pads they give you for this price to carry out the job isn’t really fair if you think what it would have costed to give you a few more.The pads cutting force greatly reduces after around a minute of use. After that it will only work with a faster speed and more force, but it does work.The shame is they eventually run out, and you may not have finished the whole area yet, and then you kind of have to just accept the job as it is, with no abrasive left. That is a shame.The kit does work though better than when I’ve done it myself with my own stuff in stock.
M**L
Great for DIY, but pump those biceps and warn the neighbours you have a few hours noisy work to do!
I needed this product for a rather unusual purpose - in an area about 6x6 inches (not a windscreen or window). After four hours, I have a much improved surface. That review was yesterday - so here is my update following a couple more hours polishing. This kit is great and does what it says as far as I am concerned. I am a very fussy customer, but even as an amateur, after putting elbow grease into this job, it is as good as I could hope. As a kit, I think it would be worthwhile for the supplier to take out the atomiser, the cloth and the mask, and rather include a few of extra pads of each grade as this is what you are really after - and the rest is available in a supermarket or DIY store. The felt pads were sufficient. One last point, both on this kit and the prior one I found the velcro on the backing plate quickly delaminated. Nevertheless, it was easily pushed back to the right place and I found that it was sufficient to do the job. I think that was because my drill built up more speed than intended, so I fairly accept possible blame for that. All in all, a decent DIY product, fairly marketed and priced in my view. I would not have a problem buying or trying again. As the seller cautions, and others also do, polishing glass is not a straightforward quick process - and the more effort you put in, the better result. Do the steps properly, get the scratches out at each grade and then move on - and polish for a long time, and if it still does not look right, keep polishing, and you should get there. One tip: strangely, I found that with extra effort, once at the polishing stage some scuffs actually improved by rubbing them with the compound on the cloth - I think it is because I could get more focussed pressure on the precise point. However, note that I used this for uneven glass, and this may not be a good idea where you are looking for optical precision. That did not matter to me as the surface slightly undulates. Last tip, when you hit the polishing stage, drop the revs, it works better and you improve control - also, spend a lot of time on this part - and go back for more, it is the longest and most important stage. Good luck and enjoy, bizarrely, it is quite rewarding. I had to grind down, then work back to a clear surface, in all about 7 to 8 hours - but part of a heavy piece of glass, and it was definitely worth it. I want to do more.
D**.
Hmm
After spending so much time trying to remove a tiny scratch/chip out of the glass and buying more sanding pads because the ones that come with the kit didn’t last as long as I thought they would, yes they got the scratch out and I’m happy with that however they left a type of hazing and scratch marks on the glass. I brought some more the blue pads as suggested in the YouTube video and after spending another 3 hours this morning trying to get the glass to a suitable standard, I couldn’t fully remove the scratches that was left from the green pads, I’ve tried 2 separate drills, one corded and the other cordless (I’m a plumber so decent drills, might I add) and still nothing… I spent a further 2 hours adding/removing the polish and buffing it all in, yes it made most of the hazing disappear and visually there was a difference but not enough to allow me to drive my car safely (drivers side), there was also some distortion, even tho I feathered and followed the YouTube video to a T… so after wasting time, money and effort, I’m replacing the windscreen. Quite disappointed, I guess the only positive would be that I managed to remove the first scratch/chip.
Trustpilot
2 weeks ago
1 week ago