Illuminate Your Space with Style! 💡
The Fibaro Dimmer 2 is a cutting-edge Z-Wave Plus universal dimming module designed for both personal and commercial use. It supports dimmable LED lamps up to 250W and operates with minimal power consumption, making it an eco-friendly choice for modern lighting solutions.
Manufacturer | FIBARO |
Part Number | FGD-212 |
Product Dimensions | 4 x 2 x 4.5 cm; 28.2 g |
Batteries | 1 Lithium Ion batteries required. |
Item model number | Dimmer |
Colour | No Color |
Style | Dimmer 2 |
Finish | Satin |
Material | Acrylonitrile Butadiene Styrene |
Pattern | Single |
Power Source | AC |
Voltage | 3.6 Volts |
Wattage | 250 watts |
Item Package Quantity | 1 |
Number of Pieces | 1 |
Measurement System | Metric |
Switch Type | Dimmer |
Plug profile | Wall Mount |
Switch style | Dimmer Switch |
Certification | energy |
Usage | Usage personnel et commercial |
Included Components | User Manual, Dimmer 2 |
Batteries included? | No |
Batteries Required? | No |
Item Weight | 28.2 g |
N**W
This is a fantastic and versatile product!
My use case was connecting a Yale Conexis L2 door lock with a Zwave 2 module (blue module) to Home Assistant, which handles an automation where my UniFi Access Reader G2 Pro sends an unlock signal to a UA-Hub, the UA-Hub sends an unlock signal via the Lock DRY terminals to the Fibaro Implant, which then sends a signal over Zwave to Home Assistant, and Home Assistant then sends an Unlock signal to the Conexis L2 door lock'z Zwave module. This way I can use a traditional Multipoint door lock (the Conexis L2) without having to change my uPVC door hardware. It works flawlessly! I can use UniFi Identity app to tap my phone at the door, use a PIN, or use NFC (and if you're enrolled in Early Access facial recognition is available) to unlock my front door, if the entry is accepted the UA-Hub sends the unlock signal, the Fibaro sends it over Zwave, and then HA receives, and an automation sends unlock signal to the Zwave on the door lock, all within seconds, it's almost instant. I then set the lock autolock duration to be 5 seconds earlier than the UA-Hub unlock duration, so when the lock relocks automatically the UA-HUB updates the status to locked at the same time. I am so pleased because the other option was a WinkHaus multipoint mechanism at over £200 for the multipoint lock and almost £600 for the add-on motor, at almost a thousands pounds this would've cost almost the price of a whole new door!!!! I didn't need to fit a magnetic lock or an electric strike. It is all Zwave-based and Home Assistant handles the communication. Brilliant! Thanks Fibaro for this really versatile device!
P**R
Turn "dumb" lights into "smart" lights
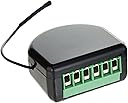
I wanted smart lighting throughout my house, but didn't want to mess around with smart bulbs which limit your choice of lighting and stop working when somebody turns the switch off. Instead, I fitted these in each lighting circuit to turn "dumb" lights into "smart" lights.The units are very compact, but difficult to squeeze inside most back boxes. In most cases, I fitted them into the hollow wall adjacent to the switch. On one circuit, I fitted it into the ceiling near to the light fitting.They are not difficult to wire up if you have experience with electrics. The terminals are small, but sufficient. These work best with permanent live and neutral supplies. If you don't have neutral to the switch, I believe you can wire the Sx terminal to the neutral terminal. In my case, I wired them up as:- L: Permanent live- N: Neutral- S1: Switch (L1)- Sx: Switch (Com)- Output: Switched liveI combined these units with momentary switches, which allow me to turn the lights on/off by pressing and releasing, or dim/brighten by holding for a few seconds.Most importantly, these connect to Smartthings hub, which allows me to control the lights on the app, Alexa, IFTTT and most other services. Connecting these to Smartthings took a few seconds by pressing the switch three times in quick succession.I have created automated routines to turn lights on at sunset and off at 10pm, as well as linking lights together so my Hue lightstrips also turn on at the lightswitch. All of these routines have worked flawlessly.These aren't cheap, but they're worth the money to be able to have smart lighting throughout.
J**S
The best dimmer you can buy... but at a price
These Fibaro dimmers really are the best that you can buy if you want remote control of lights within a home automation setup. They are Z-Wave so you need a controller, but the sheer range of options and compatibility on these is amazing. Also and very importantly they work on the 2 wire arrangement that you generally find in UK light switches. There are some capabilities (like the ability to add a second switch which triggers Z-Wave events) that you don't find in many of these devices. They are expensive unfortunately, but you get what you pay for.
E**O
Brilliant!
Works flawlessly, its pricey, but the build quality is fantastic definitely worth it, and has power monitoring :Dif you don't have space to wire behind the wall switch as it requires a deep pattress, much deeper than one typically finds in a UK house, it is possible to wire into the ceiling rose instead if you have more space there, such as with a large kitchen light, where typically you'll find permanent live and neutral, in which case one wires as per a normal 3 wire install, except the switched live from the wall switch goes to terminal S1, and the SX terminal is left blank. (see attached wiring illustration) I'm using this wiring setup in conjunction with a momentary switch to support dimming via switch, not standard a on/off one.Note this isn't an officially supported way to wire this dimmer unit so use at your own risk, however it is working fine for me.
G**L
It just works great flexibility
It works great with Hubitat paired first time and works great used to integrate my smoke alarms into my smart home with Hubitat used in HSM with a virtual smoke alarm now I will get alerts to my phone it is goes off if I'm not at home. If I am at home the house goes crazy doors unlock lights turn on and Google starts shouting as well as the obvious fire alarm sound.I then added 5 DS18B20 Temperature sensors which was abit of a struggle as I didn't realise they needed to be added before the device was paired, once I removed and repair they were found. Now I monitor my hot water tank temp and showers, which mean that now my hot water heating is smart and automatically turns on of there's not enough winner all from one device love it. I've just purchased another to work with the smoke alarm in the garage and monitor my solar battery temps
5**C
Fibaro Zwave realmente molto più affidabile di altri sistemi smart home
Sulla porta garage avevo già una automazione smart su base Tuya, ma il segnale wifi + necessità di connettersi al cloud tuya mi provocava problemi di non funzionamento (e rimanevo fuori garage...). Sto passando tutta la casa al sistema Fibaro Zwave ed è tutta un'altra cosa: il funzionamento è in locale e il segnale Zwave arriva dappertutto anche dietro muri in cemento armato. Montato con alimentazione 230V + contatto pulito in parallelo al pulsante di apertura e funziona velocissimo. APP Yubii Fibaro/Nice molto migliorata rispetto alle versioni precedenti. Scusate il casino di cavi nel quadro, ma non sono un elettricista! Il modulo fibaro è in basso a destra nella foto
R**Y
Perfect
Simpel aan te sluiten. En bereik is groot. Ideaal
P**L
Drogie, ale dziala
Drogie, ale działa
P**Y
Snabb leverans
Produkt enligt beskrivning
A**P
Excellent avec Jeedom + portail
Je ne comprends pas le commentaire précédent, fonctionne TRÈS BIEN sous Jeedom v4 pour domotiser un vieux portail Nice équipé de carte logique POA/1.Pas de soucis particulier à l’installation, module minuscule ! Rentre parfaitement dans le boîtier, c’est assez incroyable la taille...Des schémas de montage typiques sont fournis par Fibaro, par exemple j’ai pu ajouter une sonde de température externe retrouvée sur Amazon pour quelques euros (il fait presque 19 degrés constamment dans le boîtier, la sonde de température intégrée est inutile, il fait 5 degrés en ce moment dehors ! Il vaut mieux en ajouter une deportee...)Attention il faut prendre le temps de bien faire les réglages dans Jeedom: pour simuler un contact sec ponctuel, il faut par exemple donner la valeur de 0,2s pour l’impulsion et ne pas l’avoir en continu...En résumé:- J’ouvre et je ferme mon portail en z-wave (2 modes: complet et piéton, grâce aux 2 contacts secs...)- je récupère la température extérieure> avec le même petit module !
Trustpilot
1 day ago
2 weeks ago