Description
♻️ Repair your comfort, reclaim your lounge life!
- WIDE COMPATIBILITY - Fits top brands like Faulkner, Lafuma, XtremepowerUS, and more for seamless restoration.
- ECO FRIENDLY UPGRADE - Repair instead of replace—sustainability meets style with recyclable materials.
- QUICK HASSLE FREE REPAIRS - Molded metal ends simplify installation—DIY your chair revival in minutes.
- PREMIUM ELASTICITY DURABILITY - Imported latex and nylon weave ensures strong, wear-resistant cords that last.
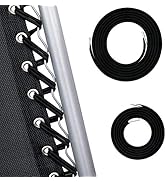
- EXTENDED LENGTHS FOR UNIVERSAL FIT - Long 98.4" and short 65" cords cover most zero gravity chairs effortlessly.
The UNEEDE 4 Cords Zero Gravity Chair Replacement Cord Kit features upgraded cord lengths (98.4" and 65") made from premium imported latex and nylon for superior elasticity and durability. Designed with molded metal ends, it enables quick, easy repairs compatible with most zero gravity chairs, including major brands. This eco-conscious kit extends your chair’s life, supporting up to 600 lbs, perfect for outdoor and indoor use.