🔧 Lock in reliability, unlock hassle-free laundry!
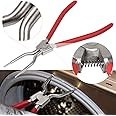
The LG Electronics 6601ER1004C Washing Machine Door Switch and Lock Assembly is a genuine OEM replacement part designed to secure your washer door and ensure safe, uninterrupted operation. Compact and lightweight, it fits multiple LG models and delivers durable, precise performance to keep your laundry routine flawless.
| Brand Name | LG Electronics |
| Model Info | 6601ER1004C |
| Item Weight | 3.2 ounces |
| Product Dimensions | 4.2 x 1.5 x 1.25 inches |
| Item model number | 6601ER1004C |
| Is Discontinued By Manufacturer | No |
| Part Number | 6601ER1004C |
| Batteries Included? | No |
| Batteries Required? | No |
L**N
OEM door latch for select LG front loading washing machines
OEM replacement door latch for select LG front loading washers. Easy to install and works just like the original door latch. Fixed issue with machine starting awash cycle they stopping with an error code showing on display.
E**2
Exact part replacement for WM1912CW LG Tromm
Purchased this to overcome the dreaded "dE" error when I tried to start a washer cycle. Got tired of banging on the door/opening closing, pressing "start/stop" over and over to do a single load of laundry. This is the exact part replacement for my LG Tromm WM1812CW. So far, (with about 5 loads of laundry), I've not noticed any problems at all with the new part. So that either means that I had a faulty Door Lock sensor, or something else was going on. Either way, no issues with this part.As someone mentioned, you can replace it by only unscrewing 6 screws total (4 for the top to slide the top of the washing machine off, and 2 that hold this part in place. However, it's a pretty tight space to reach down into. I'm 6'4 and didn't have any problems reaching the part to replace it, but it was fiddly to actually replace. The cable connector was the hard part. There's a small lever-lock on the connector, just make sure it's depressed before you start to separate the connector from the latch. It's fiddly, and I had to wiggle it for a few minutes, but be persistent, and it does eventually unlatch without problems. New part fit just fine, reinstalled, and no more "dE" errors. So, bonus!It _might_ be easier to replace with the LG tool that is sold separately, but it's probably not required. As someone else said, un-doing the rubber gasket wasn't something I wanted to tackle. That seems like something I wouldn't want to mess with on this kind of device.
D**.
Top Installation of LG's replacement Door Switch & Lock Assembly in LG's Model WM2650HWA
This LG Door Switch and Lock Assembly (DSLA) (6601ER1004C) is the replacement for the older EBF49827801. It works perfectly! Many of the on-line videos recommend removing the tub seal to access the DSLA on this model of LG WM2650HWA Front Loading Washer. However, we entered through the Top of the machine, removing 2 back screws holding the lid in place, then removing the 2 front screws holding the DSLA in place. I removed the electrical connection to the DSLA by depressing the plastic clip. It was a 10 min. fix at the most. The only big problem was that the original vendor sent the replacement switch via bubble plastic envelope. Something smashed the component hinge (15cent part) on the switch rendering it useless when it arrived at the door. We returned and Amazon replaced it within 2 days via Amazon Prime. -The "take home", it is a super easy fix (10min) for the "dE" error symbol on your LG front loader.
D**D
Fixed "dE" error on LG WM2501HVA washer.ACCESSED PART THRU TOP OF WASHER!
I ordered the part and it arrived within 2 days.For an LG2501HWA front load washing machine, with error code "dE" being displayed on the front and which stopped partway thru the wash cycle.I used the TOP OF THE WASHER ACCESS METHOD to access and replace the part.I didn't want to risk puncturing the rubber gasket on the front of the machine, to access the part. I didn't want to buy the $40-$60 pliers that decompress the large metal ring on the front door gasket.It was EASY to replace the part by removing the top cover and going in that way.To remove the top cover you simply :1. remove the 4 sheet metal screws holding the 2 white brackets (rear of top cover) that help secure the top cover to the washer's main body.2. remove the 2 white brackets.3. the top cover seems to stick a bit so I used a large flat blade screwdriver. From the REAR of cover, I gently pried the top cover up and backward slightly.4. The cover moves backward and a gap between the front of the top cover and the controls area appears.5. Using a small piece of wood (so as to not damage the enamel on top cover) and a rubber hammer, I gently tapped the front cover toward rear of the machine.After about an inch the top cover comes loose, so you can lift it off.6. Lift off the cover.7. Locate door interlock switch from looking down into the washer, right-hand side. You'll need a flashlight for a better view.8. Using a short Bungy, I hooked the wire harness of the switch, so it would not drop any deeper into the machine, once the 2 door interlock screws were removed. Then hooked the other end to the top edge of the washer.(I later discovered the wire harness is laced in quite well and the interlock switch does not drop far once disconnected. But better safe than sorry).9. I removed the 2 screws holding the door interlock part to the washer.10. The interlock part did not drop down much, as its wiring hardness was laced in pretty well, keeping the part within arms reach. I took the Bungy cord off/out and grabbed the switch.11. There is a clip on the wiring harness connector that snaps in place on the switch, to retain the wiring to the switch. You can usually pinch it and the harness connector releases from the switch.In my case, I needed the help of a flat blade screwdriver to pry the retention clip enough away from the switch to pull the connector off.BE CAREFUL with the screwdriver method, that you don't break the retention clip on the wire harness connector.12. Pull off the old piece and install the new piece.Push connector of wire harness until it's clip snaps in and locks into the wire harness connector of the door interlock switch.13. Align the interlock switch, into the hole of the main washer body, where you removed it from.Reinstall 2 sheet metal screws of the door interlock switch.14. replace the top cover. Slide the cover forward until it meets the edge of the front control panel15. replace cover rear brackets with 2 screws into each bracket.If this part was the cause of the error code "dE" on your washer, that error should now be gone.It fixed the washer I replaced it on.I've only run a speed cycle so far, to test it, but the "dE" error is gone.
P**R
SAVE $, DIY 4 SURE
Easy! No need to pull entire door gasket and retaining ring off. Disconnect at the bottom of the door gasket, retaining ring, only release some of the right side. Same as with door gasket. Reach in between the metal of the wash machine door opening and door gasket. You Will save much irritations by NOT fully removing door gasket and it's retaining ring. May use some clamps or vise grips to hold gasket/rings . DIY 4 sure.
L**M
Perfect Solution
We were getting an error code on our LG washing machine so we called the local repairman. He literally asked my wife if maybe she had overloaded the machine! Seriously - a 25 year old man asked a stay-at-home housewife if she knew how to load a washing machine. She's been doing it daily for over 20 years. Anyway, back to the review of this product. The "repairman" said he'd have to go do some research and he'd get back to us. So, I took it upon myself (I'm a computer programmer) to Google the problem and come up with a solution. The solution was this product from Amazon. Very easy installation. Great instructions. Very fair price. If you've determined that this part has gone faulty on your LG washing machine, I highly-recommend this purchase.
Trustpilot
1 day ago
2 months ago