🔑 Unlock seamless security and signal clarity—because your garage deserves the upgrade!
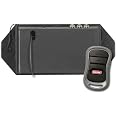
The Genie GIRUD-1T is a universal garage door opener upgrade kit designed to eliminate frequency interference from nearby radio systems by auto-selecting the optimal 315 or 390 MHz channel. It enhances older openers with Intellicode security, includes all necessary installation components, and works with most major brands, ensuring a secure, reliable, and easy-to-install solution.


| Color | Black |
| Brand | Genie |
| Item dimensions L x W x H | 2.75 x 7 x 8.5 inches |
| Item Weight | 1.3 Pounds |
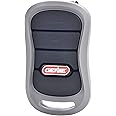
| Included Components | Receiver box, transformer, wireless remote transmitter, wire and clips, mounting screws, instructions |
| Number of Pieces | 1 |
| UPC | 050049015640 |
| Global Trade Identification Number | 00050049015640 |
| Manufacturer | Genie |
| Part Number | 36359R |
| Item Weight | 1.26 pounds |
| Product Dimensions | 2.75 x 7 x 8.5 inches |
| Country of Origin | China |
| Item model number | Model GIRUD-1T |
| Is Discontinued By Manufacturer | No |
| Style | Door Opener |
| Power Source | AC |
| Item Package Quantity | 1 |
| Batteries Included? | Yes |
| Batteries Required? | No |
| Description Pile | Lithium |
| Warranty Description | Limited 1 Year Warranty |
V**Y
Ignore the lawyers - this works fine with openers older than 1993
I got this to replace the very insecure radio unit for a 1980's vintage Powerlift opener, and to use it with the HomeLink remote in my new Camry. Works great - more on that later.But first, I want to clear up whether it works with older openers that don't have the infrared safety beams. It says it doesn't, but it does. The package says this:"ATTENTION! Operates with garage door openers manufactured 1993 to present with the current infrared beam systems. Do not install receiver unless all safety reversing systems are working properly. If you garage door opener was manufactured before 1993, it does not include current safety features and should be replaced with a fully-featured garage door opener."I'm sure the lawyers wrote that so they wouldn't get sued if you accidentally squash Aunt Minnie's chihuahua with the garage door. But it's not actually true. Technically, this unit doesn't care whether there are safety beams or not. All it is is a remote controlled switch. It works just like the door opener button in your garage, and in fact is simply wired in parallel to the manual button. It closes an electrical connection in response to a radio command, that's all. So ANY door opener with a pushbutton switch can use this.Having raised 3 kids to adulthood, and having had multiple pets that somehow escaped squashing, all under the looming menace of a garage door with no safety beams, I'm not inclined to trash a perfectly functioning opener. Besides, I'm lazy, and installing this was a lot easier than installing a new opener.Installation was easy. I didn't even have to use the wall wart transformer because my opener already had a 24VAC output. The opener had 3 terminals, marked "Radio Power", "Relay", and "24V". The GIRUD-1T has three terminals, marked "Power", "Common", and "Wallbutton Terminal". This is how to hook it up:- Opener "Radio Power" to GIRUD-1T "Power";- Opener "Relay" to GIRUD-1T "Wallbutton Terminal"- Opener "24V" to GIRUD-1T "Common"Hooking it up this way avoids running a long wire to the power outlet, and giving up a plug in the outlet for the transformer. Your opener may be different. If it's not clear, the diagram shown in the instructions using the transformer should work in any case.The provided wire is very thin gauge and breaks easily. Any type of insulated wire can be used for this application - thermostat wire, phone wire, speaker wire, plain hook-up wire. But the provided wire works OK if nothing better is on hand.Once I had the wires hooked up and the unit screwed to a joist, I tested it with the remote. Worked fine. Then I programmed the HomeLink transmitter located in the rearview mirror of my Camry. This involves pushing a recessed button on the GIRUD-1T, and then pushing the HomeLink button in the car within 30 seconds. Tip: use longer wires than necessary and do this after you connect the wires but before you screw the unit down. Might save you a rushed trip down the ladder to make it to the car on time.The HomeLink works well in the car. I haven't tested the maximum range, but it works at the end of my driveway. Now I can throw out the huge yellowed duct-taped remote we've been using all these years!The description talks a lot about the dual frequency and avoiding interference. That hasn't been a problem where I live, despite the proximity of an Air National Guard base, so I can't comment on it.In summary, a simple and effective upgrade to an old garage door opener.
D**N
Great product! Easy to install! Safety first!
Excellent! Great product & easy to install.The military interference with our old circa 1983 garage door opener kept getting worse, until one day the remote didn't work at all. Curiously, this was right after Trump took office, a week ago!The receiver box has two ears that you can either screw to the ceiling (screws included), or mount on a garage-door-opener angle strut. We chose to use two cable ties (not included). Before getting the whole thing up where you have to climb a ladder, measure the power transformer wire that you need. Cut that length wire and hook up the transformer to the unit. Plug it in on the kitchen table, make yourself comfortable & program the remote.Programming turned out to be incredibly easy; worked the first time; took maybe 30 seconds. Just press learn on the receiver, The light changes. Press one of the three buttons on the remote. That should pair them up to work together. The next time that you press that same button, you should hear the internal relay in the receiver click. That means that it is momentarily shorting the button contact to ground. (We checked this on an ohmmeter, but if you hear a click, that's what its doing!) So at this point, you have a working remote on the kitchen table.While you have it all on the kitchen table, it would be a very good time to program all the other remotes! Up to 7 remotes can be added.Once you check the function and hear the click from each remote, it's easy to install it on the garage door opener.UNPLUG the garage door opener! Cringe at the reviews that talk about being startled by the sudden (successful) working of the new unit. When you are up on a ladder, with moving chains and gears nearby, UNPLUG the garage door opener!! Safety first. Besides, you don't need it plugged in just yet.Secure the receiver case to something. Screws are supplied to hang it from the ceiling. We happened to have cable ties, so we secured it to the angle strut.Next, plug the power transformer in. Be sure to leave room to plug the garage door opener back in. One last pair of wires needs to connect the receiver output across the door button input of the garage door opener. Alternatively, this could be done near the door button, but the garage door openers have screws to accept the wires and the position is high, so the antenna sees little interference. If you want even longer range, consider putting the receiver up in the attic to get maximum height. (Ours is near the opener about 7 feet above the garage floor and operates the door from three houses away. Plenty of distance for us!)Get off the ladder for safety. Press the button on the remote. Press the button that you previously programmed to test it. If you programmed more than one button, test each button programmed. Each time you press a programmed button, you should hear the relay click. Good test!Set the remote aside in a safe spot. Now you are ready to PLUG in the garage door opener! It should work and not startle anyone!Great product!Fair price; much cheaper that the original!Should get around the Trumpian military jitters!
S**O
Fantastic upgrade for older garage door openers.
Directions are fairly straight forward. Great improvement so you can use newer intellicode based remotes. Hooked right up to my older Genie door opener! Getting the wires into these old school screw terminals can be a little tricky if you are up on a ladder messing with them. These screw in terminals should be replaced with the new click style wire contacts. Other than that, installation was simple and it works like a champ!
S**L
Very impressed!
It is easy to install and works great! We were so tired of fighting with our garage door remotes, this was a life-saver!
R**N
Fixed my problem - but the first one failed after three days
Edit: The first one worked marvelously - for about three days, then went completely dead. I returned it and got another. It doesn't have the range the first one had but it's still quite sufficient, and it's lasted a couple weeks now.---I replaced my Overhead Doors opener with a Genie about eight years ago and have wished I'd not have done that ever since. The new Genie had a remote distance of about 20 feet, vs. the Overhead Doors one that would open about 200 feet away.After trying every suggested fix - lengthen the antenna wire, running it outside, coil the antenna wire, straightening the antenna, moving it around, etc. - and nothing worked, and after years of suffering and cursing, I found this thing. Since it had the "Genie" logo, I was skeptical, but it works, I'm back to almost 200 feet of signal strength. I installed it on the outer wall of my garage, near the edge of the garage door, and did nothing to its antenna other than let it flop where it wants to.And, it works with the Homelink on my cars. It's just that Homelink is really difficult to work with - be patient and google how to do it with your car.
Trustpilot
1 month ago
1 month ago