![Galaxy Note 8 Screen Protector Tempered Glass Shield, [Liquid Dispersion Tech] 3D Curved Full Coverage Dome Glass, Easy Install Kit and UV Light by Whitestone for Samsung Galaxy Note 8 (2017) (1 Pack)](https://m.media-amazon.com/images/I/71v-aOSU1KL.jpg)


J**N
Some installation trouble gave way to PERFECT results in the end.
This is the ONLY tempered glass screen protector that I can find that has adhesive on the entire protector, rather than just around the edges. I tried using those others on my Galaxy S7 with nothing but disappointment and wasted money. Of course, the catch with this protector is that you have to apply the glue yourself!This protector is AWESOME! Once installed, it looks and feels PHENOMINAL and the phone operates as though there was no screen protector at all. It feels just as good (maybe better than) the naked screen. Perfect touch sensitivity. Perfect S-Pen sensitivity. This is premium all the way! You can barely even see that there's a screen protector, unless you notice the cut-out section for the sensors at the top of the phone, near the ear-piece. The protector is "friendly" and works perfectly with my Spigen Rugged Crystal Galaxy Note 8 Case with Clear Back Panel and Reinforced Corners on TPU bumper for Galaxy Note 8 (2017) - Crystal Clear It doesn't get any better than this!To be completely honest, the actual installation wasn't all peaches and sunshine. I watched the install video - several times. I read the printed installation instructions - twice over. I also went out to YouTube and watched even more installation / review videos. I found a PERFECTLY level surface for the install (so the glue doesn't run off the sides unintentionally). I thought I was well-prepared. Alas, nothing is ever easy.I followed the directions to-the-letter! On my first attempt, I got the "puddle" of glue exactly where it needed to be and pulled the pin to drop the protector onto the phone. Uh-oh! Great big air-bubble showed up right in the middle of the puddle as the adhesive starts spreading throughout the rest of the screen. I tried to work it out but just royally messed up the glue, protector adhesion, and I ended up with glue in all the wrong places. Knowing that there were two tubes of glue, I removed the phone and protector from the jig and cleaned everything very THOROUGHLY.At this point, obviously, the protective film on the phone-facing side of the protector has been removed and I knew I didn't want any dust on it for the second attempt. Naturally, I used one of the included dust removers to try to remove any unseen dust from the "business side" of the protector. BAD IDEA! The tape on the dust remover bonds almost permanently to the phone-facing side of the screen protector and did not come off cleanly at all. Now I had a white, sticky splotch where the adhesive would need to go in a few minutes. Fortunately, I had some 99% isopropyl alcohol on-hand and used liberal amounts to clean the protector very carefully and very thoroughly. Good as new.For the second attempt, with the 2nd tube of glue, I again got the "glob" of glue exactly centered with the markings on the jig and pulled the pin. UGH! Another air bubble showed up in the middle of the screen. Knowing that this was my second and final attempt, I did everything in my power to work the bubble out to the edges and disperse it. That left part of the screen without any adhesive coverage. So, I "played" with it and "massaged" the protector for several minutes to get the whole thing sorted out. After I was happy that the adhesive covered the entire surface area of the protector and there were no remaining bubbles, I let it sit for another couple of minutes. Then I let it sit a few minutes longer just to make sure no other bubbles showed up or that the edges would come undone.Satisfied that the protector was installed as perfectly as I could muster, I proceeded to cure the glue with the included UV light and was happy with the results. No air pockets or uneven application were visible. Things were looking up. Then I tried to remove the top alignment bracket from the tray so I could remove the phone. Remember how I said I worked the bubble out... Well, some glue got into the jig and the UV light cured it so, essentially, part of the jig was glued together with my phone locked inside. It took more than considerable effort to pry the top bracket from the rest of the jig, but I managed to do it without breaking anything. Then, I found my phone was glued in as well. That was a little trickier, but I was able to use the plastic pocket clip from a Bic pen as a pry-tool and freed my phone from the jig without damaging or scratching my phone. The remaining adhesive on the phone cleaned up easily with some more isopropyl. Finally, my protector was installed. Whew, what an adventure! Total time was close to an hour.Let me re-iterate that this a FANTASTIC screen protector. I love it, despite the installation headaches. I would rank the overall difficulty about 7 or 8 out of ten. If you think you can handle the install, I would encourage you to get this kit..
K**E
Easy to install if you just follow directions
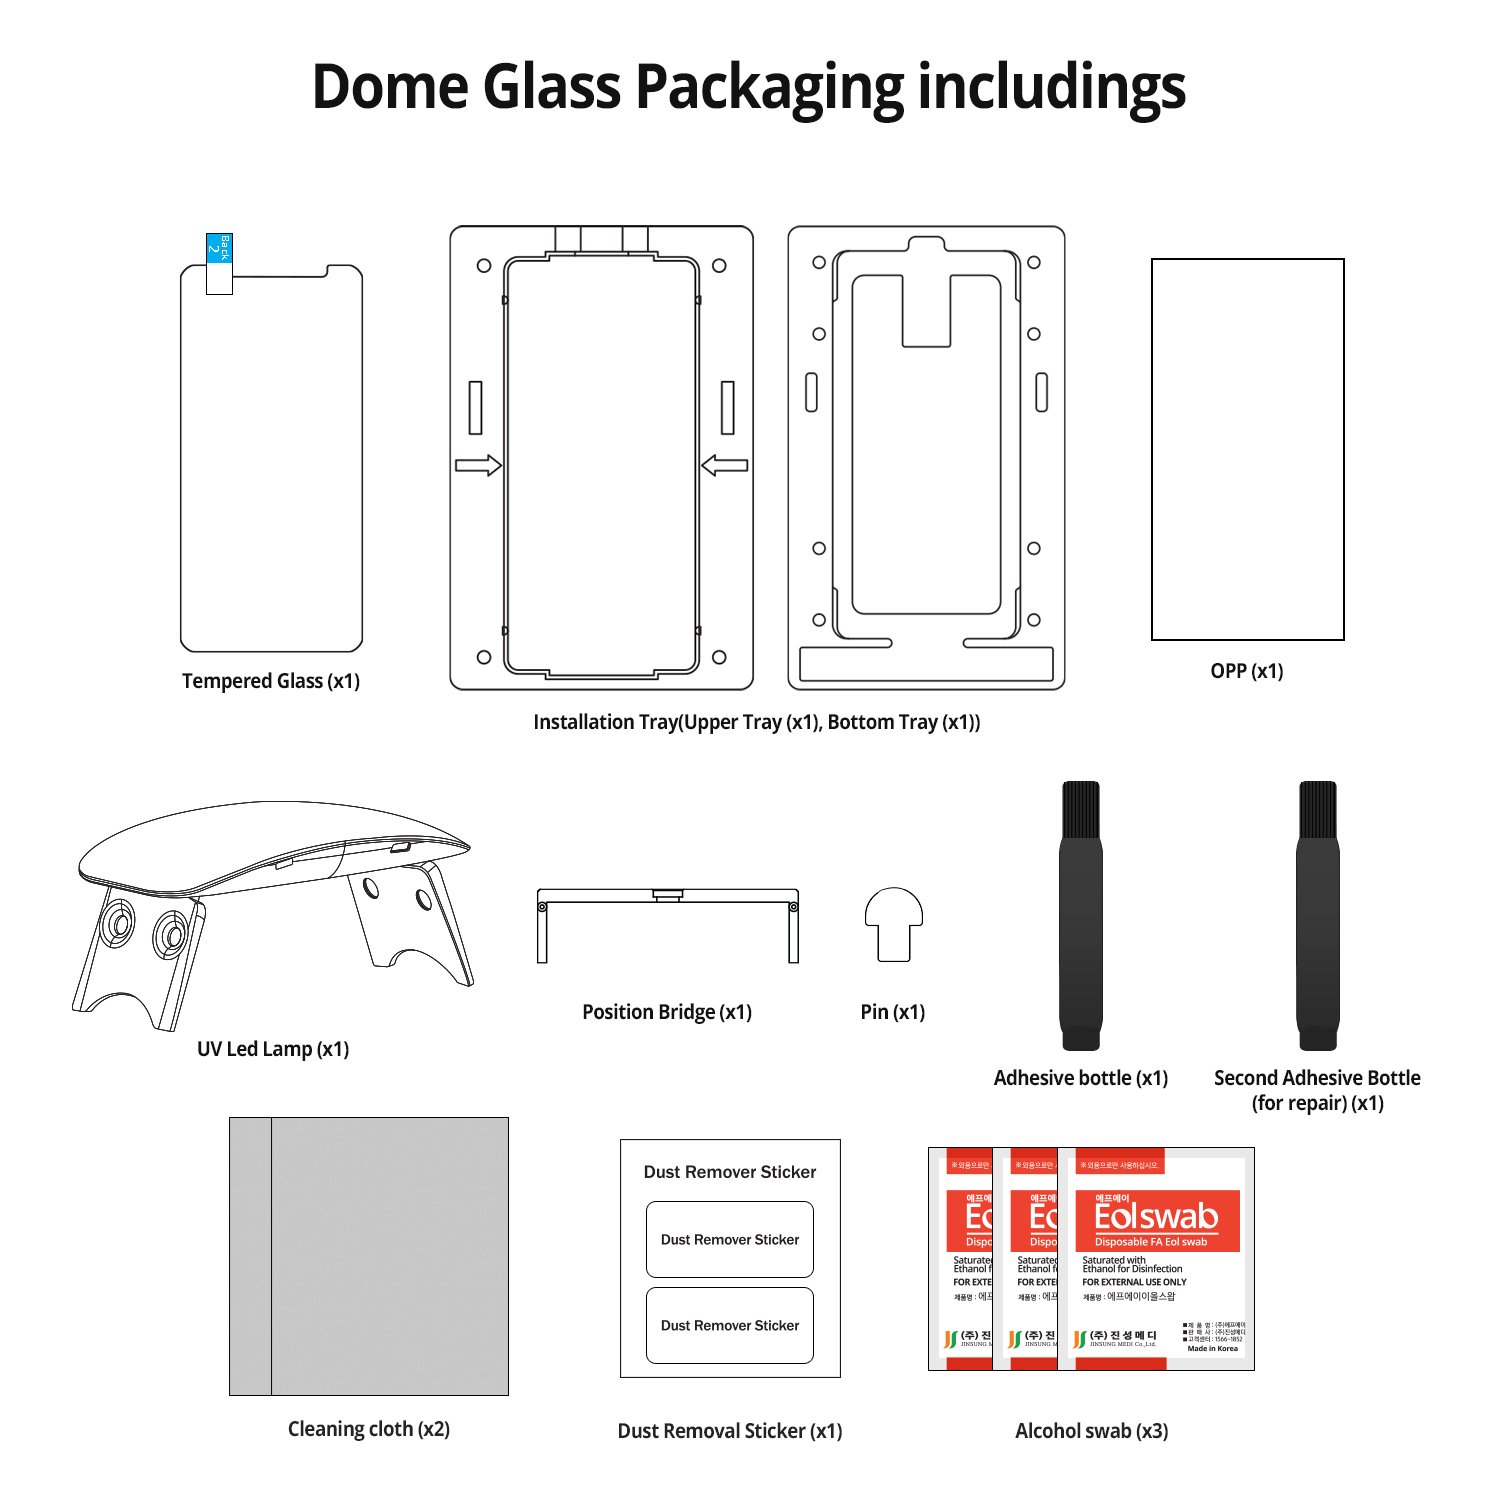
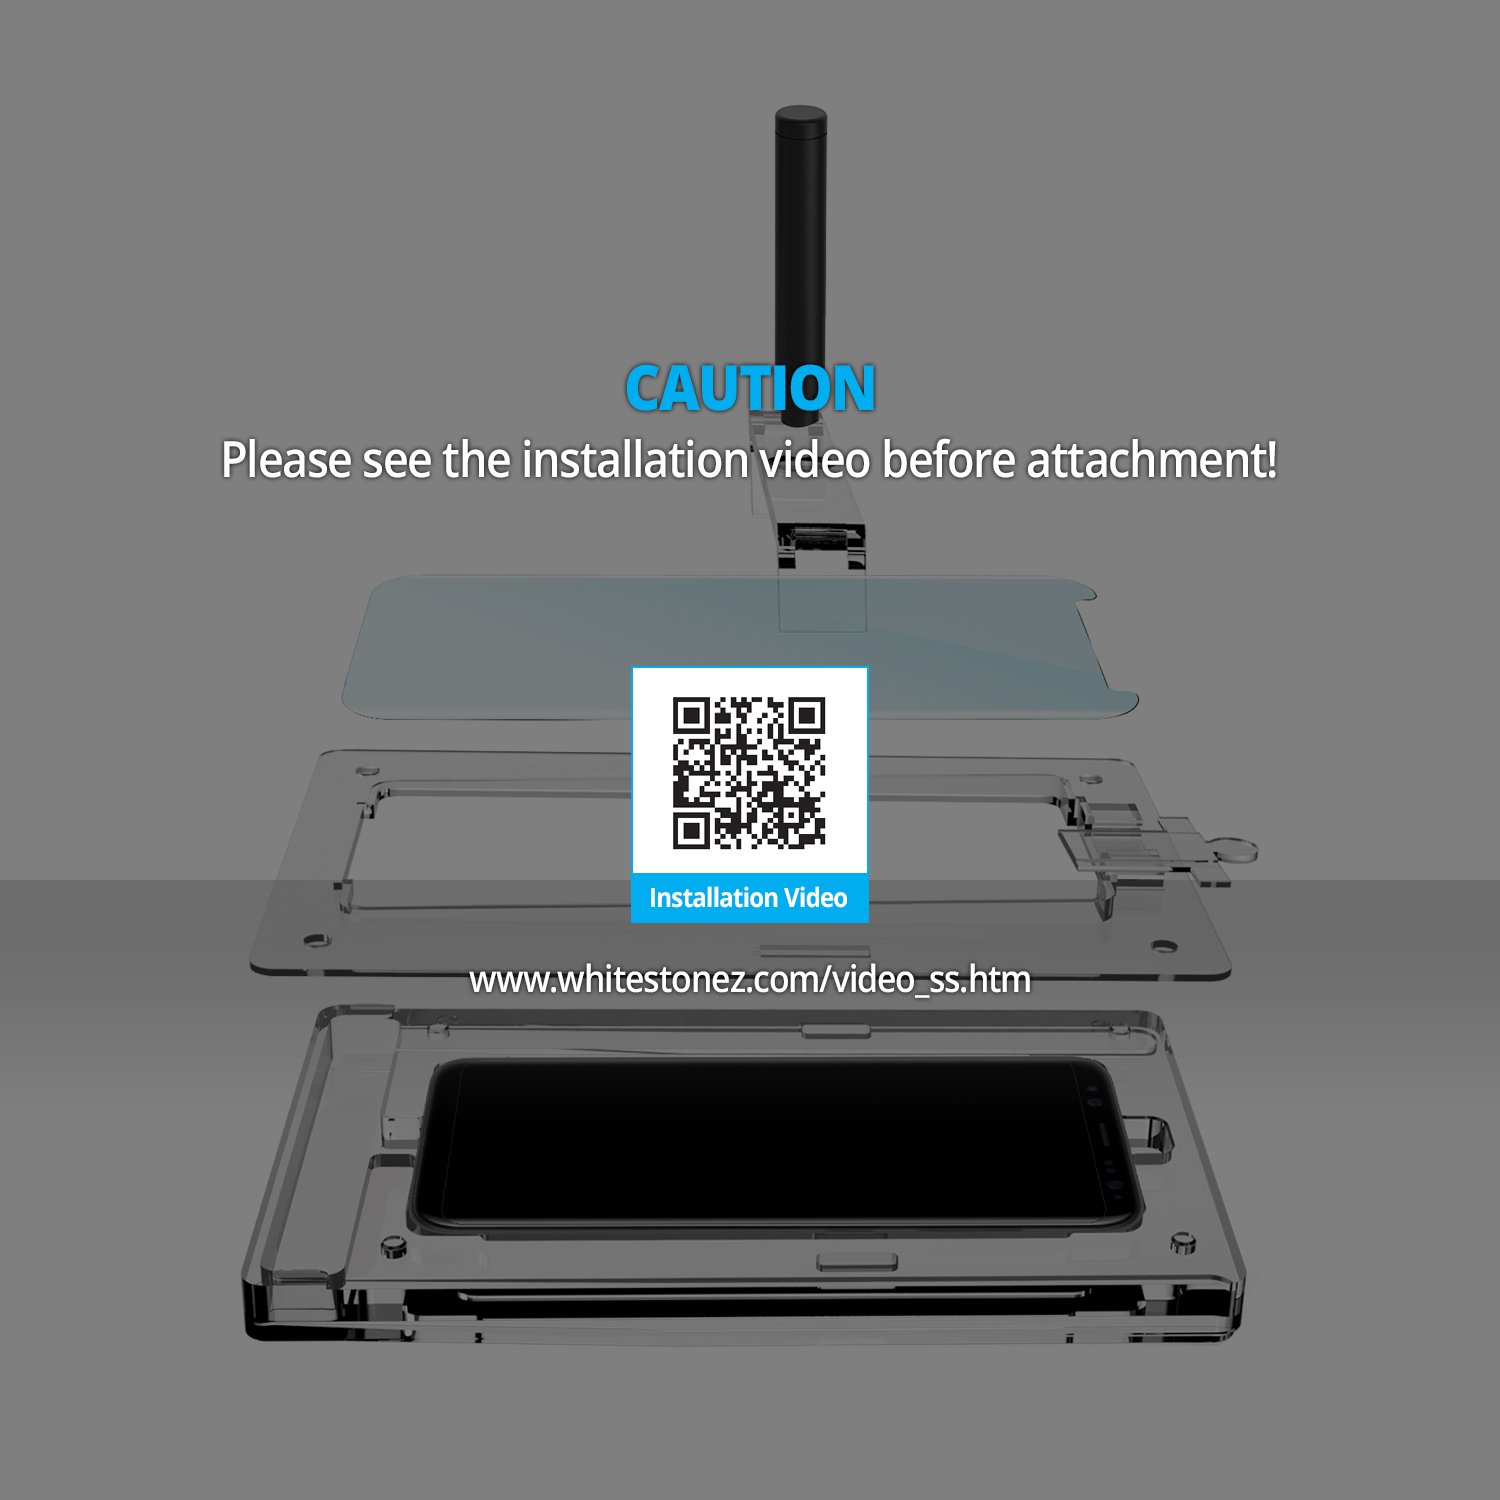
**UPDATE June 2018I still love this screen protector, but I had a user error on my third one. (Yes, I broke two of them in 6 months. The Note 8 is big in my small hands, and I'm not the most physically coordinated person alive anyway.)I have used this screen protector two times already, and both times the protector did its job--it cracked and my screen didn't. Even though my phone is insured, I'd have to pay $175 to replace it, and I'd have to spend time setting up a new one. The Dome is waaaay cheaper and faster.The first two times I installed the Dome, installation was easy. On my third installation, I realized too late (after curing) that it was shifted up a bit more than prior installations and overlapped the speaker cover tab.I thought it was okay because I was still able to remove the tab. It left a little glue gap in the center at the top, but I could live with it.However, I discovered that the case put pressure on the upper edge of the protector, pulling it away from the screen.I couldn't keep the case on top of the edge of the protector, so eventually, I had to remove it. It could not be reinstalled, so I had to throw away an otherwise perfect screen protector. So disappointing!It was my fault for not noticing the placement problem before curing the adhesive, but the first two times, it placed itself perfectly, so I didn't think about having to adjust the Dome on the face of my phone.I haven't purchased another Dome yet because of the expense (I've now spent $115 total on Dome protectors for this phone), but it is absolutely the very best screen protector I have ever used. It fits perfectly (when applied correctly), is super responsive (just like the bare screen), and provides no-fail protection even when my phone fell face-down on the pointy top of a piece of gravel in a paved parking lot, hitting the center of the screen!**UPDATE January 2018: After 3 weeks: I still love this screen protector, and if this one broke, I wouldn't hesitate to buy a new one. Still 5 stars.Don't believe the overblown complaining about installing this awesome screen protector. I just put it on two Samsung Note 8's with no trouble at all. I have very little technical skill, and I'm not terribly coordinated, but you only need to be good at two things: following instructions and being patient. The actual installation takes about 5 minutes.TIPS FOR A PERFECT INSTALLATION:1. Watch a few different videos online, but defer to the official one. Watching other people's mistakes was helpful LOL***The rest of these tips will make a lot more sense if you read them after watching the videos.2. Lay out all of the pieces in your workspace before you begin. I used my very well equipped kitchen table. Make sure all the casing parts fit together properly. Turn on the UV lamp in advance to be sure it works, too.3. You *must* work on a flat surface. If you don't, you will be sorry. The easiest way to be sure? No need to get the level. Put your phone in the installation casing and put a drop or two of water on the center of the screen. If it stays centered and doesn't move in any direction, you're golden.4. Do a dry run. Put your phone in the casing and *without removing the protective film* practice dropping the glass protector onto the phone so that the top end catches on the tab. Pull out the tab so the cover drops.***Some people say to tape up your buttons. This is absolutely not necessary. After the adhesive cures, any extra adhesive that may extend beyond the cover (very, very little) rolls off like a very thin layer of dry rubber cement. Seriously, it's not a problem. Don't unnecessarily complicate your life. (UPDATE June 2018: The package currently includes a tab to cover the speaker during installation and pads to absorb extra adhesive by the buttons.)5. Once you begin the actual installation, be sure you remove any and all dust from your phone right before putting the adhesive on the screen. Seriously. All of it. Be certain.6. Let *all* of the adhesive drip out of the tube. Don't squeeze the tube or try to force it. JUST WAIT! Walk away if you need to. If there are any air bubbles in the adhesive, JUST WAIT! They will pop on their own. I think some people who had trouble failed to do one or both of these steps.7. GO SLOWLY when you tip the casing to make the adhesive roll to the middle of the screen.8. After you drop the protector on the adhesive, JUST WAIT! Don't poke or prod the protector. Make it easy on your impatient self and just walk away for two minutes. Seriously. Inaction on your part is essential here. And don't touch the screen or phone when you come back. Just apply the UV light. (UPDATE June 2018: This is the time to be sure the protector is centered on your screen. I failed to do this the 3rd time I bought a Dome.)9. Unlike the official video and instructions, I used the UV light on the middle part of the phone as well as each end. I'm not sure why the instructions don't say to do this. Maybe the middle gets enough UV without it, but I can tell you that it doesn't hurt.The protector is, as everyone says, absolutely fantastic. It's practically invisible, and the protector feels and responds exactly like the bare screen. Although pricey, it's far cheaper than replacing your phone, and installing it really isn't a problem.
G**O
Pague por muy buen producto.
Muy buen producto, queda al 100% , ya le había puesto de los chinos de la mitad de valor y nunca se veía bien , este si fue echó para este cel . Por cierto ya lo usé, osea ya le di un golpe muy fuerte y se quebró, ojo no digo que no funciona hizo su función y no le paso nada a la pantalla del cel. ¿ Lo volveria a comprar? Claro y lo volvere a comprar.
R**N
Ajuste perfecto, no pierde sensibilidad, grosor y dureza generosa.
Es un cristal curvo que se adapta a la totalidad de la pantalla. Trae la misma caja un "molde" para colocar tu movil y que no se mueva, pones unos topes, el pegamento en el centro y la pantalla encima; quitas los topes y ves como el pegamento se reparte por toda la pantalla (si ves que no llega a todas partes puedes ir moviendo el movil para que la gravedad haga el resto). Una vez toda la pantalla está cubierta, pones la luz ultravioleta el tiempo indicado y voilá.Yo miré un tutorial de como se pone correctamente en internet y la primera vez fallé ya que mi mesa no estaba equilibrada (hacía pendiente), pero por suerte como que hasta que no pones la luz no se seca, puedes retirarlo y volverlo a intentar ya que trae para hacer dos intentos.El montaje es fácil si sigues las instrucciones que en youtube hay varios chicos que te lo explican fenomenal.No esperé las 24h sin tocar, esperé un rato mientras hacia otras cosas y en menos de 3-4h ya lo toqué y sin problemas.Es un grosor generoso pero la pantalla apenas pierde sensibilidad, si que noté que se habia descalibrado pero un reajuste y todo perfecto.Tema dureza, soy bastante bruta y suelo dejarlo boca abajo así sin cuidado ni nada, pero aún no se me ha caído al suelo por lo que no puedo decir si aguanta grandes golpes pero parece recio.De añadido la luz ultravioleta te sirve para otras cosas que puedas hacer (en mi caso pintauñas en gel), así que genial.Vale la pena el precio la verdad.
S**R
The Search Ends Here
Nothing compares to this perfect with easy installation with the kit
K**I
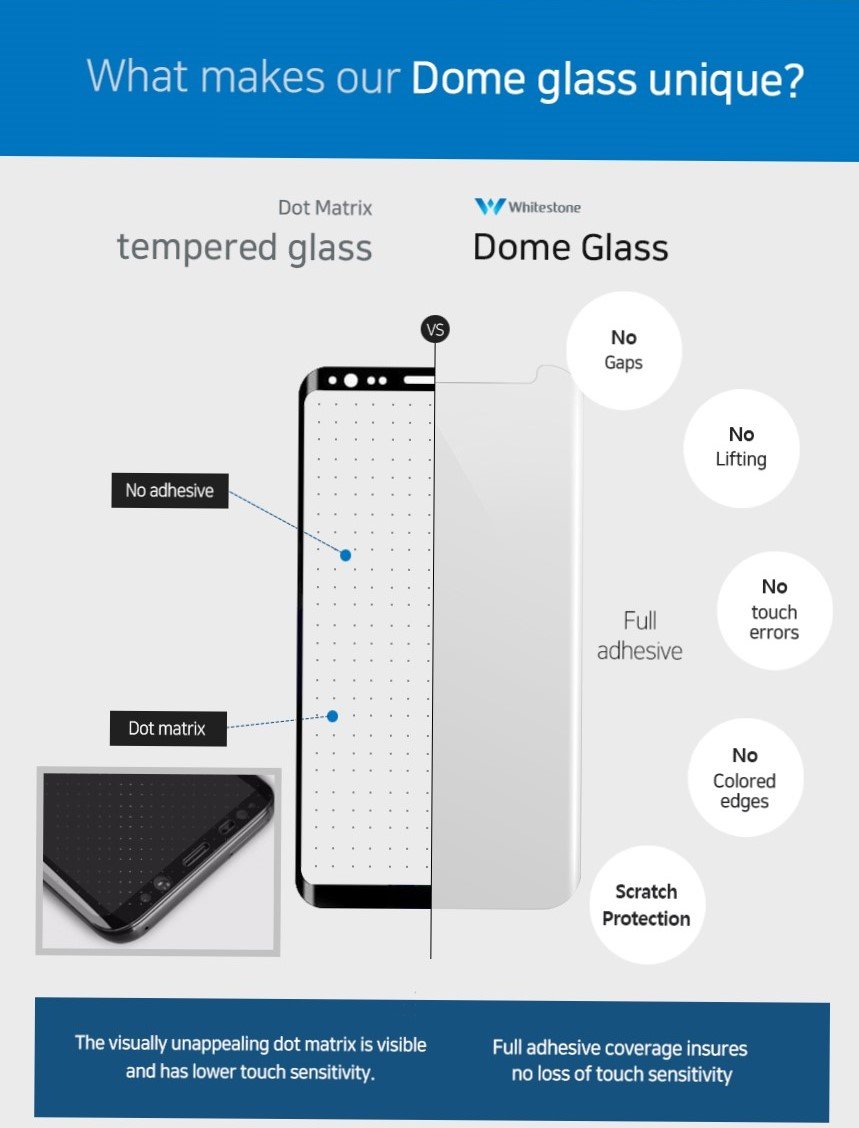
Best screen protector on the market. No micro dots and no loss in touch sensitivity.
I bought a cheap $12 screen protector for my note 8 and it absolutely sucked. It had micro dots and I lost a lot of my touch sensitivity. I returned it immediately. I then was told by a friend to check out the Whitestone Dome Glass screen protector. I noticed it was pretty expensive but after having to pay $200 + tax for my shattered Galaxy S8+ I justified the purchase. After the easy and precise installation process (use a YouTube video), I was amazed at how seamless and natural the screen looked. It didn't even look like there's anything on the phone. No microdots, no loss in touch sensitivity. 10/10 I would recommend this product. Just make sure you follow every step properly in the installation process. And by the way, if you're worried about the screen protector being permanently on your phone and damaging your screen, don't be. It removes easily with no damage at all. There's also a YouTube video on the removal. Enjoy!
R**À
Eccellente!
Eccellente! Il primo vetro temperato che funziona, rimane incollato e mi consente anche di mettere la mia cover...NON è esageratamente difficile e basta seguire i consigli che trovate sul loro sito. Ho scritto, a mia volta, una utile guida...PRO• Qualità generale. La qualità è eccellente! Tutto il KIT ha un'ottima qualità e, soprattutto, funziona!• Funzionalità. Come detto sopra, è l'unico a funzionare veramente!• Unicità. L'idea va premiata e, soprattutto, si spende un po', ma si risparmia anche molto...• Risultato finale. Stupefacente, soprattutto per chi, come me, ha provato decine di vetri e pellicole.CONTRO• Semplicità di applicazione. Anche se PERFETTAMENTE spiegata, l'applicazione NON è semplice e i meno smaliziati potranno incontrare un po' di difficoltà.• Prezzo o completezza del KIT. Le cose sono due: andrebbe abbassato il prezzo del singolo vetro (€39) oppure sarebbe giusto inserire un secondo vetro all'interno del KIT.
Trustpilot
2 months ago
3 weeks ago
