🏆 Elevate Your Game with Every Shot!
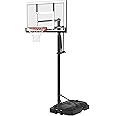
The Lifetime Portable Basketball Hoop features a 54-inch steel-framed acrylic backboard, adjustable height from 7.5 to 10 feet, and a weather-resistant design, making it perfect for outdoor use. With a heavy-duty base for stability and a 5-year limited warranty, this hoop is ideal for players of all ages looking to enhance their basketball experience.


| Brand | Lifetime |
| Material | Acrylic |
| Color | Clear |
| Product Dimensions | 99"D x 54"W x 148"H |
| Item Weight | 119 Pounds |
| Indoor/Outdoor Usage | Outdoor |
| Special Feature | Breakaway Rim, Portable, Adjustable Height, Fade Resistant, Rust Resistant |
| Mounting Type | Freestanding |
| Target Audience | Parents, Youth, Adults, Teenagers |
| Room Type | Outdoor |
| Model Name | Adjustable Portable Basketball Hoop, 54-Inch Acrylic |
| Team Name | mit |
| Included Components | Portable Basketball System |
| Frame Material | Metal |
| Minimum Height | 7.5 Feet |
| Style | Basketball Hoop |
| Assembly Required | Yes |
| Maximum Height Recommendation | 10 Feet |
| Global Trade Identification Number | 00081483715223 |
| UPC | 081483715223 |
| Rim Size | 18 Inches |
| Manufacturer | Lifetime |
| Overhang Distance | 2.5 Feet |
| Item Package Dimensions L x W x H | 56 x 35 x 12 inches |
| Package Weight | 54.43 Kilograms |
| Item Dimensions LxWxH | 99 x 54 x 148 inches |
| Brand Name | Lifetime |
| Warranty Description | 5-Year Limited Manufacturer Warranty |
| Suggested Users | unisex-adult |
| Number of Items | 1 |
| Part Number | 71522 |
| Size | 54-Inch |
| Sport Type | Basketball |
S**N
Great but you might want to know about these assembly hiccups.
First, the assembly manual is the best I've seen for something like this so far. Detailed writing and pictures that actually match the parts with very good details. That was enough for me to go on but they also had optional YouTube videos for each step with QR codes to scan which was really nice.Now for the hiccups (with the parts lettered as they are in the manual):1. Step 4.2: After you tighten the screws AQB, The nuts AAN will not tighten all the way to the metal. Maybe it's supposed to be that way but it's hard to tell; it works fine and the screws don't move2. Step 4.3: The rubber parts AQC will not fit when the bolt from step 5.7 is put in place. I had to cut a small piece off the midsection of AQC to make room the the bolt.3. Step 4.4: my bolt AAD had damaged threads on the very tip and attempting to tighten the nut would have ripped it off or damaged it further. I had to cut off the damaged tip with a hacksaw to proceed.4. Step 5.7: piece APR (finger touching in photo) was too long. It would fit but there wouldnt any room for the rear lifter arms (ALS) that was supposed to be installed with it. I actually had to get my multi-tool out and cut about a fifth of an inch off that metal cylinder and then file the edge smooth. I had trouble making the cut with a plain hacksaw. But as you can see in the photo now completely flush and fits.5. Step 6.5: The height sticker is not designed properly. When I set the hoop to 10 ft exactly And then line up the sticker at the 10 ft mark, the 7.5 foot height is actually indicated by my finger in the photo and the goal won't lower any further than that. Double checked the height on both.Lastly, you need to be decently strong or have a long ratcheting wrench to tighten the counterlock nuts that are used in multiple steps. I am strong but I had to put a good amount of effort in with my 6 inch ratchet. You will either have to hold the nut on the opposite end with one hand while you tighten the other end with opposite hand, or you need a partner to hold it for you.I did most of this assembly solo but it would definitely help to have a partner for a few steps.Those things being said, I'm really happy with the end result and it looks and plays great. Took me about 5 hours; probably would have taken me 4 if I hadn't had to improvise on a few steps and had a partner to help me the whole time. Hopefully Lifetime will see this and try to prevent these issues for other people.
E**H
ITS OK
It took about about 4 hours to assemble this. However, do not follow the directions. There is a description on YouTube, the guy who installs it Online makes your life a lot easierIt took about the directions are terrible,scsn the qr codeAnd follow the link.Makes it much easier to assemble.Again be prepared for 3 to 5 hours to assemble***NOTE****ITS VERY HEAVY AND NOT EASY TO JUST ROLL AROUND..ITS 178 POUNDS WITH WATER..
B**
Assembly wasn’t easy
It’s a good product and the directions were good. I used the you tube video from Lifetime that was very helpful. It was difficult because you definitely need 2 adults to assemble. My only issue was the bolt going through the height adjustment handle. Couldn’t Get the bolt to line up with the other end of the handle. After 2 hours of trying everything (including loosening a lot of other bolts ) I ended up drilling out the hole to make it a little bit wider. After that everything was fine. They should make an easy assembly product like Spaldings product.
B**C
Niightmare to assemble, don't count on expert assembly
It took 7 and a half hours, with me and my skilled carpenter/mechanic son-in-law to put this together. Plus a third adult to help lift and hold it (horizontally) when parts needed to be attached, many of which did not line up as they were supposed to. And when you insert one section of the pipe into the other, you'd better make sure the holes for the bolts are lined up perfectly, because once pushed together you can't pull them apart. At that point (they weren't lined up, or else they were drilled wrong) my son-in-law had to drill through the steel pipe to create a new hole. Then when trying to attach the handle and pneumatic tube and pole together, in addition to needing at least three people, all the holes lined up but one -- it was off by a fraction of an inch. After unsuccessfully trying to muscle the sections in place, out came the drill again to drill through the rubber to allow the bolt to go through.. Do you have a drill with the proper bits? You also need a socket wrench kit, wrench, rubber mallet, lot's of muscle power to make things line up to slip in various connectors. Instructions (48 pages), though step by step, are in dire need of additional pointers to make sure you don't make common errors, and better diagrams of the hard to comprehend pieces that get put together. And, very important - if you are planning on paying the $100 or so for "expert assembly" like I was, don't count on it. We had the box, but the amazon expert assembly people could not find anyone who would do it. An that's over a two week period, with three calls to amazon. What you should do, is buy the expert assembly first (you then get to choose three days and hours as options), pick times a week out, and when (and IF) they confirm it, THEN buy the unit -- it came very quickly. Otherwise, I'd say buy another of the two main competitors; I would if I had to do it again.
L**N
Awesome basketball hoop
Bigger than I even imagined. Excellent quality. Very well packaged and carefully delivered. Took my husband about 2 hours to put together solo, even though he hates reading instructions. I don't understand the horror story comments regarding difficult assembly. Easy to adjust height, even our 10 year old does it with ease. So far it's perfect!
J**E
Great ball goal
Bought this for my 6 year old and she loves it. It is a full size goal and built very well. It will last her for years to come.
M**A
Great hoop, such a difficult assembly
The hoop is great and the kids love it!The assembly was WAY HARDER than the videos portrayed. I am pretty handy and love building stuff and it took me 8 hard hours to complete. Definitely ensure you have a full docket wrench and individual wrench set, a work table and a drill that doesn’t over tighten (clicks when bolt is tight).Another review has details on the difficult assembly, all of that I echo.
Trustpilot
3 weeks ago
1 day ago