🏡 Elevate playtime with a dollhouse that dreams are made of!
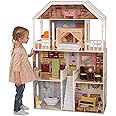
The KidKraft Savannah Wooden Dollhouse stands over 4 feet tall and comes with a charming porch swing and 14 accessories, making it the perfect gift for children aged 3 and up. Constructed from durable MDF and solid wood, this dollhouse is designed to withstand countless hours of imaginative play, accommodating dolls up to 12 inches tall and ensuring that it can be cherished for generations.


| Item Weight | 16.3 Kilograms |
| Size | 33.75"L x 13.65"W x 51.25"H |
| Style Name | Classic |
| Theme | Southern Flair |
| Color | Multi |
| Material Type | MDF and Solid Wood |
J**S
How to assemble this beauty
I love this house. Great value for the money. Huge. There are plenty of other comments on the merits. Here's how to put it together once it arrives on your doorstep. I will say it's sturdier than some of the reviews give it credit for. Apologies in advance if some of it is obvious. This is what I would've liked to know ahead of time.- Give yourself plenty of room: start with a large area to put all the parts out first; you'll need some room to maneuver- Throw out the stopwatch... this will take you awhile; I am skilled at these things and it took me a good long while. The first three steps will take you forever, but then it accelerates. Not difficult, just lengthy.- ... and get some motivation: Find your favorite picture of your daughter, and set it somewhere you can see it. It will remind you why you're spending all these hours wrestling pink pressboard...43 parts and 15 steps, but each "step" can be multiple steps.- *PARTS: before you start: Grab the nuts and bolts package, flip it over, and open it from the back, compartment-by-compartment (they number each on the back, makes it really easy to keep the pieces straight).- You only need a screwdriver: they give you a small allen key. Resist the urge to use power tools, first because you want to enjoy this (probably the only one you'll ever build), but also because it has some tight spaces, and you do NOT want to over tighten. Undertighten if anything.- Give them a little credit: the designers are pretty smart: the instructions are good and the numbers are essential. There is no part #9 (because it looks like a 6) and there's no part 10 (looks like 01) etc.- Get all the bolts in before you tighten: there are a few steps at the beginning where you have to put two bolts into perpendicular pieces; do not tighten the first bolt all the way, until you have both in, otherwise it might torque a little.- Remember to take off the numbers: the parts are numbered which is extremely helpful; but take these numbers off as you go, don't try to do it all at the end (some of them are in tricky places)- Coffee: don't put this together tired (laughs every father doing this at 10pm on a Tuesday night so their kid doesn't have to witness the assembly process). Ok, how about: drink coffee. Seriously you need to focus. Turn off the TV. This assembly is as much mental as it is physical.- Wipe off the dust: keep a damp paper towel around, to wipe down the pieces (just water, not cleaner). They have a bit of factory dust on them, not much, but I found it easier to wipe as you go.- Which side up: again maybe just common sense, but you can get disoriented in the directions from step to step. When you're putting in the side pieces (walls) make sure you have your floors and ceilings straight. If you're wondering which side to put the bolt head into, here's two hints: where the bolt head goes in, it's almost always recessed; also the designers tried to put the nuts in places where they can't be seen, like in the back or on the bottom. Pretty straightforward but this might help.- Step 4: leave those B bolts a little loose. You'll wish you did in Step 6.- Step 6: this one is hard. No real advice here. All I'll say is: don't over tighten the screws; wait until you get them all in a little bit, before tightening them up; and the back screws don't screw in as far as the front screws (and don't try). Good luck.- The swing: this was the step where I switched from coffee to beer. Really? you need a swing? on a dollhouse? Frustrating.- Step 7: **once you get one of the two screws in, keep one hand on Part 13 at all times. I can see how many people must've broken this part in this step. Make sure you keep one hand on it so that it doesn't swing forward and break off.- Step 8: there is some wiggle room in these roof parts, so that you can get them flush together. I'd put all 12 screws in first, about 90% of the way in, then get the middle (part 16) fairly set. You can press the two sides (Part 15's) up so that they touch the middle Part 16. Then tighten the two top screws on each of the 15's. Looks better and you don't have a gap between the sides and the top of the roof.- Step 9: lay it on its back (don't smash that @#$% swing in the process). Don't try to sneak the F screw up through the bottom while the house is standing upright -- this thing is getting top-heavy and I almost tipped the whole thing over. Definitely put the F screws in first to give it stability, but only tighten about 50% of the way -- you'll need wiggle room to find the pre-drill for the G screws. And don't over tighten yet (sound familiar?) you'll need a little room for the next step, Step 10- Step 11: the dreaded plastic stairs. Definitely the weak link in this construction. Not a big deal but I couldn't get them to snap. Don't push too hard, I imagine it's easy to accidentally pop the entire floor through. Ended up gluing the things with some Gorilla glue.- Anchor: I would definitely anchor this thing. They include an anchor, but there's nothing in the instructions on how. I would just use the hole at the very top (under the teddy bear on the top floor). It's a little top heavy, not what I'd call a risk, but if you're paranoid like me I'd mount it.In sum: after three hours and 45 mins, 2 cups of coffee, 2 Buds, a bag of pretzels, and a lot of focus, this thing is beautiful.Reminder: do not over tighten. This will really make your life easier.Construction: build is a solid B+.Aesthetics: and painted details are outstanding A.Assembly: is long but not complex, and as I said the directions are good A-.Durability: we'll see but I'm giving it the benefit of the doubt for now; it is pressboard with a few real wood parts (only the small stairs are plastic, zero cardboard, those reviews are ludicrous), and the bolted construction seems the best chance this has at a long life. Be back.Good luck.
B**E
Excellent product and a great value!
I bought this Savannah doll house for my 4 year old grand daughter this past Christmas 2009. The product arrived quickly and well packaged. The Box is HEAVY. Materials are wood and painted heavy pressboard. I'm not a doll house expert at all, but this seemed to be very well made with attention to detail. Even things like the color of the screw tops to match the painted area they were being inserted into. All in all, the finished product was amazing. I sent pictures to my daughters and got back a lot of well deserved oohs and ahhs.The doll house itself is big enough for full sized barbies. It is taller than my 4 year old grand daughter.Most importantly, on Christmas Eve when we carried the doll house (2 people) out for Abby to see, you should have seen the eyes on this little girl. It was exactly what she wanted, and she started playing immediately. It comes with wooden furniture also. Lots of things for her to do.Ok...so quality and value, much better than the cheap plastic barbie house I had compared against. Only one warning. I am not a handy kind of guy. The directions do not contain a single word at all. I'll type it again...the directions do not contain a single word. The directions are ONLY a series of blown up pictures. Literally it took me one hour to put the first screw in place, no exaggeration as I was struggling with the orientation of the pieces and the blown out diagram. As the build progressed orientation becomes much less of an issue and moves along much faster. If you've got somebody to help you buld it also and you can avoid taking your initial direction frustration out on them :-) , you do need a second pair of hands to hold things.Overall...would I buy this again? Absolutely!
R**.
Great Purchase!
I got this dollhouse for Christmas for my 3 year old daughter, so we've had it about 3-4 months. The house itself is adorable, and my daughter loves it! The included furniture was really cute (some pieces, like the fridge, even have movable parts). I was also very pleasantly surprised that the furniture was so sturdy - all the pieces (and the dollhouse itself!) survived our recent move and the inevitable rough play by my kids. It took 1-2 hours to assemble, but was overall pretty easy to put together. I searched for hours for dolls for the house, and was unsure what would fit. Ultimately I decided to get three different Chelsea dolls (Barbie's littlest sister), and I was pleased with how they fit in the house and in the furniture. Although the house is tall enough for a full size Barbie, a Barbie doesn't fit very well on the furniture. The house itself is huge! We have to keep a stool in my daughter's room so that she can see the top floors. Overall, she loves it though, and I definitely think it was worth the money!Pros:Cute houseEasy assemblySolid construction (both house and included furniture)Cons:House is a little tall for younger girls
Trustpilot
1 month ago
3 days ago