⚡ Power Up Your Ride with Beiter DC!
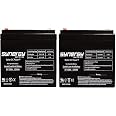
The Beiter DC Power E100 Electric Scooter Battery Pack includes two high-performance 12V 5AH rechargeable batteries designed for rugged use. With a spill-proof design and versatile mounting options, these batteries ensure safe and reliable operation, making them the perfect choice for your Razor E100, E125, or E150 Crazy Cart.

| Manufacturer | USA |
| Brand | Beiter DC Power |
| Model | E100 |
| Item Weight | 4 pounds |
| Product Dimensions | 3.54 x 2.76 x 4.13 inches |
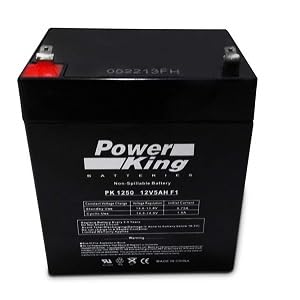
| Item model number | PK1250-X2-ttt |
| Batteries | 2 12V batteries required. |
| Is Discontinued By Manufacturer | No |
| Manufacturer Part Number | PK1250-X2-ttt |
| Amperage | 5 Amps |
| Voltage | 12 Volts |
D**S
Great Price, Easy Quick Connects
I saw this on Amazon and read the reviews. Some were bad, but I think it's because of what the other reviewers said that gave good reviews. You can go on YT and do a search for how to install these batteries to the electric Razor scooters. We have a E150.We got the electric E150 Razor from Goodwill for $14. I saw normally they are near $300 so that was a great deal. I called Batteries Plus that is local to us and they were charging $30 for EACH battery and $5 to solder the connection, so it would've cost us either $70 or $65 (not sure if that was $5 to solder both batteries or one). First Web Sales was selling the pair for about $22-23, which is less than 1 battery locally and free shipping, though, it didn't have Prime shipping.A day after it arrived, which was I think 3-4 business days after I purchased online, we installed the new batteries in our son's Razor. He charged it for nearly 24 hrs, but to no avail. His Razor wasn't working and we will be returning it. However, our daughter's Razor was working, but the batteries that it came with were just about depleted. So yesterday we took the new batteries from our son's Razor and put it in hers. And it ran.I have not good reviews for the Razor in terms of the design of the area where the batteries are, but as far as these batteries go, I'm glad they came with a Quick Connect male, so all we had to do was cut the wire from the batteries, put a female Quick Connect to it using wire crimpers to hold it in place. After that, you just connect the male and the female, which was really easy. I think it uses 14 or 16 gauge Quick Connect parts that we got at Auto Zone for about $3 for about 18-20 pieces (you need the female Quick Connects). There is no need to solder anything. The tools we used to install the new batteries were: Phillips Screwdriver, Wire Stripper/Crimper/Cutter, Socket Wrench, and some duct tape. We used the duct tape over both terminals to keep them down and from disconnecting accidentally.The design of the space to put the batteries in is SUPER tight and the wiring configuration is a mess and you have to jam everything in there. The wires from the Razor to the batteries may not be very long, which was the case for ours, which stunk. You need to cut the wires from the old batteries because they are glued in. I think the option of duct tape is better with quick disconnects, so you don't need to cut wires in the future. If you kept doing this, then you will need to replace the wires, which you could probably do easily, but that was just one more thing I didn't want to do.This was a great price on the batteries and for 2, not just one. Hopefully these batteries will last some time and not what some other people on YT were saying. I will add to this review at some later time if the batteries last long or short and say what kind of usage we are doing. But, as for now, I'm glad I didn't have to pay the near $70 and could've bought three sets of these batteries for the price of one pair locally. Hopefully these are good.
B**R
Great batteries. Precise excellent fit. Exactly like the original batteries.
These batteries worked great. They were easy to install but the Razor E100 battery compartment is very tight so these have to go in similar to how they came out so make sure you take a picture before you start otherwise you might have to play around with it more than I did. Overall though, this is a very simple install. You'll have to cut the old wires, strip some insulation back on them about a 1/4" - 3/8", and then crimp a connector onto the end of the wire and connect it to the battery but it's really very easy to do. I went to an Auto Parts store and purchased female connectors sized 16-14. Carefully remove the batteries and work on the wires one at a time. Cut the wires close to the original terminals, strip the wire, and then crimp on the connector. Then hook the battery back up and cover the terminals with electrical tape. The connector will stay on by itself but the terminals shouldn't really be left bare. Then do the next battery. The red wire on your scooter goes to the red terminal on the battery and the black wire goes to the black terminal on the battery. Put the batteries back in, close it all up and you're off and running. Yep! My batteries came charged and ready to go once the install was done. Run time is excellent. In fact, it exceeds my expectations. Charge time is even better. My old batteries would take 24 hours to charge and only last about 20 minutes. These batteries charge overnight when fully drained and easily run for MORE than a full hour. If they're only partially drained then they charge up in a couple of hours. Batteries Plus wanted $35 for each battery. These cost me less than $25 shipped and I plan on using these for all of my scooter battery replacements.
J**S
Fits Intended Use on Razor E150, Need to Add Disconnects
I ordered these mainly because they were a lot cheaper than similar products on dedicated Razor scooter repair parts sites. As others have commented, they do NOT come with an easy method to attach wiring. See review from Ryan Nelson for a detailed discussion on wiring issues and switchover. I will modify his review and state that I used a set of disconnects (spade connectors) from Ideal Industries which I purchased at Lowes. I used the 22-16 AWG size and I also posted a picture showing which one I used. Ryan suggested 4.8mm but that seems a bit small to me. The battery terminals are 6mm wide per the mfg drawing so I don't see how a 4.8mm spade connector would work.Other than that, you should also keep in mind that on the original Razor product, the terminals were electrically isolated with some sort of sealing compound. You could buy weatherproof disconnects to accomplish nearly the same thing but they are 2x the price of the non-weatherproof ones, so I just used some electrical tape to wrap the terminals once I had the new wires attached.Overall it was an easy switch out that took about 15 - 20 mins once I purchased the disconnects and laid all the tools out. As others noted, it is too soon to comment on long term battery life, but they seem to work fine and hold a charge for a normal amt of time (similar to the original equipment).See my posted pics for more info.
Trustpilot
2 months ago
2 weeks ago