
DOWNLOAD THE APP


Customer Services
Copyright © 2025 Desertcart Holdings Limited
DOWNLOAD THE APP


⚡ Power your peace of mind — never get left in the dark again!
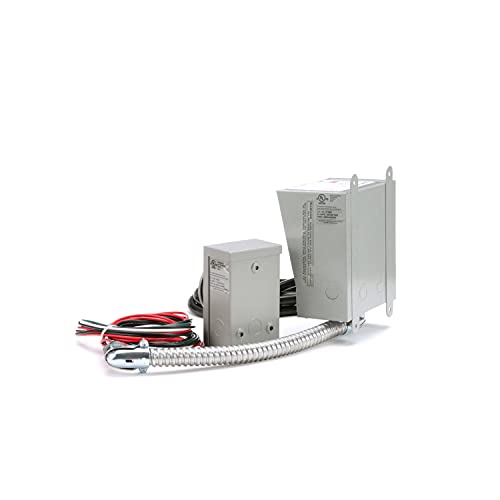
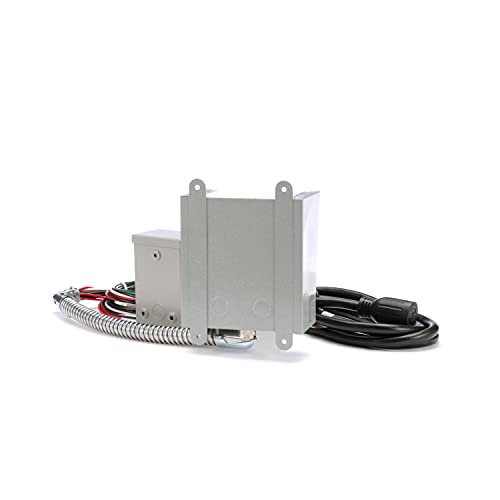
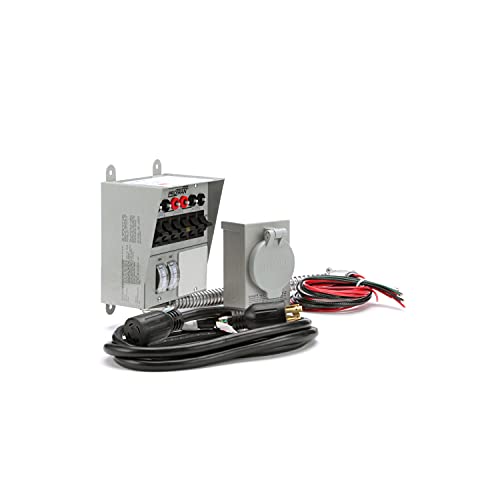
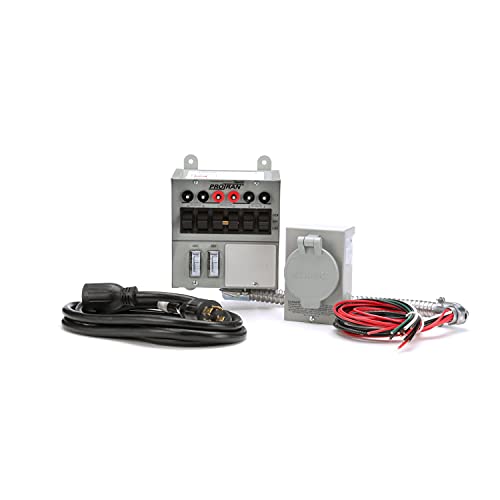
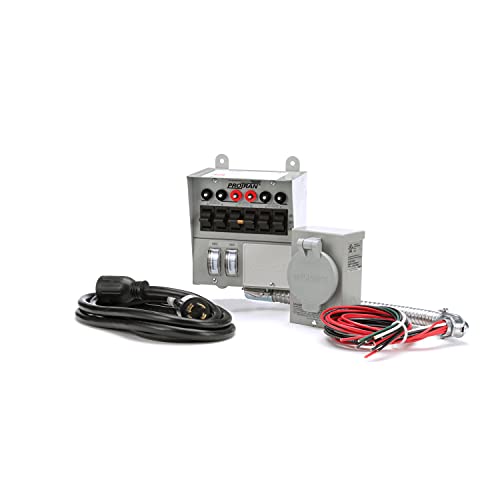
The Reliance Controls 31406CWK is a professional-grade 30 Amp, 6-circuit manual transfer switch kit designed for portable generators up to 7,500 watts. It enables safe, code-compliant connection of backup power to home or office circuits, preventing backfeed to utility lines. The kit includes a prewired transfer switch with wattmeters, a 10-foot generator power cord with dual L14-20 and L14-30 connectors, and an outdoor power inlet box. cUL1008 listed and backed by a 5-year warranty, this reliable system offers a quick, all-in-one solution for seamless power transfer during outages.


| ASIN | B000BQN4T2 |
| Actuator Type | Push Button |
| Best Sellers Rank | #21,499 in Patio, Lawn & Garden ( See Top 100 in Patio, Lawn & Garden ) #16 in Outdoor Generator Transfer Switches |
| Brand | Reliance Controls |
| Circuit Type | 6-way |
| Color | Gray |
| Compatible Devices | Portable Generators |
| Connectivity Protocol | X-10 |
| Connector Type | Plug In |
| Contact Material | Alloy Steel |
| Contact Type | Normally Closed |
| Control Method | Remote |
| Control Type | manual |
| Current Rating | 30 Amps |
| Date First Available | January 1, 2008 |
| Global Trade Identification Number | 00851890000034 |
| International Protection Rating | IP00 |
| Is Discontinued By Manufacturer | No |
| Item Weight | 13.77 pounds |
| Item dimensions L x W x H | 4.5 x 7 x 7.5 inches |
| Item model number | 31406CWK |
| Manufacturer | Reliance Controls |
| Number of Items | 1 |
| Number of Positions | 6 |
| Operating Voltage | 250 Volts (AC) |
| Operation Mode | ON-OFF-ON |
| Product Dimensions | 4.5 x 7 x 7.5 inches |
| Terminal | Blade |
| UPC | 815181010683 851890000034 |
| Unit Count | 1.0 Count |
| Upper Temperature Rating | 180 Degrees Fahrenheit |
| Wattage | 5.00 |
L**E
Easy install for backup power!
Had one too many power failures and decided to invest in a generator for our house. While this supports 6 circuits it installed super easy. Instructions were clear and easy to understand through out the mounting and wiring steps. Even with minimal wiring knowledge after watching their video, I tackled the entire install in just about an hour. Already used it twice in a month since installing. My daughter’s bigger fear is when we lose power for some reason. She can now hit the remote on the generator and then flip the switches and she won’t even know the difference! Had everything needed included and I feel is a great value! If I had to do it again I would go with the 10 circuit as I had more watts available than I thought!
R**D
Certified, solid, well-made product.
This Reliance Pro/Tran 6 circuit Transfer switch kit paired well with my Aferiy 3840Wh Portable power station. I used a TT-30p male plug to 4 prong L14-30 female receptacle to connect to the 30-amp cord that came with kit to the 30-amp RV outlet on the backup battery. It has been thoroughly tested my me in case of a power outage and passed with flying colors :). Good length on the wires. Good instructions. I had no issues installing the product once I had everything planned out. The delivery was delayed for almost a month. But that was offset by what I received and how well it works.
C**E
Very High Quality Product
I cannot say enough good things about this product and this company. I purchased this transfer switch in July of 2014 to go along with my new Westinghouse WH6500E portable generator. I am reasonably handy, and have done a small amount of electrical projects before, but by no means am I a professional. I did all the setup, installation, and wiring myself. My setup includes the portable generator with a 30 amp power cord feeding into a Reliance Controls power inlet box mounted on the house. I then installed permanent 10 gauge building wire between the power inlet box outside and the transfer switch mounted inside next to my panel. For the most part it was all very straightforward and I expected to have no problems. After initial setup I got the generator running to do a quick test. Long story short, there was a problem, and I could not run off the generator power. I struggled for 6 months to figure out what was wrong. I did various tests, but did not want to break down and pay an electrician, so I continued to hunt for the issue myself. After 6 months, I finally decided to call Reliance customer support. I was impressed to get connected to a very helpful lady from Racine, WI. Imagine that, good ole US of A customer support! She was extremely helpful, and was happy to give me her email address so I could send pictures of my setup for diagnostic purposes. We communicated via phone and email over the course of 2 days, and she quickly helped determine my issue after having me run 2 tests. The problem was entirely mine, the Reliance Controls transfer switch works flawlessly. In fact, the problem I had was a clamp that was too tight on my building wire, and was causing a short. I had arc marks on the transfer switch due to my wiring short. That did not phase the Reliance Controls transfer switch at all. The breakers on the switch and the generator worked as they should. Everything is fixed and working correctly now, thanks to the great customer service at Reliance Controls. This product is extremely robust and well designed. I would recommend this to anyone! A couple of lessons learned from my experience. Professional electricians would obviously already know this stuff, but I was learning as I went. 1) Be careful not to over tighten cable clamps, it's easy to do. 2) The power inlet cord gave me some issues. You need to make sure you really get the cord at the inlet box pushed in and turned as far as it will go. It may take a slight bit of force, but if you don't, you may only get one side of the power coming through. 3) The instructions are slightly misleading for the wiring of the watt meters in the transfer switch. Make sure you only have 1 side of the black wire and 1 side of the red wire passing through each of the watt meters.
R**N
Nice unit but with problems
This kit is nice. You cannot beat the price if you were to get all that's included separately. Again its a very nice kit but I'm not so sure about the well built comments I read in some of the other reviews. I installed mine in about two hours. I turn back on the power feeding the six circuits that I'm feeding with the transfer switch and one by one I flipped each switch on the transfer switch to the line position. Once all of the six circuits were on I then checked around the house to see that everything had power and worked. Well, I found that my furnace and one of the two bedroom circuits were dead. You know DEAD, as in No power, dark and cold. WTF. So I'm thinking to myself, ok Ive been working for one of the largest companies on ALL OF EARTH as a electrician building industrial equipment for the last 21 years and I'm very confident that I didn't make any mistakes. But, I'm only human. So I checked all Of my connections and found that all was good. Next I made sure that none of the breakers just needed reset and found that this too was ok. Next out of frustration like you would an old tv I gave the side of the transfer switch a good smack. Well not so funny to me as it may sound to you readers but that worked for the bedroom circuit. "LIGHT ARE ON IN THE BEDROOM" my wife gave a yell. OK I don't know about the rest of you, but this to me was not acceptable. It did however give me a clue as too what was wrong. Everybody say it together now "SOMETHING IN THERE IS LOOSE". I Turned off the power to the SIX circuits feeding through the switch and removed the two screws in the case to try and see what was amiss. THERE IT WAS PLAIN AS DAY. ONE OF THE WIRES WAS NOT EVEN PUSHED ONTO ITS POST ON ONE OF THE SWITCHES AND THE OTHER WAS ABOUT TO COME OFF(bedroom circuit). Firstly, why are all of these connection made with just push on connections. We call these "fast on connection" at work. Secondly, and more importantly why are they not on there termination points. WHATS WITH THIS CRAP. I SHOULDN'T HAVE TO BE TAKING EQUIPMENT APART TO MAKE REPAIRS TO IT. Anyway, I pushed the two wires onto there termination points and closed the box up and turned the power back on. TA DA! everything worked. Are you all still with me? There's more. Anyway, an hour later the family and I return from getting lunch and wouldn't you know it. Both of the bedroom circuits are not working. I found that the two bedroom arc fault breakers in my main breaker panel were tripped. This to me automatically indicated to me that Something is loose and is, are you ready for this? Something is ARCING. Arcing is bad. Arcing leads to electrical fires under the right conditions. BUT, My arc fault breakers did there job. So again I open the transfer switch to see what was loose. I found that everyone of the push on or fast on connections were loose and needed some attention. One by one I had to remove and with needle nose pliers make all of these connections tighter by slightly closing or crushing each of the push on crimps. This is NOT something anyone should need to do on any new piece of equipment EVER. But since I was really not into the idea of tearing it all out and returning it to Amazon for a new one, only to receive another half assed unit from a company that's apparently not that concerned with quality. I decided to just make the repairs. And to add insult to injury I was disappointed to see that this shabby work was made in the USA according to the box. COME ON GUYS WERE BETTER THAN THAT. I would have expected this type of work from elsewhere on the planet. ANYWAY, that all having been said. I would have giving this Kit a five star if it weren't for these wiring issues. Its a nice kit with all that it comes with for the money. Easy to install with some basic electric knowledge and a few tools. I guess I would recommend this kit as I hope this is just an isolated case. I did write a lengthy e-mail to Reliance controls support team about my issue two weeks ago and as of this writing and have not received even a peep from them. Mmmmm. OK Ive said enough, or to much, you decide.
N**Y
Bought it to connect my 7500 watt generator for power outage. Very good quality components and all wiring is included with clear instructions and cable identification. Yes you need to know a bit about electricity and if you do, this is very easy to connect into your main electric house panel. It is cULus approved so good to use in Canada as well. No more needs to pull the gen. out and run power cords through the house anymore., this make it a permanent installation. Just turn the gen ON end flip the switch and you power the house section-outlets you need. The wattmeter is great to inform you of the power usage so you don't overload your gen, great feature. Highly recommend for your portable generator and price is good compared to other who are sometimes twice the price. Good investment I believe.
R**3
Excellent transfer switch, very flexible. I got an electrician to hardwire it to code to an of outside inlet for my 2.6kW Honda generator. Super easy to use. Instructions are quite good. I would have installed myself if I had not required all the holes in the wall to run the wiring to outside. The Wattmeters for both of the split phases are really useful to understand current load. Note that this transfer switch comes with L14-30 (240V split phase 4 wires for 2 Hota, neutral, ground) plug and extension cord, and cannot directly connect to a generator having L5-30 (120V 30A 3 prongs locking) plug like my Honda and many smaller generators. The solution is to buy an adapter cord, which are available, which connect both hots together on the L14-30 side. If you adapt like that, then you cannot use the 240V switch in the middle for a 240V appliance, but you the manual shows how to untie it to use it for 2 more 120V circuits. Was very happy with the overall quality and ease of use.
B**.
What a great transfer switch. Came just as advertised. There is a few really good utube videos to help with installation. If your comfortable around wiring this is pretty straight forward. I have an older panel that is full so this system was perfect for what I wanted.Did not want the 220v option and it was really easy to switch 220v circuits to two 110v so you can have 6 curcuits of 110v. I am using a 5000 (6250 startup)watt generator that has 30 amp plug in and included cable plugged right in. Got to try it out when Hurricane Lee made landfall and worked like a charm. Would highly reccommend this product.
R**R
Pas tout à fait conforme au produit annoncé (manquait la barre qui relie les deux circuits pour le 240 volts) ... doit être installé à côté du panneau principale car la gaine métallique ne permet pas de placé le commutateur sous le panneau principal ... le produit semble être de bonne qualité ... les fils noir et rouge sont suffisamment longs pour aller partout dans le panneau principal.
D**N
Wow, lots of complainers here, the most common being that the kit doesn't come with cable to run to the outside box. How is the manufacturer supposed to know if your outside box is 6 feet or 50 feet away? If they included 50 feet of cable, the kit would be $100 more, then the people who only need 6 feet of cable would complain about the price because of all the unnecessary wire they ended up with. Also, if you are not comfortable with or knowledgeable about electrical work, don't try to install it yourself and then complain about how difficult it was. Installation was simple, and it works great. Just used it for a 40+ hour outage due to ice storm, worked flawlessly using all circuits.
Trustpilot
1 week ago
2 weeks ago