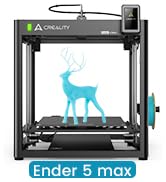

🚀 Elevate your maker game with speed, precision, and effortless control!
The Creality Ender 3 V3 SE is a high-performance DIY 3D printer boasting a blazing 250mm/s print speed, CR Touch auto-leveling, and a reliable Sprite direct extruder compatible with multiple filament types. Its dual Z-axis and reinforced Y-axis ensure stable, high-quality prints, while the 32-bit silent mainboard offers quiet operation and easy filament management. Perfect for both beginners and pros eager to accelerate their creative projects with minimal setup and maximum precision.


| ASIN | B07D18L9K6 |
| Best Sellers Rank | #7,857 in Industrial & Scientific ( See Top 100 in Industrial & Scientific ) #15 in 3D Printers |
| Customer Reviews | 4.1 4.1 out of 5 stars (25,907) |
| Date First Available | December 29, 2018 |
| Is Discontinued By Manufacturer | No |
| Item Weight | 15.43 pounds |
| Item model number | Ender 3 V3 SE |
| Manufacturer | Creality 3D |
| Product Dimensions | 17.8 x 16.93 x 20.47 inches |
M**G
Excellent introductory printer for The Tinkerer.
I am very happy with my Ender 3 V3 SE. It is my first 3D printer, having some experience with them in the past. This printer performed to an excellent standard and required very little setup out of the box. Unfortunately, the SE does not talk to the Creality Print software, and does not have WiFi or Ethernet network connectivity. Basic functionality is through physically moving an SD-card from your computer to the SD slot on the printer. It has a USB-C outlet that can be connected with a data cable to a computer and communicated serially with COM ports and the CH340 communications driver, it’s not complicated, but it’s not a straightforward process. After about 50 prints or so, the bearings on the Y axis optical rails came loose and resulted in a bed wobble that could register on the Richter scale. I upgraded the Y axis and X axis to linear guide rails, I do believe these upgrades are wholly necessary if you wish to print at the printers upper accelerations for any extended period of use. Changing filaments is a breeze with the direct drive extruder, I have printed in PLA, TPU, and PETG all with very good quality, adjusting settings along the way. If you enjoy tinkering, and learning how FDM printers work, how slicers and gcode work, and want a less expensive start to the hobby I would highly recommend the SE printer. I have also heard good things about its sister the KE.
L**Z
Amazing printer!
The Ender 3 marked my entry into the 3D-printing world, and I love it! The 3D printer has been a godsend! If you're also newbie and searching for advice, here's my brief take on the Ender 3. It's awesome! The Ender 3 arrives in pieces that you must assemble. Since it is essentially a robot, assembly can seem overwhelming at first, but if you take it one step at a time, you'll be printing in no time. I found the printed instructions accompanying the unit to be more sizzle than steak, but, fortunately there are several videos on YouTube that make assembly a breeze. Believe it or not, assembling the unit yourself is beneficial because it familiarizes you with the device. It will allow you to easily make the minor adjustments that 3D printers often require. My wife and I have found that 3D printing comes with somewhat of a steep learning curve, but it's fun. YouTube and websites such as "all3DP dot com" have proven themselves to be life savers. The most common adjustments you'll make while 3D printing is "bed leveling." In truth, though, you're not actually "leveling" the print bed, but rather you're ensuring that the print nozzle is uniformly distanced from the bed (the print surface) on all its 4 corners. The nozzle needs to be super close, too. ...not about an inch or two away from the print bed, but rather it needs to be no further than the thickness of a piece of paper. Crazy, huh? When my wife and I printed a test file provided by Creality (the manufacturer), we frankly sat mesmerized at the unit's precision. It was like staring into a campfire and getting lost in the flames. The nozzle just zipped back and forth across the print bed leaving tiny bits of corn-based "plastic" one layer at a time, and eventually (over time) created a cat/dog thingy. In search of more things to print, we settled on two websites with tons of 3D-printable files that are very often free to download. The websites are "thingiverse dot com" and "cults3d dot com". The latter site takes longer to load, but seems to have more options. Creality has one too, but I haven't really checked it out yet. It's important to note that the files you download from such websites are *.stl files, whereas the Ender 3 needs *.gcode files. To make the file conversion, we downloaded a piece of software called Cura. It appears to be the best (free) software on the market for "slicing" 3D files into *.gcode files. That too has a steep learning curve, complete with complicated settings. But fortunately there are lots of tutorials online along with settings you can copy from experts. I mostly rely on "all3DP dot com" for that. After a while, we decided to invent our own designs and then print them into existence. In my opinion, the cat's meow -- the best and easiest 3D design application -- is Fusion360. It has a limited free version for students and schools, but otherwise it's quite pricey. My wife then found free, open-sourced design software called FreeCAD. We love it, and haven't turned back since. The filament we prefer is PLA. In our experience, PLA produces little to no fumes and it's guilt-free because it's corn-based and biodegradable. It should be noted, though, that not all PLA is created equally. This is primarily because (according to what I've read) pigments affect the PLA in different ways. So, when I order PLA from Amazon, I always look for the PLA with the most and highest reviews. Then, I refer upon their temperature recommendations. Overall, we absolutely love the Ender 3. At under $200, it's extremely affordable, and the process of printing things into existence can be (in my experience) somehow transformative. And if you find yourself confused about something, take my advice by not wasting time by trying to figure it out for yourself. Just refer to the experts on any of the websites I mentioned so, later on, you can focus on things that really matter...like design. Note: the bearing on a little fan went out. So, I reached out to Comgrow, they got back to me immediately, and now a new fan is on the way. No fuss no muss. Finally, at the risk of getting to personal, I'm a disabled veteran who benefits from focusing on tangible things. The process of 3D printing has proven itself to be such a godsend in that regard, that I think the VA should seriously explore ways of getting more vets 3D printing. I hope this helped newbies like me. Happy printing!
R**E
Take your time, build it, don't just assemble it. Make the build quality right and your prints will turn out right.
You might be able to assemble this printer in a couple of hours but you can't build it in that time. There is a significant difference in building something correctly and assembling it. Assembly is the easy part, anyone can throw things together. The build is now complete and to do it correctly takes 4 to 5 hours. When you stand the Z axis uprights on their ends on a granite surface plate it's clear that the ends aren't machined square. After machining the ends they are square and flat enough to assemble now. The Z axis bracket that the leadscrew nut bolts to was not fully bent so the leadscrew didn't line up with the coupler and had to be straightened to make it parallel to the Z uprights so it would line up with the coupler. Check yours to make sure that bracket was bent at 90 degrees. The two uprights had to be shimmed to get them square to the bottom supports and parallel with each other so that the X axis rail would go up and down in a straight line without binding. Colored plastic shim stock of various thickness and an accurate machinist square is paramount to your success here. Even a small Framing square or a plastic triangle from an office supply store would assist in getting the uprights square to the base. The two uprights have to be parallel to one another and hopefully square to the base in order for the top rail to mate up correctly. If you want accurate prints the X and Y axis has to be able to move squarely to one another. The Z axis has to move perpendicular to the build plate once the X and Y axis are square. If this isn't accurate it will affect your print quality. Once the mechanics are built you will need to tidy up the wiring, check the hot end and build plate heating and make sure the extruder will extrude plastic from the nozzle. Prints can be made directly to the build plate, to a piece of borosilicate glass, mirrored glass or tempered plate glass resting on the heated bed. Once the Z stop is set close so that the Z homes with the nozzle close to the bed plate the you can level up the bed plate with a stainless steel feeler gage and you should be good to go. I would use a .005" feeler gage to start as a comparable piece of paper is .004" thickness. Summary: Pros: 1. Good value for money. 2. Everything bolted up and worked 3. Spare parts were a nice touch and much appreciated. 4. Good selection of software to slice and handle STL files. 5. Fastener quality was good enough to get the job done. Cons: 1. Instructions are abysmal. The illustrations are too small, not well explained and the references are sorely lacking for someone that has no experience with building small CNC type electronics. In short the instructions are just enough to get the job done but the neophyte will struggle. 2. Build photos would be a big help. You can't depend on a bunch of folks on the Internet to cover your failings with YT videos and websites that may be doing it wrong to start with. The factory needs to own it. 3. Use a full size SD card. Micro SD cards are OK for phones and tablets because they get installed and stay installed, they have no business in a 3D printer they are simply too small to use all the time. 4. The 24V wiring coming from the power supply had insulation nicks on both the + and - wires and had to have heat shrink applied to keep them from possibly shorting out. The screws on the terminal block at the bottom of the power supply were just barely tight so check yours. 5. XT 60 connectors are rated for up to 65 amps continuous but they were never designed to be permanent connections. In RC model applications you may fly for 5 to 10 minutes and then the packs are disconnected. Most of the time the connectors aren't even in use. I would prefer to see a metal enclosure with a terminal strip for the power connections. 6. The uprights are cut on a cold saw and this is a common operation for extrusions. The problem is that the resulting surface isn't flat, straight or square. When you bolt the uprights onto the lower frame they aren't square and parallel. You will have to shim them to get them to be square and perpendicular. Note to the factory; you can do better. Suggestions to Creality: Look at the Pro's and Con's, take note of some of the issues and make corrections to the new kits coming out of China. It takes just as long to do something wrong as it does to make it right. Making it right is easier. There should be an adjustable Z stop instead of a fixed one. The homing speed needs to be lowered slightly as the hot end and table hit too hard when homing. I can do this in the Marlin Firmware but the factory just needs to lower the speed slightly. All in all, this is a great way to spend a couple of evenings and the print quality is really good, especially for the money. Despite the issues this is a great printer. Don't let the issues cloud your decision about buying it. All the issues can be resolved by the builder and that's you. This should be a 3.5 star printer but it could be a 5 star printer with just a little work by the factory. Suggestions
P**C
I really gotta give props to Creality for making this printer so affordable and (relatively) easy to set up and use. Since getting it I learned a <ton> of stuff about 3D printing (both by being forced to do it and trying to troubleshoot all the different issues :P) It's a great printer for the price, not sure what else I can say. Initial assembly was relatively easy and took around an hour. Then I realised I haven't done it properly so I had to re-assemble parts I assembled before (another 1h). Then a couple of days later I realised the frame is not straight... So I disassembled and re-levelled the whole thing from scratch (another 2h or so) Then i've done it yet again a couple of days later to straighten the gantry :P Unfortunately factory pre-assembled parts were not perfectly assembled. The bed is not perfectly even either, seems a bit warped but oh well the glass bed upgrade is too expensive. Usage is straightforward after assembly, there's an amazing amount of 3D-printable improvements to the Ender 3, tons of guides and information readily available. SD card slot is a great addition but you'll probably want to move to an Octoprint setup for ease of use and to flash a more recent Marlin firmware. Unfortunately the Pause feature has bugged out multiple times on me on the original firmware (just freezes printer in place, ruining prints) but at least the power-loss recovery works fine (once it freezes just shut it off and back on and it will give you an option to resume). No such issues with the custom-built Marlin fw. Worth noting is that my unit came with a 4.2.2 32-bit motherboard, an extruder guide enforced with metal and adjustable tension. Attached amount of filament was almost enough to print the sample doggy figure - you can clearly see where the filament ran out ;( Overall it's a fun learning experience but if you're expecting to just "buy, print and forget" - this might be the best choice for you as it has no auto bed levelling and other features present in more expensive printers (unless you upgrade it yourself) Definitely watch one or two assembly videos to get an idea of what to look out for during assembly, it will save you time in the longer run
C**E
****UPDATED FEBRUARY 2021**** Most problems have been solved, thanks! They sent me replacement and/or partial refunds for the problematic parts. Thanks a lot! Ender 3 pro is long to build - be sure to watch Youtube Videos as written info isn't enough - but it's fully customizable, affordable and printing quality is amazing. You have to put some efforts into it, beware, but the satisfaction of your 3d printer working perfectly is worth it.
A**A
Product is simple and amazing. I am looking at functionality versus absolute quality and this is perfect for me. The product has been handy for making anything u can think of. I was able to quickly draw a repair part for a washing machine and that has recoverd a third of my investment here. With some free 3d online files, i've managed to make my printer more compact. Only cons for any enthusiast is the purchase of 3d drawing software if Tinkercad aint enough.
G**.
Ho sostituito la mia stampante 3D creata artigianalmente con questa. Avendo un piccolo lab mi serviva un prodotto di qualità. La Stampante si presenta benissimo nella sua confezione e soprattutto facile da montare. Viene fornita di tutti gli accessori necessari sia al montaggio e in più ci sono pezzi di ricambio! Ender 3 S1 ottima stampante. Spero di prenderne altre ancora di Creality!:)
S**H
Love the printer.
Trustpilot
2 weeks ago
1 day ago