
🚀 Elevate your ride, dominate the road.
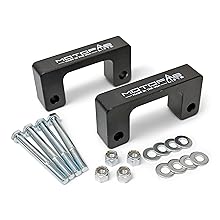
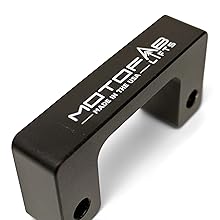
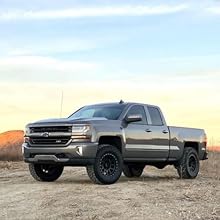
The MotoFab Lifts CH-2LM is a premium front leveling lift kit that raises Chevy and GMC 1500 pickups by a true 2 inches. CNC machined from billet aluminum and anodized black, it offers durable, factory-matching aesthetics. Designed for easy installation in 1.5 to 2 hours without strut or coil disassembly, it fits 2007-2014 models perfectly. With a strong 4.6-star rating from nearly 1,900 users, this kit delivers reliable performance and a sleek, aggressive stance that keeps your truck looking and driving its best.


| ASIN | B00KOU2UYU |
| Brand | MotoFab Lifts |
| Customer Reviews | 4.6 4.6 out of 5 stars (1,876) |
| Date First Available | 15 July 2014 |
| Item Weight | 1.03 kg |
| Item model number | CH-2LM |
| Manufacturer | MotoFab Lifts |
| Manufacturer part number | CH-2LM |
| Position | Front |
| Product Dimensions | 20.32 x 20.32 x 15.24 cm; 1.03 kg |
J**A
Installed on 2014 sierra z71. Watched youtube to get a general idea and installed in about hour and half. Loosened upper ball joint while keeping the nut on and loosened upper shock tower bolts, removed sway link, Slipped it in with pry bar. I pointed the bolts up and added an extra 3/8 flat washer and it fit perfect. Bolt up or down doesnt matter as long as there is clearance. If you feel like pointing them down to sleep at night, have at it, but works either way. Got truck aligned and it looks perfect all the way around. Drives exactly the same as it did before. Maybe a tiny bit stiffer in the front but i have had it on for a few months now and its such a tiny difference you will forget how it rode before in a week. If you want a better ride get bilstien shocks or a cadillac. Its a pickup truck. Great price as long as they last! Better than name brand plastic. Thick chunky aluminum quality. Update- have driven 15k miles since I installed and all is great. Still love the look as much as when I installed 2 years ago. Only gripe, and its small, when I put weight in the back of the truck or towing a trailer. The back sits lower than the front. It's common sense this will happen but worth mentioning. I put lift rite airbags on the back and it fixed that issue when hauling/towing.(great product by the way). To me this is a 40$ no brainer.
H**R
Easy to install had to buy longer bolts
A**I
خطييييير
T**M
IM PLEASED... EXTREMELY PLEASED.. I love my 2015 GMC Sierra Crew Cab too much to mess something up and didnt wanna spend the money for professionals to do it but I figured what the heck, 100% bolt on no special tools required but 15mm wrench, a crescent wrench, and 2 sockets (18mm and 15mm). Let's proceed. First off the kit comes with 2 billet aluminum spacers, 4 bolts, 8 washers, 4 nuts, and instructions. INSTALL TIP: for ease of installment. I followed the youtube video "2010 Rough Country Leveling Kit Install" TO THE TEE! However when trying to pry the strut up there was an extreme amount of pressure and it just felt as though someone was gonna get hurt. Didnt feel normal. Well after about an hour of trying to watch every moving part while prying and also trying to observe what is happening as well as "what needs to happen" ..FINALLY WE SPOTTED THE PROBLEM... we noticed one important step missing in the video instructions that would make the install go from 1.5 hours to 20 minutes tops GAURANTEED, WHICH IS JUST OUR OPINION. But if somehow you were able to get it by watching the video in this post and following those steps then most likely your here reading this because you broke something or messed something up and want to know of that easier way you could have done it. In the video they stated loosening and leaving the sway bar bolt loose. For us this was humanly impossible to pry the strut far enough away from the lower control arm to slip the spacer in safely. We simply unscrewed the top nut and removed it completely from the sway bar but left the bolt in place. Giving you MUCH more room to move strut up and down. Next we easily picked the strut up away from the control arm and placed the spacer in place and wiggled the pry bar back and forth to align holes to accept bolts. We used a small vertical hydraulic jack to crank the lower control arm up to allow bolt for sway bar to protrude through enough for nut to catch. Your also going to need the 7/32 allen to keep the ball joint from spinning when tightening your control arm nut. Also FYI the other side took us 12 minutes TIMED!!! Trust me just just remove the to nut completely from the sway bar. Now that we are finished and see the bigger picture of what we needed to do I consider this install a very very simple install probably a 2 or 3 on a 10 scale of difficulty. I don't ever post on anything but figured my two cents may save someone an hour of daylight. PLEASE GIVE THUMBS UP IF THIS REVIEW HELPED IN ANY WAY! Thanks God bless. Update 4/9/2017: Since I first wrote this article, I have since installed this kit on a number of trucks and SUVs. All were equally easy and came out nice! MOTOFAB is the way to go! Dont settle for anything less!! Other brands have packaging issues, broken parts, missing pieces, uneven bolts, long bolts, misthreaded bolts, unthreaded bolts, etc... MotoFab has an unmatched Quality Control department that ensures correct blemish free products."
C**Y
Great product easy install.
Trustpilot
3 weeks ago
1 month ago


