We remain fully operational. Our teams are working around the clock to ensure your deliveries continue safely.

DOWNLOAD THE APP


Customer Services
Copyright © 2025 Desertcart Holdings Limited
DOWNLOAD THE APP

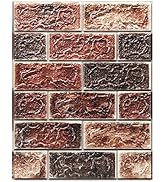
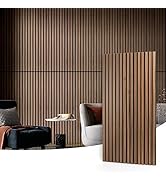
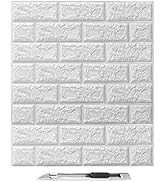
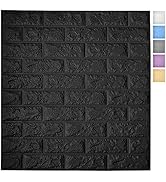
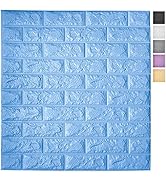
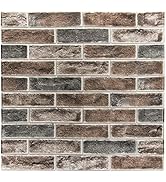
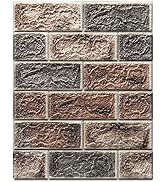
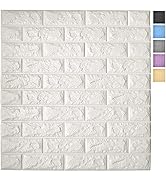
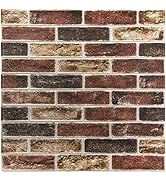
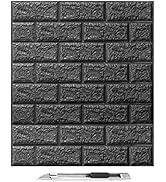
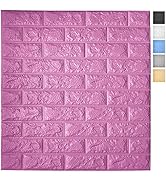
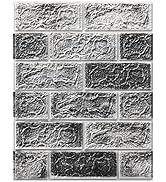
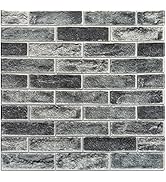
🧱 Elevate your space with vintage charm—no contractor required!
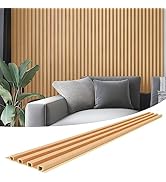
Art3d’s 10-pack of 27.5"x27.5" gray-brown faux brick 3D wall panels covers 52.5 sq.ft with peel-and-stick, waterproof foam sheets. Designed for easy installation and realistic texture, these non-toxic, stain-resistant panels are ideal for accent walls in bedrooms, kitchens, and living rooms, delivering a stylish upgrade without the mess or cost of real brick.


| ASIN | B0B384Y1ZQ |
| Batteries Included? | No |
| Batteries Required? | No |
| Best Sellers Rank | #17,543 in Tools & Home Improvement ( See Top 100 in Tools & Home Improvement ) #25 in 3D Wall Panels |
| Color | Gray/Brown |
| Customer Reviews | 4.2 4.2 out of 5 stars (1,954) |
| Date First Available | June 6, 2022 |
| Item Package Quantity | 10 |
| Item Weight | 3.94 pounds |
| Item model number | A06008AY10 |
| Manufacturer | Art3d |
| Material | XPE |
| Measurement System | English/Standard |
| Part Number | A06008AY10 |
| Product Dimensions | 27.5 x 27.5 x 0.2 inches |
| Shape | Square |
| Size | 27.5x27.5inch |
M**A
would recommend with steps included in review
I wanted an inexpensive accent wall in the living room, so I decided on these. I purchased the grey/brown brick. First time ever doing anything like this. I followed Will’s suggestions in his review on here. Thank goodness for him!!! I’d love to thank him personally for his suggestions in his review. 💯 First, I sprayed the panels with a clear, matte spray paint. I then cut the panels so that the “bricks” lined up better. I then stapled any areas that were not lying flat to the wall, like edges of panels and around the corner of the wall. I then started with grout filler but went through that very quickly. I finished going over all of the faux grout lines between the bricks with white caulk instead of grout filler due to caulk being less expensive. I needed about 4 tubes of white caulk for this project. I went heavier with caulk over the areas where two panels met and over staples to make the transition seamless. The caulk also helped adhere the panels to the wall. I did not prep to the wall and I did not use any extra adhesive product. The best part is that the messier I was with the caulk, the better and more rustic and natural the wall appeared so I went ahead and would just smear the excess caulk randomly over the bricks. I used a piece of white adhesive trim and more caulk to transition the brick to the regular wall under the bar area. I considered white washing it lightly with diluted white paint, but figured I would save that project for another day. I am very happy with how my wall turned out. I would definitely recommend this product for anyone wanting to do an accent wall in their home on a budget. Keep in mind, I am a woman (who is fairy handy), who had never done anything like this before, and I ran into zero issues. This project was actually therapeutic and not frustrating at all for me, fully completed within a few days. If not doing the steps I took, I don’t think the wall would’ve turned out as nice as it did. The panels are foam, very lightly and thin, and easy to cut with regular household scissors.
C**3
Quality Faux Vintage Brick Appliqué Product! Highly recommend these.
These faux brick panels are really great! They actually look very believable when they are applied. We chose the variable colored brick pattern that had a sort of an old brick patina to them. The best aspects about their quality are: 1). the size and look of the brick looks authentic; 2). The adhesive is very, very strong and applies securely; 3). Each panel section aligns perfectly with the next paired section, so that a “half brick” pairs up with the other half of the brick in the next panel. (I discovered also that if you don’t want there to be a crease in the middle of the half brick, you can cut around the foam edge of the panel so that the foam of a 1/2 brick will line up perfectly with foam of the other without the dividing line if you cut it out.) And 4). The texture, thickness and the pattern of the 5 or six different colored bricks each panel do look very much like old vintage mortared bricks. Our project was that we are staging an old 1850 Sea Captain’s home for sale that had a vintage mantle in the living room, and we wanted to have the effect of a “bricked up and unused fireplace,” but we didn’t want the expense or the labor of actual masonry, so we looked for a quality alternative that would look believable for prospective buyers when touring the house. We are very, very pleased with the results. See the attached photos.😊 We like the look and quality of these so much that we are going to use the rest of the faux brick panels in our kitchen on a side counter wall of our 1870 farmhouse!
M**.
I do recommend, but not what I'd call renter friendly
The panels are very large squares so covers large amounts of area at once. It really looks gorgeous once completed. It is easy to apply. It's not quite as easy to remove. One thing to note is that it is SUPER sticky. I absolutely love these, but I wouldn't exactly call them renter friendly because at some point in time, you have to remove them. Once that happens you have a whole problem with re-mudding and painting the wall. The place I chose to put this is the center part of the wall that houses an electric fireplace. It sticks out approximately 5 or 6" from the rest of the wall so I had to wrap it around the corners. I started on the left side of the wall and moved to the right. When I got to the end of the right side of the wall, it ended right at the corner. There was maybe an inch or inch and a half overhang. I could not get it to stay laid down for anything. I tried to cut the overhang off and it was a disaster. So I decided to peel off that column of panels and come in from the right side and wrap around to the front and insert a strip into the 6" gap. As I peeled off the panels, I took most of the paint with me. It stuck to me. To my floor. To the wall. To the cat. I was astounded at how well it stuck. It stuck too well. So that looked like crap because I can't cut a straight line and I wanted to start in the middle and move out. I had the bright idea to leave the old up because this stuff sticks to anything. It doesn't stick to itself very well. After a few times of putting the panels back in place, it was time to remove the first layer. Yes, it ripped off huge chunks of the paint and mud. I finally got it to look like I want though. And it is gorgeous. It looks like real bricks. I love that it is thick and textured. If I had done it right the first time, I would've saved a lot of money.
D**E
Je dois retourner car ce n'est pas même blanc et je ne veux pas payer pour retour ; je suis abonnée à amazon prime . Ce n'est pas de ma faute si cette boîte n'est pas le même BLANC !!!!!!! La dernière production n'est pas le même blanc que celui que j'avais acheté en février 2021....Donc , je ne peux pas finaliser mon mur ...!!!! C,est terrible ...Pour le retour des panneaux , payez-vous les frais de retour ????????
D**T
Ordered the 20 pack to cover a wall prior to installing a shelving unit. Was going to cut the half bricks to blend the joins in a bit better, but decided against it as it was mostly going to be covered, and the extra time added wasn't worth it. So in the end I just peeled them off and slapped them on the wall, and as luck would have it, I only needed to trim one end, as the height worked out near perfectly. Used a roller to get a good seal against wall after reading reviews saying they may peel. Left for 3 days and for a few hot/cold cycles to see if I needed to add any glue, but they've been perfect. Very pleased with the result and quality of the tiles.
O**S
I made a wizards tower for a fair I went to and it adhered to the card board really well, and I could still move it to advise for the first 10 minutes before I rolled it with a roller to really get it pressed in place. This went on flat and then I cut the cardboard pieces. I was really worried it would lift off however it will stay stuck once you stick it and press it. Just make sure you give it time to adhear really well. I've had it for a month now in this state and there is no peeling. My one recomendation is when placing them to cut the lip off the edge where it's connecting to on the SIDE to give a more seamless look.
L**B
Buen producto que ayuda a realzar la vista de los espacios.
J**T
These panels are thin foam. It didn't appear to be very durable as some were chipped on arrival. The texture was unpleasant. I did not install the panels and returned them for a refund.
Trustpilot
2 months ago
3 weeks ago