Desert Online General Trading LLC
Dubai, United Arab Emirates
Desert Online General Trading LLC
Dubai, United Arab Emirates


🛠️ Elevate your brake game—flare like a pro, every time!
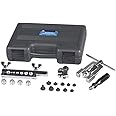
The OTC 6502 Master Brake Flaring Tool Kit is a comprehensive, precision-engineered set designed for professional-grade single, double, and bubble flares. Covering a wide range of imperial and metric sizes, it includes all essential tools—flaring bar, arbor press, adapters, tube cutter, and debarring tool—housed in a durable hard case. Perfect for millennial managers who demand reliability and efficiency in vehicle maintenance.


| Manufacturer | OTC |
| Brand | OTC |
| Model | 6502 |
| Item Weight | 0.078 ounces |
| Product Dimensions | 9.3 x 12 x 2.9 inches |
| Item model number | 6502 |
| Is Discontinued By Manufacturer | No |
| Manufacturer Part Number | 6502 |
| OEM Part Number | 6502 |
A**Z
A total winner.
The shipping company had some delay on the road. Since I had a long weekend available to replace my brake lines, I couldn't wait for the shipping issue to resolve itself.I bought a more expensive set at NAPA. I'd resolved to send this one back.Gathering all my Popeye-ness, I doggedly made up endless double flares. After a while, the NAPA set began to crack at an eye, admittedly, getting a lot of stress.In time, I just had to return the locally purchased set.By now, this set had arrived.NIGHT and DAY better set.The threads are finer. You don't need quite so much Popeye.The flares seemed to come out cleaner (given that I was new to double flares and I'd gained experience and had developed a bit of a method).The transitions from one process to the other was easier.This unit is better designed, appears to be better materials and had no breakage.The tube cutter isn't as good as any of the Rigid cutters I have. I ended up using one of my own.Something I realized, it is often stated that the tube ends need to be cut square, de-blurred on the inside of the tube, beveled inside and out.It should be easy to cut square with any of the tube cutters.Practice, if you're new to double flares. But, a wonky flare may not be due to a out-of-square cut. I believe you can get the same result if your outside bevel (I filed mine) is not even all the way around. If you have a segment of the tube end with a thicker wall, after you bevel it, I do not think you can force it square in the flaring process. Just too much material.Watch the end thickness as you bevel the outside. Get it pretty close to even all the way around. Then de-burr/bevel the inside.Great set, gerat price. Nice case.A total winner.My truck even stops now!
C**K
Worked perfectly on .032 copper ACR tube for double flare.
This is my experience. I am not a professional mechanic (I am an engineer), so it's application to your specific problem or my method may not be correct for your application.. The results for my application were excellent executed as I describe. You must choose appropriate tools, lube, tube, cleaners, fittings, and components for your specific application. There are safety regulations that must be investigated and followed to be legal. My federal marine fuel line regulation required a min. of .029 tube wall, so Cupro Nickel .028 lines locally available at auto parts places could not be used, I ordered appropriate approved copper line here on Amazon.I remade a damaged copper 5/16" fuel line with 5/16" soft copper tube (.032 wall) and 1/2" 45 degree brass flare nuts. Results were excellent. Completed flare was actually slightly more uniform than the original. This set of flare tools appears solid and sturdy if used correctly. In the photo above is a freshly made flare right out of the die (before I dusted off a stray burr sitting there loose with a copper cleaning pad. The pipe was cleaned and burr removed immediately after. Always inspect and clean off stray dust and particles before connecting.For those who have difficulty making good flare joints, the secret is all in the careful preparation. Once it's prepped with care, the rest goes quick and easy.Here's thoughts to help:1. Keep the tool clean in its case when not in use and dirt and grit free. Get the right tube for the job that complies with regulations. Where possible, make sure you work on a straight section. Install the flare and nut before bending if working close to the flare. Use a good bender. I purchased one here for 5/16 tube. Follow directions for the specific tube; most guides say to anneal hard copper tube with a torch. Soft is easier and good to go without annealing.2. Cut your tube to length using the tubing cutter gently to minimize distortion. Do more turns less pressure. Avoid a saw, but at least do not cut crooked!3. Chamfer the tube with a good chamfering tool. The rigid tool I purchased on Amazon is particularly good in my test: "RIDGID 29983 223S Stainless Steel Pipe Reamer, 1/4-inch to 1-1/4-inch Inner/Outer Reamer". It has many small cutting faces vs just a few on cheaper ones; so makes a very uniform smooth cut.4. Now you can clamp it up being very particular to follow published guides for the stick out past the tool. Get a good tight uniform hold. Double flare sticks out exactly the height of the die piece. Look at good instructions or watch a good video.5. I now lubricated the double flare die. I used some high zinc motor oil I had handy for my marine engine. Tiny residue won't harm a gasoline carburetor. For brake lines, use only an oil compatible with your brake system or be prepared to clean it perfectly in solvent. Extreme pressure grease seems a good choice for hard to flare tube only if you thoroughly solvent clean after. The lubricant decreases the force necessary to flare smoothly. Avoid getting it on the clamp surfaces that grip the tube. If you do, clean with suitable solvent. On thumbscrew threads lube is fine, where friction is king holding the tube, don't use it. I tend to clamp tight, which reduces risk of slipping, which does leave a slight harmless pattern on the tube wall.6. Once lubed, well gripped, and perfectly concentric, it will produce a good solid flare. I had no trouble going slowly and making repeated good flares. Good means a good clean uniform seating face with a nut that pulls it in straight.7. Once the edges are chamfered slightly inside and out, check each end visually and remove any burrs with a copper cleaning pad. Point down while you do this so nothing falls in. Leave nothing to cause trouble. As an extra precaution, with no compressed air handy, I dropped a string through the tube, and tied a small piece of copper cleaning pad on, and pulled it through. This clears loose flakes or burrs out of the tube.8. Practice is a good thing. I made a couple of test double flares. Including one I lightly coated with a dusting of spray primer and snugged up in the filter inlet a little; then rotated back and forth several times. I then unscrewed the nut and inspected the mating faces to ensure they were mating properly over 360 degrees. You can see the impression because of the coating. There are special testing dyes sold for this which are more appropriate. I cleaned the surfaces with acetone after testing to leave no residue.9. Basically that is the way to success. Prep everything carefully. Make sure everything is straight concentric and smooth. Lubricate dies appropriately after clamping. Clean your work, check your work. Finally, after installing, leak check under full pressure. (use a flare nut wrench designed for tubing too...this minimizes the risk of rounding off or distorting a nut when tightening. Flare nut wrenches grip the nut face all around except for the tube gap, not just two faces). My creed is check your work at every step, and then do a final test. Every once in a while you still get a surprise when something just doesn't behave even though you thought you nailed it.That's it. For my app, with copper tube, set worked perfectly and still looks brand new on completion, so that's an A+.
V**S
Professional grade.
There's quite a lot of low quality flaring tools on the market that will frustrate you with crooked flares, or even just outright break in use. This is not one of those tools.
R**W
Does the job.
Not made in USA. But since the motor companies found a need to re-invent the end of a line with the bubble flare. Time to buy another tool or YouTube it with the double flare tool.This tool gets the job done and comes with all except tool to taper outside of line, so a file is still needed. Quality is good enough to last a backyard mechanic forever but not a tool that will be proudly handed down to grandson. LOL. But gas vehicles with hydraulic braking systems will not be what your grandson will ever own. Ha.Bottom line for a complete kit IMO worth the one and done cost. If no loaner is available at parts store.
O**O
Works well for double flare configurations
This tool set worked perfectly for doing a double flare on a 10th generation Toyota Corolla. Buy some cheaper brake line to practice on first if you've never done this kind of job before. Precision and attention to detail counts for getting a proper flare for a proper seat and seal with a brake line flare nut. Do it right the first time and it'll last. I recommend buying stainless steel flare nuts. On a 10th generation Toyota Corolla, it uses 3/16" lines with matching 10 x 1mm flare nuts.I like that this tool tells you on the main hose clamping piece itself what size die you need for making the flare for each size tubing. No need to look it up else where.I also like that this kit comes with a reaming tool for clearing off sharp edges and burs from cutting the tubing. Only things you'll need are some sandpaper and a small fine tooth saw for cutting metal for tight spaces where the included pipe cutter won't fit.
Trustpilot
4 days ago
1 day ago