Desert Online General Trading LLC
Dubai, United Arab Emirates
Desert Online General Trading LLC
Dubai, United Arab Emirates


🌊 Dive into Innovation with ZRDRAquarium!
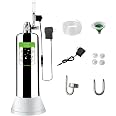
The ZRDRAquarium CO2 System is a state-of-the-art 2L generator designed for aquarium enthusiasts. Featuring an automatic pressure relief valve for safety, a user-friendly bubble counter with a syringe for easy water injection, and a dual atomizer for refined bubble output, this system ensures optimal plant growth while being cost-effective and durable. Made from high-quality 304 stainless steel, it promises longevity and stability, making it a must-have for any serious aquarist.


| Item Weight | 10.58 Ounces |
| Liquid Volume | 2 Liters |
J**H
My detailed installation instructions
UPDATE April 24, 2021 - I have now been running this set up for a few months now and it is awesome. I change the baking soda and citric acid about once every 2 weeks. The output has been consistent and the issues I had at first with the gauge not showing accurate readings is no longer an issue. My plants seem to be doing really well. I highly recommend this set up and have changed my rating from 4 stars to 5.Original:Once set up, I so far have found this CO2 setup to be awesome. Here’s some tips from my experience, step by step:1. My cotton filter was already attached to an apparatus that looks slightly different than the one in the directions (part 3). My set came with a spare cotton filter also (part 4).2. Screwing the filter (part 3) to the valve (part 2) was easy in my experience. Just tighten as far as I could.3. Use the funnel and fill the tank (part 1) with ingredients. NOTE: 200g is 7/8 cups. I did about 3/4 cup each citric acid and baking soda, then 1 cup water. I will do 1 full cup each acid and soda and 2 cups water next time. I was short on supplies. Screw the pressure valve into the body as tight as you can (part 2 into part 1)4. My valve did not register any pressure to start. I waited a long time. Finally I gave up, unscrewed the top bolt above the gas output knob on the valve and heard air escaping. I knew then it was producing fine. I never reused this top bolt once removed.5. Connected the solenoid valve (part 6) and used the wrench (part 13) to tighten into place securely.6. I screwed the entire top ( smaller end with bolt) of the bubble counter (part 5) and filled 3/4 with water. Replaced the top of the bubble counter tightly and screwed the other side (bottom) in place tightly to the top of the solenoid.7. Removed bolt from top of bubble counter and slide end of rubber tubing (part 17 - “trachea” in instructions is tubing) they the home of the bolt. Then push the end of rubber tubing onto the top tapered part of bubble counter where the bolt was and re-screw the bolt on tightly to hold tubing in place. NOTE: The tubing is stiff and pretty hard to work with. I am considering replacing it with higher quality, more pliable tubing.8. Cut rubber tubing twice —Once about 4 inches from the bubble counter (save this 4 inch section for later). The second cut about a 18 inches long.9. Secure the check valve (part 12) on the other end of tubing that’s attached to solenoid (end with filter inside of check valve goes on this end of tubing) tightly. The loose 18 inch section of the cut off tubing gets secured in the other side of the check valve (open end of the valve with no filter).10. Secure the other end of the 18 in section of tubing to the u shaped tube (part 14). This part will go over the edge of your tank when you install it.11. Use your remaining loose 6 inch section of tubing and secure it tot he other end of the U shaped tube. The other end of that 6 each section secure your atomizer (part 15).The CO2 set is now ready to install. Put the base on the bottle (part 16) and put it wherever you plan on storing the unit. Secure the U shaped tube over the edge of your tank and use the suction cups (parts 11) to secure the 6 inch section of tubing between the U shaped tube that’s now over the edge of your tank and the atomizer into place inside your tank under the water.Plug the solenoid connection valve (part 8) into the solenoid, then the power supply cord (part 7) to this.Once everything is in place, plug the power cord into your outlet to power the solenoid on.VERY slowly turn the gas output knob on the pressure reducing valve (literally a hair width at a time) until you reach the goal of one bubble per 10 gallons every 5 seconds or so. This process took me a while to adjust but once I had it set it’s stayed put.The set up day my pressure valve showed no pressure. The bottom of the stainless body got very cold and my bubbles were producing a set count so I knew it was working fine. Figured the valve was faulty. The next day though it reached 10-15 or so in the green range.I plugged my power plug into a wall timer and set for 8am to 6pm. Takes about 30 min in the morning for it to fully come back up to pressure. It is very consistent so far throughout the day.Also, I agree with other reviewers that the solenoid does get quite warm. Mine doesn’t get HOT as others have described but it is pretty warm to the touch. I will be keeping an eye on it as well as the bubble counter evaporation.Last note: the first set I received was missing the u shaped tube, suction cups and the replacement filter cotton. I contacted Amazon and the provided a replacement which was fine. I sent the first incomplete set back for a refund.The missing parts, minimal instructions and questionable valve readings are the reason for only a 4 star rating. So far so good though. I will update if anything changes. I do recommend and hope these more detailed notes will help explain the set up process better than the minimal instructions that are included with the kit.
3**O
Using this to make SODA
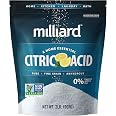
The media could not be loaded. ZRDR Aquarium Co2 System 2L with Pressure Gauge Automatic Pressure Relief Valve Bubble CounterPurchased 20 May 2024 from ZRDR for $77.99WARNING: SERIOUS INJURY OR DEATH CAN OCCUR, DON'T DO THISThis is a nonstandard use of the ZRDR CO2 system. This is more of a product suggestion than a review. For the price, this kit is outstanding for the original intended purpose (aquarium) IMHO. This modification is not for the risk adverse, feint of heart, uneducated, nor unskilled. I am merely illuminating what I have done in the hopes that ZRDR will make a professional system for the masses (product suggestion).In the beginning...there was the SodaStream Art by Pepsico. Then I converted this thing to replace the Art and gave the Art away.I just didn't want to fool around with their reasonable $15 60L CO2 canister exchange program, preferring to make my own CO2 from reactants (baking soda and citric acid). I mean come on, making CO2 is cheap and easy. Upfront investment cost is about the same. Recurring costs can be less, providing local access to low cost reactants. At 200g per charge, 5lbs is 2268 grams yielding 11 charges. For convenience, the reactants are sold right here on Amazon:https://www.amazon.com/gp/product/B000OZFECU/ref=ppx_yo_dt_b_search_asin_title?ie=UTF8&th=1https://www.amazon.com/gp/product/B0774M73SF/ref=ppx_yo_dt_b_search_asin_title?ie=UTF8&psc=1This project does require know how and mechanikin' skillz. There are two basic options, modify this canisters OEM top cap permanently destroying the built in regulator and removing everything past and including the bubbler (port in cap for bubbler is 1/8" BSPP), or drill and tap an M30x1.5mm plug using a ~34x28mm O-ring:https://www.amazon.com/gp/product/B0BCFB7PBV/ref=ppx_yo_dt_b_search_asin_title?ie=UTF8&th=1Then it's basic plumbing parts until the bottle. I clear Epoxy all plumbing joints. I used two ball valves and a pressure gauge so I could check the canister and bottle pressure, all 1/4" NPT. Then a pressure washer quick disconnect:https://www.amazon.com/gp/product/B07RHK7HK2/ref=ppx_yo_dt_b_search_asin_title?ie=UTF8&th=1https://www.amazon.com/gp/product/B08F2X5L24/ref=ppx_yo_dt_b_search_asin_title?ie=UTF8&th=1Then drilled a replacement SodaStream bottle cap with 3/8" brad point drill bit then 13/32" and thread with 1/4" NPT tap, appropriate washer threaded 1/4" NPT, epoxy and a 1/4" compression fitting:https://www.amazon.com/gp/product/B0CZ32LWCC/ref=ppx_yo_dt_b_search_asin_title?ie=UTF8&th=1And a check valve between pressure washer QD and 1/4 compression fitting:https://www.amazon.com/gp/product/B0BN6HL5B3/ref=ppx_yo_dt_b_search_asin_title?ie=UTF8&psc=1Then there are two options for the 1/4" stainless tube. From the underside of the bottle cap to the end of tube assembly should be 3+1/2 to 3+5/8 inches long. Easiest was to use a piece of this tube and crimp end in vise for small holes ~1mm:https://www.amazon.com/gp/product/B0006NAUQK/ref=ppx_yo_dt_b_search_asin_title?ie=UTF8&th=1Fill Sodastream bottle with water to line, chill in fridgedator, screw on and three *quick bursts. NOTE: releasing Sodastream bottle pressure between each burst (I just unscrew bottle from cap). At the end of each burst the bottle pressure should read ~55psi. I should have added a 55psi regulator. This is INHERENTLY DANGEROUS as the Sodastream bottle can be pressurized to way more than 55psi.The second method for the tube assembly that I preferred was to use heavy wall (0.065" wall) stainless 1/4" tube, drill and tap for 3/16-24, then use a vented socket head stainless screw (0.046" hole = 1.1684mm). Both purchased elsewhere.Sodastream bottles and caps here:https://www.amazon.com/gp/product/B01AHGDQ3Y/ref=ppx_yo_dt_b_search_asin_title?ie=UTF8&psc=1https://www.amazon.com/gp/product/B004OYMOK2/ref=ppx_yo_dt_b_search_asin_title?ie=UTF8&th=1Amount of CO2 in soda is amazing. I get 6 to 10 1L carbonized Sodastream bottles out of a single baking soda and citric acid charge. At 11 charges that is at least 60 1L bottles carbonized, up to 110. When ZRDR canister pressure drops to below 100psi, I pressurize the Sodastream bottle assembly, then QD and shake vigorously for 10-45 seconds, let sit in fridge for a bit to get more 1L carbonized bottles out of a single charge. This is the reason for the QD and check valve on bottle cap assembly. I like this method for many reasons, the added bonus is it doesn't leak so CO2 waste is minimized. But it lacks a safety release and regulator making it INHERENTLY DANGEROUS.Some notes: I did some research and lots of R&D on this project. What I show here is what I ended up with that IMHO works best. DO NOT use more than 200g of baking soda, 200g of citric acid, and 300g of water in this canister. Pressure will build to 270psi (room temperature) after a couple days unless you use some of the CO2. The canister safety release built into the OEM top cap is advertised for 30Kg/cm2 which is 426psi. My method shown here eliminates that safety release which is DANGEROUS and NOT recommended. I should have added a 300psi 1/4" NPT safety release sold right here on Amazon. Ordinary soda bottles have a burst pressure of 12bar which is 174psi, though there is yielding way before burst, I do not use ordinary bottles. Sodastream bottles are heavy wall and burst has been tested (one unit) at 25bar or 362psi, though there is yielding way before ultimate. Pepsico says this: "To successfully carbonate water with a CO2 tank, the gas regulator valve should be set at 55 PSI, to enable the serving pressure to remain at around 12 PSI." I should add a 55psi regulator, this method is dangerous as the Sodastream bottle could be pressurized way above 55psi. Pepsico advertises 4 years per Sodastream 1L bottle, not cycle dependent. The modification I made to the Sodastream bottle cap invalidates all of this. It would be best if a cap was specially made for this application (product suggestion).edit 23 July 2024I ended up replacing the vented screw with a 0.8mm misting nozzle. Taking the misting nozzle apart and removing the spring and rubber check valve. This works much better. FYI 0.6mm is too small.https://www.amazon.com/gp/product/B093L385FF/ref=ppx_yo_dt_b_search_asin_title?ie=UTF8&th=1Also, I purchased a used 5.5L tank elsewhere and added an oxygen regulator, but that bottle needed a smaller o-ring stretched on the M30x1.5mm top cap, 1"ID by 1/8" thick.https://www.amazon.com/gp/product/B073P1C18S/ref=ppx_yo_dt_b_search_asin_title?ie=UTF8&psc=1Notes: Helps to put glycerin on the o-rings. Helps to put a small 5" balloon in the tank and fill with water (ye old brass hose nozzle) then drop in tank and screw on top cap. Then shake. Balloon comes later for reuse.https://www.amazon.com/gp/product/B07SR1P15T/ref=ppx_yo_dt_b_search_asin_title?ie=UTF8&th=1
F**P
Leaky valves, failed in under a month before it was useless.
Out of the box it had issues holding pressure, discovered the valve for the main assembly leaked, was able to get it to hold and it worked fine for about a month but would only last 3-4 days before I had to re-fill, far under what I would have expected.Failed today 100% and the valve is now broken. There is pressure stuck in the tank but the release valve that goes to the aquarium is stuck and I can't easily unscrew the hookup without having a lot of pressure blow back at me so I'll have to try to disconnect it somehow to relieve pressure or hope it leaks for a week and is safe to handle when the pressure gauge goes down. The thumb screw for the pressure valve rotates freely but it only opens the valve between the aquarium and the open air, the pressurized tank is still stuck under pressure with no way to easily open. Could be a safety issue if someone were to overfill this and had no way to vent pressure without unscrewing the top (I don't even think there's a pressure valve that I was able to spot)
Trustpilot
2 months ago
2 weeks ago
1 month ago
3 weeks ago